I used to rely heavily on meta ads to drive traffic and conversions for my content.
But Meta has changed their algorithm from 2021 to 2025, especially with the new Meta Andromeda ads AI. This caused a huge drop in my conversion rates.
What once generated solid leads for less than $2 per conversion suddenly cost $8 to $12 per lead. My ad spend continued to increase while my results continued to deteriorate.
Additionally, tracking became unreliable and difficult to understand.
I needed a different approach to get more leads that convert!
That’s when I discovered that lead magnets could replace my expensive reliance on advertising. But creating them from scratch seemed like too much work. You actually have to provide value, which can be overwhelming.
Then I realized something simple: I could repurpose my existing blog content instead.
Now I use a strategy that kills two birds with one stone.
First, I create checklist-style blog posts, like my WordPress Performance Checklist. Since it can be easily linked to different posts, I then use it to improve my internal linking for SEO.
Finally, I convert those same posts into professional lead magnets using Beacon.by.
One piece of content serves two purposes. Better SEO rankings plus consistent lead generation.
Now I don’t have a heart attack every time I look at my Meta Ad Manager account because I don’t rely solely on social media to sell.
In this article, I’ll show you exactly how to turn your existing blog posts into high-converting lead magnets.
You will learn step by step how I use Beacon.by’s URL import feature. I’ll also tell you about the dual-purpose content strategy that’s been working for me since I ditched expensive meta ads.
What you will learn (key takeaways)
- How to turn existing blog posts into professional lead magnets in less than 30 minutes
- My proven strategy for creating dual-purpose content that boosts SEO and generates leads
- Step-by-step instructions using Beacon.by’s URL import feature for instant content conversion
- Quick ways to create checklists, eBooks, worksheets, and resource guides from any content
- Time-saving workflow that eliminates the need to start from scratch while maximizing your content ROI
Why repurposing blog posts works better than starting from scratch
Creating lead magnets from existing blog posts is a huge time saver. But that’s just the beginning of why this strategy works so well.
Here are more reasons to turn your existing content into a lead magnet.
Your content has already proven its value
Blog posts that get good search traffic or engagement have already shown that they solve real problems. People are actively looking for this information.
You can also use your analytics data to see which topics generate the most interest.
This means you don’t have to guess what your audience wants. You build lead magnets around content that is already working.
SEO-optimized structure can be translated perfectly
Blog posts written for SEO naturally follow a logical structure. Clear headings, organized sections, and actionable information. Additionally, they are written to answer specific questions that people are looking for.
This structure also works perfectly for lead magnets. Your blog headings become lead magnet chapters. As your step-by-step instructions become actionable checklists.
Multipurpose content strategy
Create blog posts that are intended to serve many functions right from the start.
For example, comprehensive checklist-style posts support internal linking strategies while connecting to multiple related topics on your site.
This increases SEO performance through logical content relationships. Additionally, checklists are a great way to get organic backlinks.
You can then convert these posts into lead magnets, which requires minimal effort as the checklist format converts perfectly into downloadable, close-tracking resources.
Time efficiency that really counts
Starting from scratch means hours of content creation, design work, and formatting. With the conversion, the hard work is already done.
Your research is complete, your content is written, and your information is organized. All you need to do is reformat it for lead magnet submission.
I can turn a solid blog post into a professional lead magnet in about 30 minutes. Creating the same lead magnet from scratch would take at least 3-4 hours.
Now that you understand that Whylet’s get into this How.
How to turn your blog posts into lead magnets
The process is broken down into five simple steps that anyone can follow. You don’t need any design knowledge or technical knowledge. Just your existing blog content and a little time.
However, before we start the step-by-step process, let’s make sure you have everything prepared for a smooth setup.
What you need before we begin
Setting up this lead magnet strategy doesn’t require much. However, if you have these parts ready, the process will be smooth and quick.
Published blog posts ready for reuse:
- This method works best if you already have blog content. Look for posts that are already getting good traffic or engagement.
- Checklist-style posts work particularly well.
- In addition, instructions and step-by-step instructions can be easily converted into lead magnets.
Time investment:
- Allow 20-30 minutes per lead magnet creation. This includes importing your content, customizing the template, and publishing. This is much faster than creating lead magnets from scratch.
Basic Content Marketing Understanding:
- You should know your audience and what type of content they find valuable. This will help you choose which blog posts to convert first.
- Additionally, you should think about how the lead magnet fits into your overall marketing strategy.
Reliable Email Marketing Tool:
- Additionally, you need an email marketing tool to send your leads to. Services like Constant Contact, ConvertKit, Mailchimp or ActiveCampaign work well.
- Without email follow-up, your lead magnets won’t generate real business results. The whole point is to capture leads that you can convert into customers.
- If you don’t have one yet, here is a detailed list of the best email marketing services to get you started.
Now that that’s out of the way, I want to show you step by step how you can turn your blog posts into lead magnets.
Step 1: Select your blog post to convert
Not every blog post is a strong lead magnet. However, if you choose the right content, the conversion process becomes much easier.
Start with your Google Analytics 4 data to know exactly what content you want to reuse.
View your most popular blog posts from the last 6 months in your Analytics account. Focus on posts that generate consistent organic traffic. These posts are already solving problems that people are actively looking for.
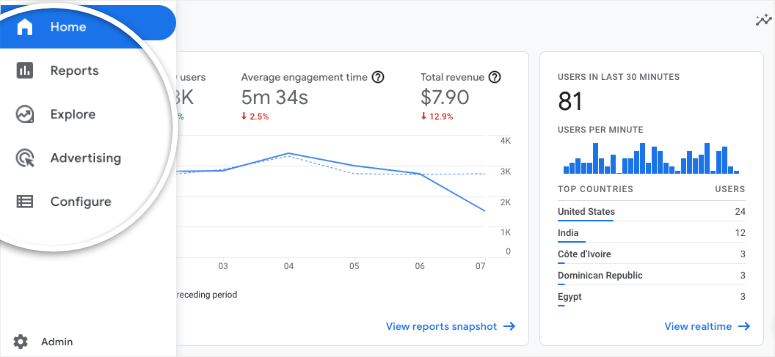
There are also other things you should consider when making your decision:
- High page views and long time on page – Shows both demand and genuine willingness to help
- Step-by-step instructions and how-to articles – Natural conversion into downloadable guides and checklists
- Posts with clear sections and subheadings – Beacon.by imports structured content automatically
- Content that generates comments and social shares – High engagement means that the topic is well received
- Posts that are already generating email inquiries – People obviously want to know more about these topics
- Actionable, evergreen content – Avoid news-oriented or time-sensitive posts that quickly lose value
- Resource summaries and comprehensive guides – Work perfectly as downloadable reference materials
I know Google Analytics can be confusing with all of its complicated reports and data tables.
I recommend using a simpler analysis tool like MonsterInsights instead. Even the free version can break down this complicated data into actionable insights that you can actually understand and use.

For more information, see my MonsterInsights review. If this tool isn’t right for you, here are other WordPress analytics plugins to help you simplify your content research phase.
If you find a post that meets these criteria, you can proceed with the import process.
Step 2: Import your blog content using the URL method
3 minutes | Let Beacon automatically extract and format your existing content
Now that your Beacon.by account is ready, it’s time to create your first eBook from your blog post.
First, log in to your Beacon.by dashboard and look for the “Rebuild…” button in the top right corner. Then select “Lead Magnet” from the drop-down menu.
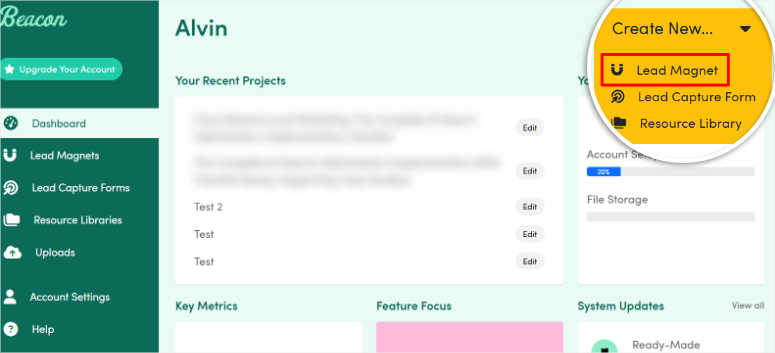
After that, you will see all available lead magnet formats.
In this tutorial, we’ll focus on eBooks because they’re well-suited to rich blog content. Click “eBook” to get started.
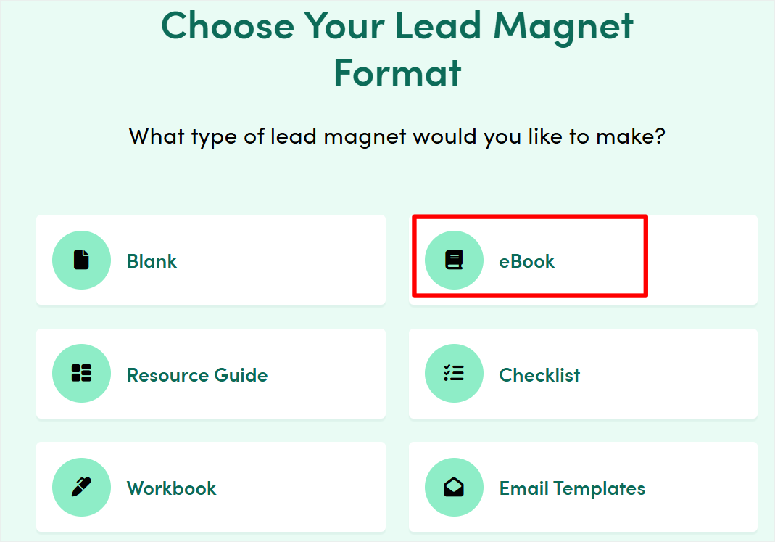
Remember that the process is almost identical for checklists, worksheets, and guides. I will discuss this in detail following the eBook tutorial.
Next, Beacon will ask you if you want to import content from a blog post. Click “Yes” – that’s exactly what we want.

On the next screen you will see two import options to import from HubSpot or Other. Select “Other” as this will allow you to add a link to a live blog post.
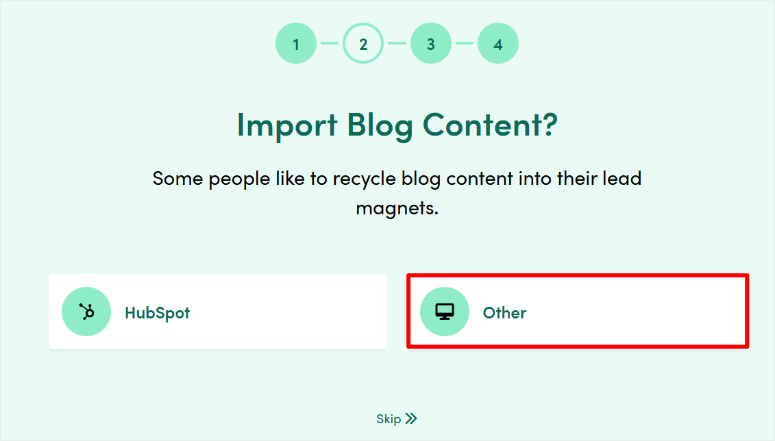
The good thing is that this method works with any website, including WordPress sites, custom websites, and sites hosted on another CMS. As long as the blog is on a live site.
Next, copy and paste the full URL of the blog post you want to convert into an eBook into the text box that appears. Make sure you provide the full URL starting with “https://”.
When you’re done, select “Import” and wait while Beacon analyzes your blog post. This typically takes 15-30 seconds depending on the length of your post.
Beacon automatically scans your post and extracts the main content.
This includes your headings, body text, images and overall structure. Apart from that, the lead magnet creation tool is smart enough to ignore navigation menus, sidebars, and other page elements.
After scanning, proceed to the next part by clicking Carry on.

Step 3: Select and customize your template
8 minutes | Transform your imported content with professional design that fits your brand
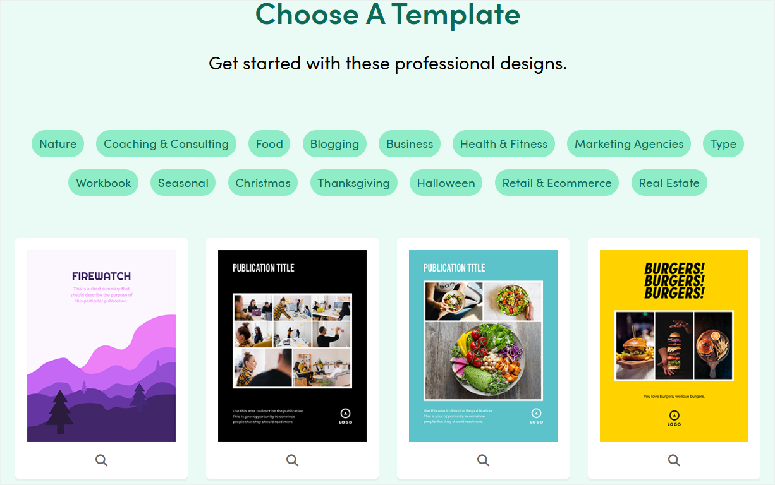
After importing your content, Beacon will automatically show you template options. This step makes the difference between amateur-looking PDFs and lead magnets that people actually want to download.
You’ll see over 20 professionally designed layouts specifically for eBooks. Each template displays a preview thumbnail so you can see exactly what your finished lead magnet will look like.
Find one that suits your style and choose it.
Next, name your lead magnet in the text bar provided. Make sure it’s easy to remember if you plan to create a lot of lead magnets.
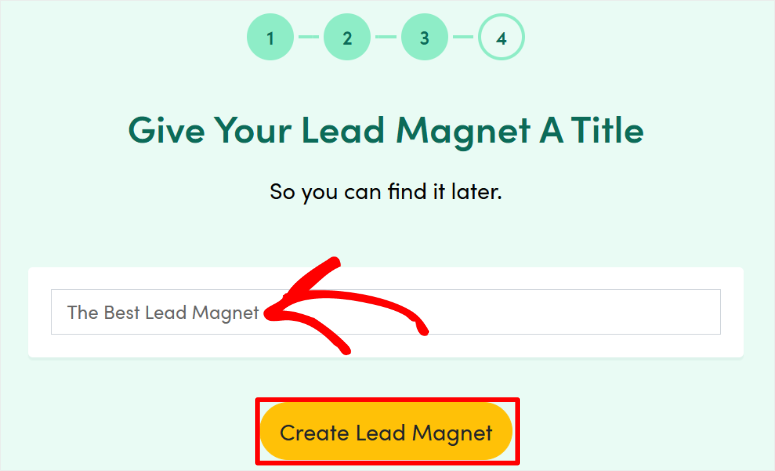
Once you add a name, you will be redirected to the drag-and-drop lead magnet builder.
Here you will notice that your imported blog content will automatically populate the template sections.
First, the title of your main blog becomes the lead magnet headline. Then your subheadings become chapter titles while your body text fills out the content areas.
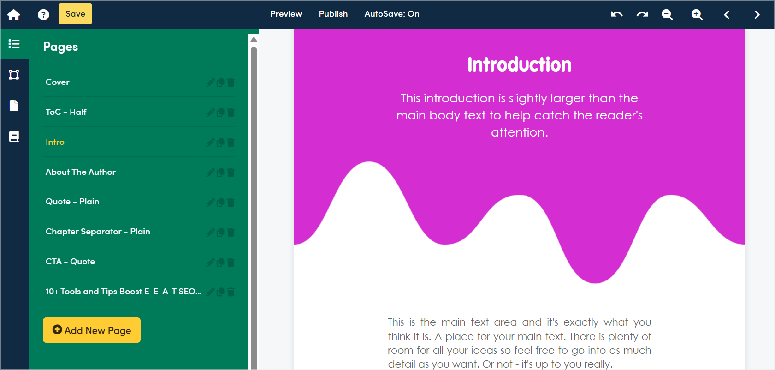
This saves hours compared to manual copy and paste. Additionally, the formatting remains consistent throughout the document without you having to do any additional work, so the lead magnet is consistent.
But we not only want the e-book to be consistent, but also to fit the brand!
So how do you adapt your brand elements?
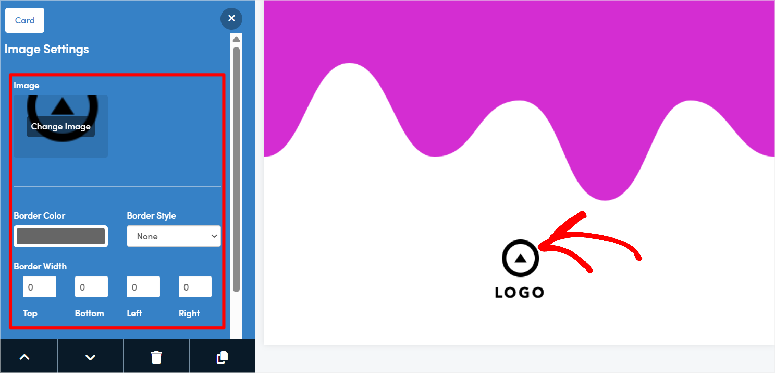
In the left pane, click the theme customization options. This will open settings where you can customize the eBook, upload your logo, and set your primary colors.
I always start with colors because they immediately impact the entire design. You can use preset color schemes or enter custom hex codes to exactly match your website. The changes automatically apply to all template elements.
Next, upload your logo to the header section. Note that Beacon accepts PNG or JPG files. Also, make sure your logo is high resolution so it looks crisp in the final PDF.
Next, let’s look at how to customize typography and layout
Font settings allow you to customize the appearance of the text without damaging the template structure. You can adjust the size of the headings, the fonts of the body text, and the spacing between elements.
I stick with readable fonts like the template standards unless my brand requires something special. Remember that lead magnets need to be easy to read, especially on mobile devices.
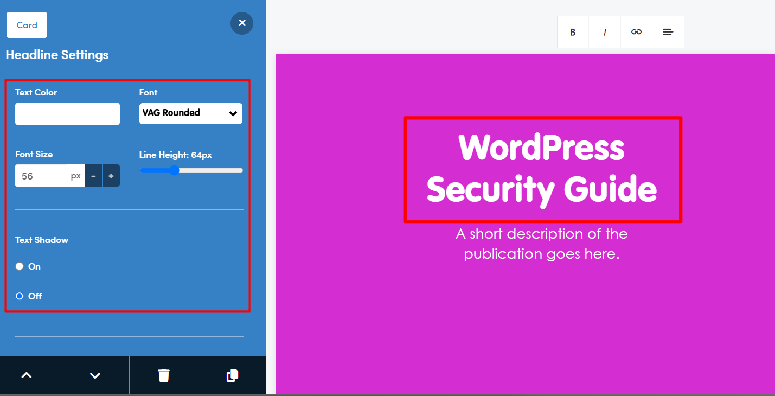
Additionally, you can change section layouts by adding or removing content blocks. The drag-and-drop interface makes this easy, even if you don’t know much about design.
Pro tip:
Maintain Blog Lead Magnet Consistency
Here is a strategy that works well for me. I keep the lead magnet design similar to my blog’s visual style. Same colors, similar fonts, consistent branding.
This creates a seamless experience as people go from reading your blog post to downloading your lead magnet. It creates trust because everything feels connected.
Additionally, consistent branding makes your lead magnet look more professional and authoritative.
Great! At this point, your template is now customized and ready for content editing.
Step 4: Edit and improve your imported content
10 minutes | Turn blog content into compelling lead magnet material
Now comes the fun part. Your imported content is good, but it needs to be optimized to work as a standalone lead magnet rather than a blog post.
Let’s see how to use the drag and drop eBook builder
The beacon editor displays the preview of your lead magnet on the right. The left pane contains all your editing tools.
You can see each page of your document listed at the top, so you can easily switch between sections.
Click any text element in the preview to start editing. The left pane automatically updates to show formatting options for everything you selected. You can also see styling options above.
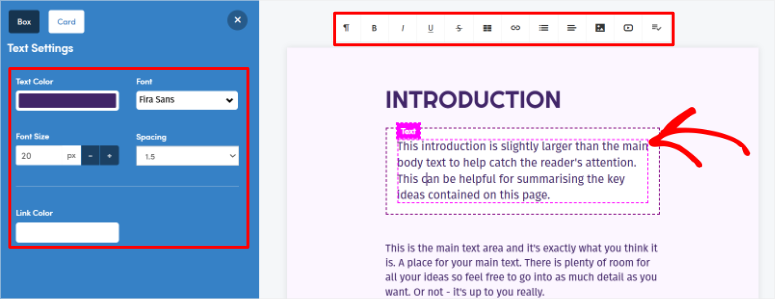
This visual approach makes editing feel natural. You’ll see changes immediately instead of guessing what they will look like in the final version.
How about converting blog headings into lead magnet sections?
Your blog’s headings will be imported automatically, but adjustments may be required for the lead magnet format. Blog headings often contain SEO keywords that sound strange in downloadable resources.
For example, “How to Secure WordPress Sites: Complete Guide 2025” works for blog SEO. But “WordPress Security Guide” sounds better as a lead magnet chapter title.

With this in mind, I go through each headline and make it more action-oriented.
- “Understanding WordPress Security” becomes “Secure Your WordPress Site.”
- “Common Security Mistakes” becomes “Avoid these dangerous vulnerabilities.”
Now let’s remove blog-specific elements.
Your imported content contains things that don’t make sense for a lead magnet.
References such as “in this blog post” need to be changed to “in this guide”. Additionally, all mentions of comments or shares should be removed.
Also, pay attention to navigation-related phrases such as “as mentioned above” or “in the next section.” These work in blog posts but feel strange in PDFs. Replace them with more direct transitions.
I’ve also seen that removing all calls to action that drive readers back to your website works with great success. Save these for the end of the lead magnet.
Speaking of CTAs, let me show you how to add call-to-action elements.
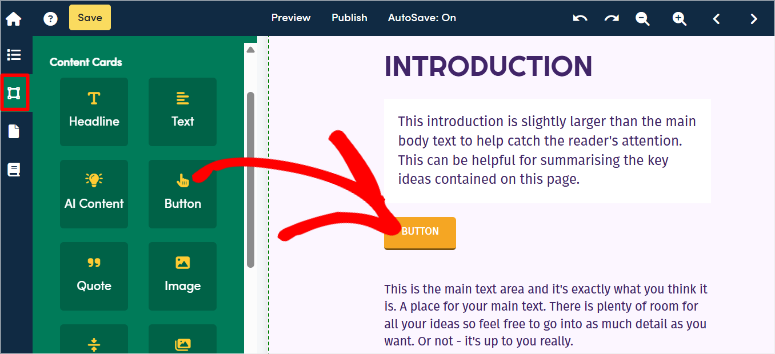
This is where you improve the content beyond what your blog post offers. Go to Content cards Tab and drag and drop CTA buttons, contact information, and next step suggestions.
Next, I’ll show you how to expand the content of checklists with interactive elements.
Since I focus on checklist-style blog posts, this step is crucial for me. I convert bullet points into actual checkboxes that readers can check.
Beacon makes this easy with checkbox content cards.
I drag these into the document where the original blog post contained action items. This turns a static list into an interactive tool that users actually use.
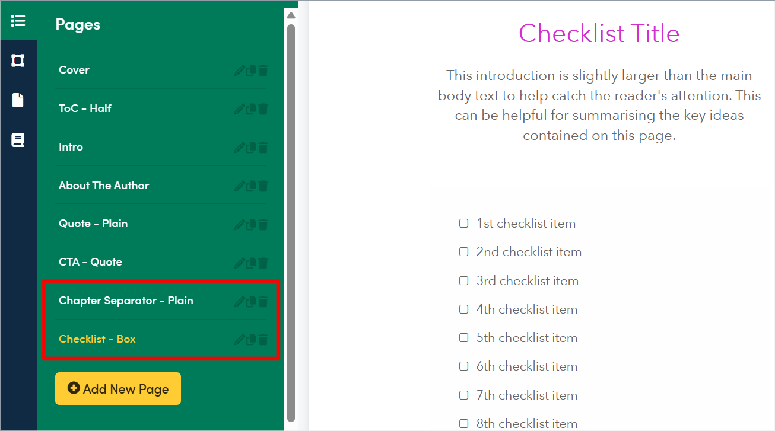
Additionally, I add space after each checkbox for notes or completion dates. This makes the lead magnet more valuable than the original blog content.
Your content now flows naturally as a standalone resource rather than a blog post conversion. You can now publish it.
Step 5: Publish your lead magnet
4 minutes | Make your lead magnet live and start capturing leads immediately
Publishing your lead magnet follows a practical process that even beginners can learn.
You choose your format, then set up lead capture, connect your email tool, and finally test everything before going live.
Let me explain this to you.
First select Publish. This will open a popup where you select your format under “Publish Settings”.

On this screen you have the following format options to choose from.
Smart PDF
This allows you to share your lead magnet as a web-based document that works perfectly on any device. Smart PDFs appear like professional websites, but maintain the valuable PDF look and feel that people expect from lead magnets.
Choose Smart PDF if you want:
- Detailed analytics on views, reading time and most popular sections
- Search engines index the content for additional organic traffic opportunities
- Mobile responsive design that looks great on phones and tablets
- Real-time content updates without redistribution of new files
Download PDF
This creates a classic downloadable PDF that users save directly to their devices. This well-known format works well if your audience prefers to have files they can access offline.
Select “Download PDF” if you want:
- Compatible with any PDF reader or device without internet requirements
- Easily share via email attachments or file sharing platforms
- Professional look and feel that maintains your exact formatting and branding
- Printable format for people who prefer physical reference materials

Reck
This adds an advertising bar to your website that appears at the top or bottom of pages. This method promotes your lead magnet throughout your website without being intrusive.
Choose “Horizontal Bar” if you want:
- Visible on every page for maximum exposure of your existing traffic
- Customizable display rules to exclude specific pages if necessary
- Eye-catching design that doesn’t interfere with your main content
- Perfect for promoting seasonal or time-sensitive lead magnet offers
Inline form
This allows you to embed lead capture forms directly into your blog posts or website pages. These forms blend naturally into your content without interrupting the reading experience.
Choose Inline Form if you want:
- Seamless integration that feels like a part of your original content
- Strategically place in related blog posts for greater relevance
- Fully customizable theme to match your website’s existing look and feel
- Higher conversion rates with contextual placement within relevant content
Content update
This creates a call-to-action button that you embed directly into your blog posts or website content. Content updates work well because they feel natural and relevant to what people are already reading.
Choose Content Upgrade if you want:
- Minimal visual impact that doesn’t distract from your main content
- Two-click engagement process that encourages higher engagement from interested visitors
- Perfect integration for offering resources on specific blog topics
- Easily A/B test different messaging and placement locations
Pop-up delay
This will display your lead magnet offer in a pop-up window after visitors spend time engaging with your content. Delayed timing respects the reader’s experience while effectively capturing attention.
Select “Popup Delay” if you want:
- Timing based on visitor scroll depth or time spent on page
- Higher conversion rates than instant popups because the timing feels natural
- Customizable triggers that only appear to truly engaged visitors
- Configuration options that only appear once per visitor to avoid hassle
Link blocking
This will generate a direct share link that requires email sign-up before granting access to your lead magnet. Link blocks work great if you want maximum flexibility in promoting your content.
Choose Link Lock if you want:
- A single shareable URL that works anywhere you can post links
- Perfect advertising tool for social media, email newsletters and partner collaborations
- No website integration required – works independently of your website
- Ability to collect leads even if you don’t have a blog or website
I recommend Smart PDF In most situations, this is the case because reader data helps improve your future lead magnets. And that’s exactly what I chose for this tutorial.
In this case, your lead magnet works like a professional-looking website. Search engines can also find this content and generate additional traffic.
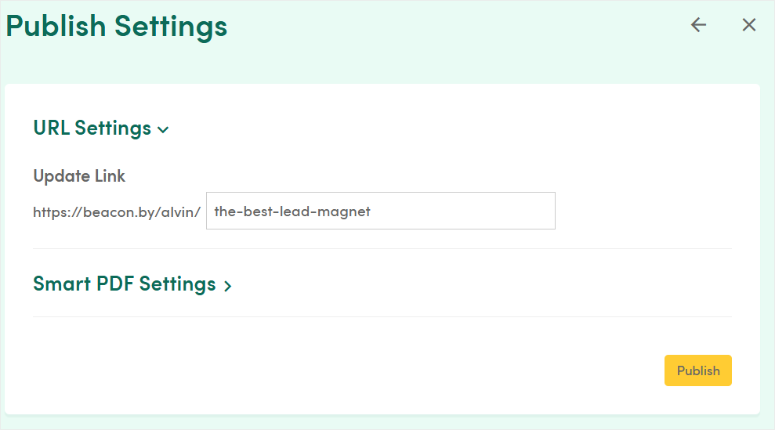
Once you select “Smart PDF,” Beacon will open the publishing settings window.
At the top you’ll see the URL settings where you can customize your lead magnet’s web address to make sharing easier.
Next, use the drop-down arrow to expand the Smart PDF Settings section, which gives you control over how your content appears online.
My recommendation is:
- Check “Activate download” if you want readers to save copies locally.
- Uncheck the checkbox “Disable social media share buttons” to promote viral exchange across platforms.
- Next, uncheck the box “Deactivate mobile version” to ensure everyone has a great experience reading your eBook on any device
- Then uncheck the box “Prevent search engines from indexing” so people can find it via Google
- Uncheck the checkbox “Hide company name in title bar” to improve your brand awareness
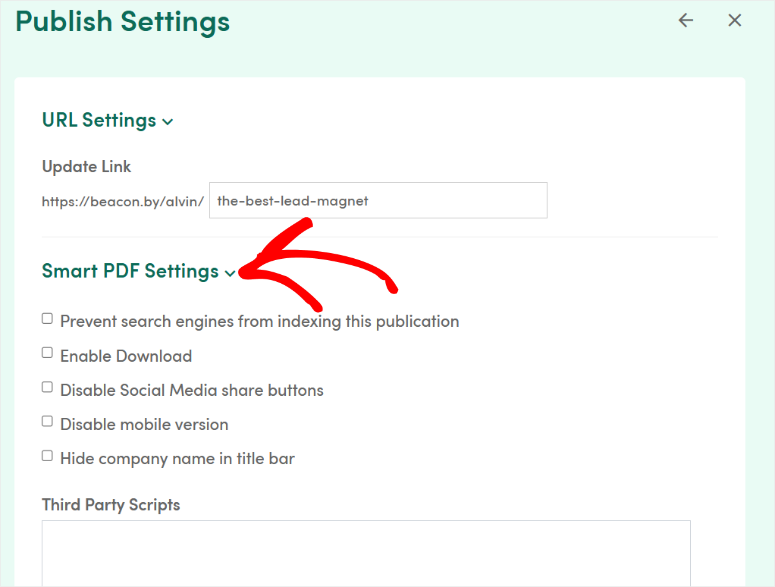
When you’re done, scroll down this page and add yours Google Analytics ID in the field to track visitor behavior and conversion data. This will help you understand which sections engage readers most effectively.
Next, fill this out Meta title Field with SEO-friendly text like “WordPress Security Checklist – 15 Essential Steps.” This will appear in search results and social media previews when people share your content.
Hire password if you want to grant access only to premium subscribers. Leave blank for public access to maximize lead generation potential.
Once you’ve configured these settings to suit your marketing strategy, click the Publish button to make your lead magnet live.
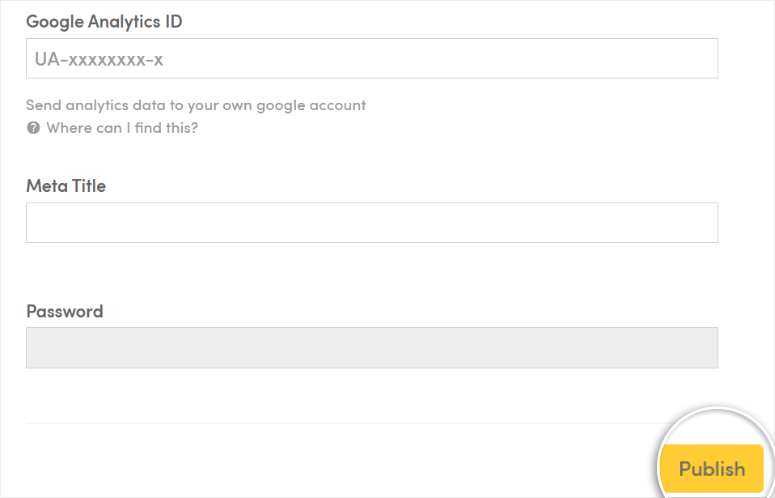
That’s it! Your lead magnet is now online! You can now get more quality leads. However, this tutorial wouldn’t be complete if I didn’t show you how to convert these leads into sales.
We achieve this by connecting Beacon.by to an email marketing platform.
Connect your email marketing platform
As part of the lead magnet marketing process, you also connect it to an email marketing platform.
While this isn’t necessary since you can use the lead magnet independently, it will help you better nurture your leads.
To do this, go back to your Beacon.by dashboard. Navigate here Account Settings » Email Integration and then press Plus (+) Sign in to open email marketing options.
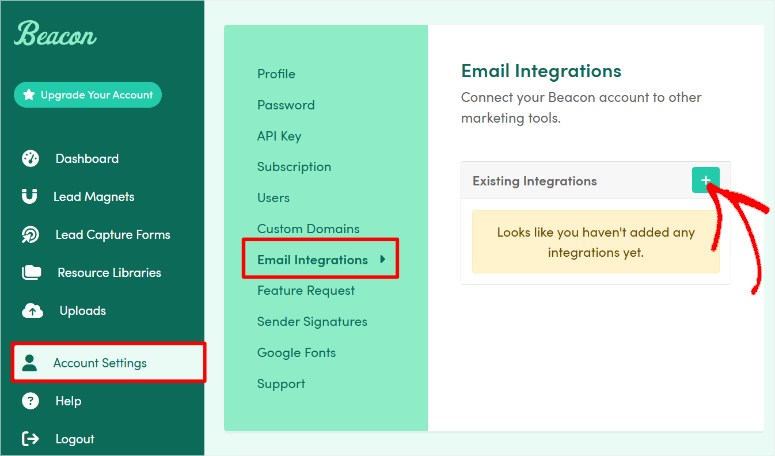
In the drop-down menu, you will see options like ActiveCampaign, AWeber, Drip, GetResponse, Brevo, and many more.
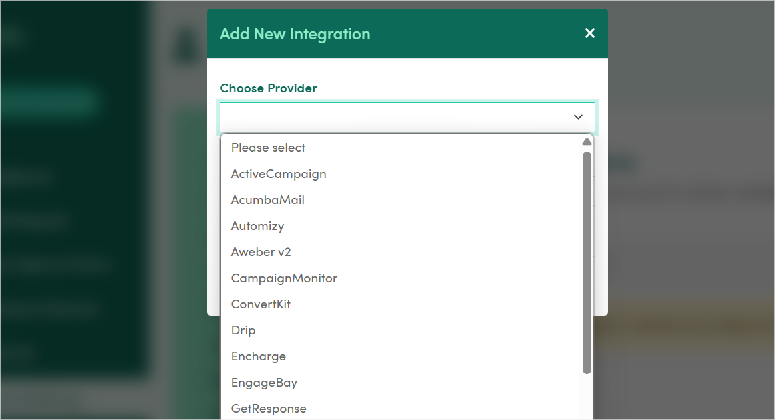
For this tutorial, we will connect Beacon to ConvertKit. Don’t worry, no matter which email tool you choose, the process is the same.
First, you need the Email Marketing API to make the connection.
For example, for ConvertKit, go to Account Settings » API keys. Or go for Mailchimp Account » Tools » API Keys. Most platforms have similar locations in their settings sections.
Copy and paste your API key into Beacon’s integration field. The connection is usually instantaneous.
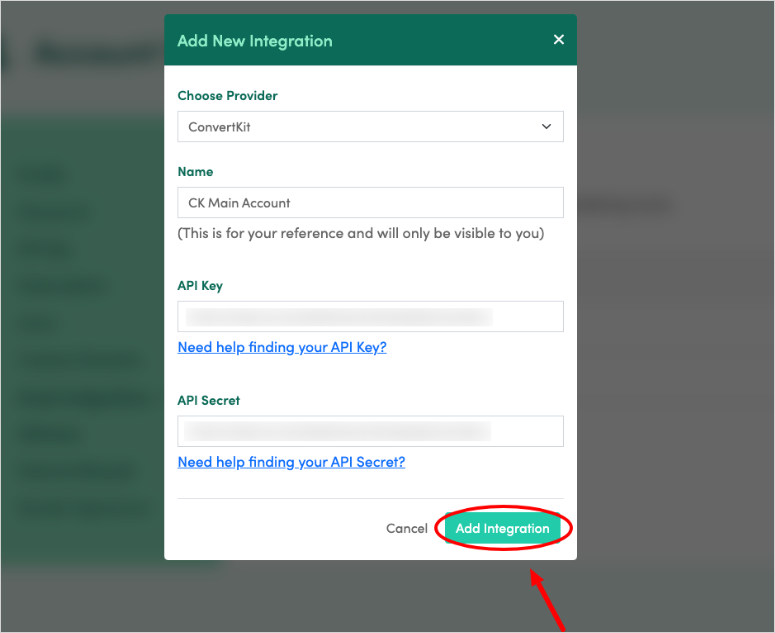
Now, to add this lead magnet’s subscribers to an automation or segment in ConvertKit, you need to add a tag.
So go to the next page Actions and hit them Select Day fall down. From this list, select the tag you want your new subscribers to be placed under.
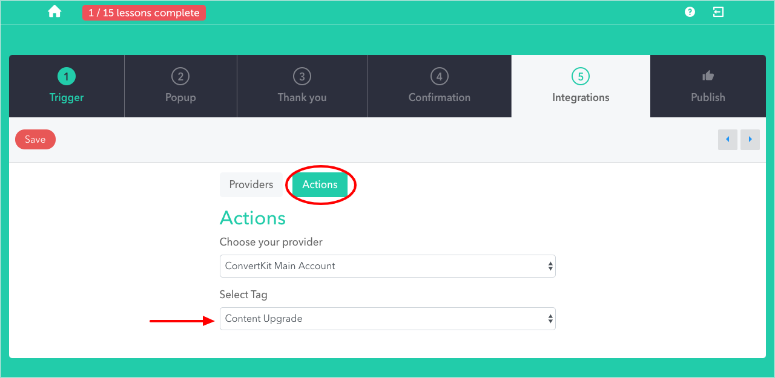
Well done! You can now turn any of your blog posts into a lead magnet and nurture them using your favorite email marketing tool.
Now in the Testing and Optimization section below, let’s make sure your lead magnet has a high conversion rate using the following checklist.
Checklist: Testing and Troubleshooting Your Lead Magnet
Your lead magnet needs to be tested quickly before advertising. Here you will find the most important checks and solutions to common problems.
Essential test steps:
☐ Mobile Preview: Open your lead magnet on your actual phone. Then check the readability and functionality of the buttons.
☐ Test your own forms: Complete the opt-in process with your email address. Check the functionality of the form and the sending time.
☐ Check email integration: Confirm that new subscribers appear in the correct list on your email platform within minutes.
☐ Check cross-browser display: Test forms in Chrome, Safari, and Firefox to identify compatibility issues.
Common problems and quick solutions:
☐ Problems importing content: Blog posts can import at odd intervals. So adjust the paragraph formatting using Beacon’s spacing controls.
☐ Missing images: Import problems result in incorrect images. In this case, upload replacement images directly to Beacon instead.
☐ Email integration errors: Check the accuracy of the API key without extra spaces. Remember that most platforms allow you to generate new keys if necessary.
☐ Forms are not displayed: Embed codes break in the wrong places. Always use WordPress HTML blocks, never text blocks.
☐ Slow loading: Large images cause performance issues. Make sure you compress images to less than 500KB before uploading.
☐ Mobile display issues: Desktop text appears too small on mobile – increase the font size specifically for mobile viewing.
☐ No confirmation emails: Check the email platform’s sender verification – some require verified addresses before automation will work.
Most problems arise from blog content not being properly adapted to the standalone lead magnet format.
That’s it from me. I hope you enjoyed learning how to turn your blog post into a lead magnet. If something is unclear, check out the frequently asked questions below.
FAQs: How to Turn Blog Posts into Lead Magnets
What Types of Blog Posts Are Best for Lead Magnet Conversion?
Step-by-step instructions, comprehensive checklists and guides lead to highly effective conversions. Posts that already get good organic traffic and engagement usually also produce good lead magnets. Avoid news-oriented or very time-sensitive content as lead magnets should have everlasting value.
Can I use copyrighted content from other sources in my lead magnets?
Only repurpose your own original blog content for which you have full usage rights. Do not copy content from other websites or sources. When referencing external information, always make sure to cite the source correctly and keep quotes short.
How long should my reused lead magnets be?
The most effective lead magnets are 5-15 pages maximum. Blog posts often contain more content than is necessary for lead magnets. Remove introductory paragraphs, long-form explanations, and blog-specific elements to keep your lead magnet focused and actionable.
Do I need different email lists for each lead magnet?
If possible, create separate email lists for different lead magnet topics. This allows for targeted follow-up sequences based on what people have downloaded. Someone interested in WordPress security will likely want to receive different follow-up emails than someone who downloaded content marketing tips.
How often should I create new lead magnets?
Start by converting your 3-5 top-performing blog posts into lead magnets. Then add 1-2 new lead magnets per month and mix reused content with original resources. Focus on quality over quantity – one well-crafted lead magnet beats five mediocre ones.
Can I use Beacon.by to update my lead magnets after publishing?
Smart PDFs enable real-time updates without the need to redistribute new files or change URLs. Traditional PDFs must be republished and redistributed when content changes. This flexibility makes Smart PDFs more suitable for evolving topics or content that needs to be updated regularly.
What is the best way to promote reused lead magnets?
Embed optin forms into the original blog posts that inspired each lead magnet. This leads to natural content upgrades for readers who are already interested in these topics. Additionally, promote lead magnets on social media, in email signatures, and through guest posts.
Final Verdict: Should I turn my blogs into lead magnets?
Absolutely. Repurposing blog content into lead magnets is, in my opinion, the most efficient way to generate sustainable leads.
This strategy solves the core problem many content marketers face. Create enough valuable resources to build an email list without getting burned out from constant content creation.
Your existing blog posts represent months or years of research, writing, and optimization work. So turning them into lead magnets multiplies the value of that investment.
Additionally, lead magnets based on proven blog content typically outperform resources created from scratch because the topics are already validated by search data and reader engagement.
Start with your best-performing blog post this week. Your content library is waiting to become a lead generation system. Use it.
If you’re looking for a distraction-free way to get more leads with your lead magnet, here’s a post on how to create a squeeze page.
Otherwise, here are a few articles I knowledge You’ll love it.
These resources will not only help you find the best lead magnet tool for you, but they will also show you how to use it. In the end, you’ll be much better equipped to stop relying too heavily on social media ads to get leads.


