I helped a client recover from a nightmare hack when she lost 40,000 email subscribers. Three days of her life disappeared in damage control, her reputation took a hit and she is still recovering.
But here’s the thing. Within three hours of implementing appropriate security measures, we made their website bulletproof. Two years later? No successful attacks, their search rankings improved and customer trust increased.
This success made me think about something important.
I recently created a WordPress speed and performance checklist after many users asked for a compact resource they could follow step by step.
Then I realized that WordPress security and performance solve the same core problems. Both ensure the stability of your website and prevent crashes and downtime. Both protect your search rankings.
A fast website is often a secure website. A secure website stays fast because it doesn’t fight malware or attack traffic.
That’s why today I present to you the safety companion to this performance guide. Consider this the second half of keeping your WordPress site healthy and running smoothly.
In 40 minutes, your website will be more secure than 80% of WordPress websites available. No scary jargon. No expensive business tools. Simply intelligent, systematic protection that actually works.
In fact, for each step, I’ll show you the manual approach and a free tool that can help you improve your security.
Quick Takeaways: What You Get Today
- Automatic backups protect your entire website
- Login protection blocks 99% of attacks
- Real-time monitoring for early threat detection
- The WordPress core is blocked against exploits
- Professional firewall runs free of charge
Time required: 40 minutes. Protection: years.
Understand what you are protecting yourself from (5 minutes)
Before installing security plugins on your website, spend five minutes understanding what actually threatens WordPress websites.
This knowledge will help you make smart, non-panicking decisions.
See, most beginners install every security plugin they find and enable all the features. This slows down the crawling of their website and they still don’t know what they are actually protecting against.
The real numbers (2024-2025)
On average, WordPress sites are subjected to attacks every 32 minutes.
That sounds scary. But here’s the reality: 96% of vulnerabilities lie in plugins, not WordPress itself. The WordPress core is incredibly secure. Your plugins? That’s where the problems lie.
Additionally, according to Search Engine Journal, 55% of all attacks are SEO spam.
No dramatic movie-style hacking with hooded characters typing furiously. Just automated bots that inject hidden spam sites to hijack your search rankings.
Only 27% of website owners have proper recovery plans in place.
The last number is the most important because most hacks are recoverable if you are prepared. And that’s why we’re here today. So you can stop WordPress security attacks before they happen.
The 3 Most Common Attacks (What Actually Happens)
1. Brute force login attacks
Brute force security attacks happen when bots try thousands of password combinations on your login page. They don’t specifically target you. Instead, they visit every WordPress site they can find.
This means that if your website is protected or needs extra work to hack, it will simply be skipped. After all, they can target millions of other websites.
Check out this post to learn everything you need to know about brute force attacks.
The good news? This can be fixed in 2 minutes with simple tools that you will install shortly.
2. Outdated plugin exploits
Old plugins become unlocked doors to your website. Hackers look for websites running vulnerable plugin versions. If they find one, automated tools exploit the known vulnerability.
3. SEO spam injection
Attackers inject hidden content to improve their own search rankings.
They create thousands of spam pages on your domain. Google sees these pages, causing your ranking to drop. In the end, visitors are redirected to scam sites.
Now, if you want to quickly see the status of your website and determine if any of these vulnerabilities exist on your website, first scan your website with our free WordPress security checker.
Complete WordPress security checklist
Now, I know this is a long post and it’s easy to get confused. That’s why I summarized the entire checklist using the following table of contents. This way you can see everything at a glance.
Additionally, you can jump to any part of the WordPress security checklist using the links below.
With that out of the way, let’s get started with our safety checklist!
☐ Emergency Foundation – Do This First (10 Minutes)
These four things are your safety net. Not glamorous, but they will save your website if disaster strikes.
After this section, you are already safer than 70% of WordPress sites.
Set up automated backups (3 minutes)
Like home insurance, you hope you never need it, but if you have it and then don’t, it can be disastrous.
The reality is that 73% of WordPress sites do not have a backup plan.
Think about it for a second. Three out of four website owners are just one hack away from losing everything they’ve built.
So how do you actually secure your WordPress site?
Manual approach:
Your host may offer backups. Top hosting providers like Bluehost, Hostinger, etc. offer some kind of backup plan with every plan you purchase.
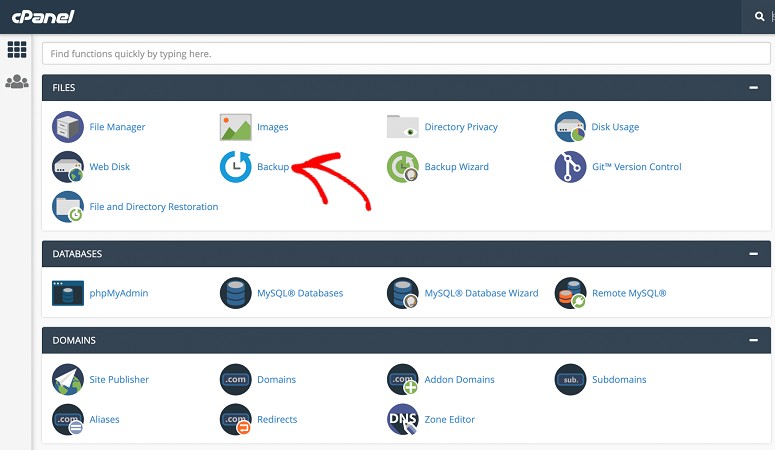
However, you delete these backups when you leave their hosting or after a certain number of months. And if the server itself is compromised, your backups will fail too.
Remember that if you want to use your host’s backup option, you will need to know how to use your cPanel or SFTP. Check out this tutorial to learn how to set up your website backup via cPanel or SFTP.
While you have your backup with a hosting provider, you should never allow this to be your only solution. It’s like keeping your spare key in the car.
Tool solution: Duplicator (free)
While setting up manual backups across your hosts can be complicated, using a plugin can automate the entire process.
For example, Duplicator solves the biggest backup security problem: recovery speed during an active attack.
If malware gets to your website, you need to recover quickly. Duplicator packs your entire WordPress installation into a single archive, including database, files, plugins, themes, uploads and everything.
One package means one-click recovery, rather than piecing together scattered backup files during a crisis.
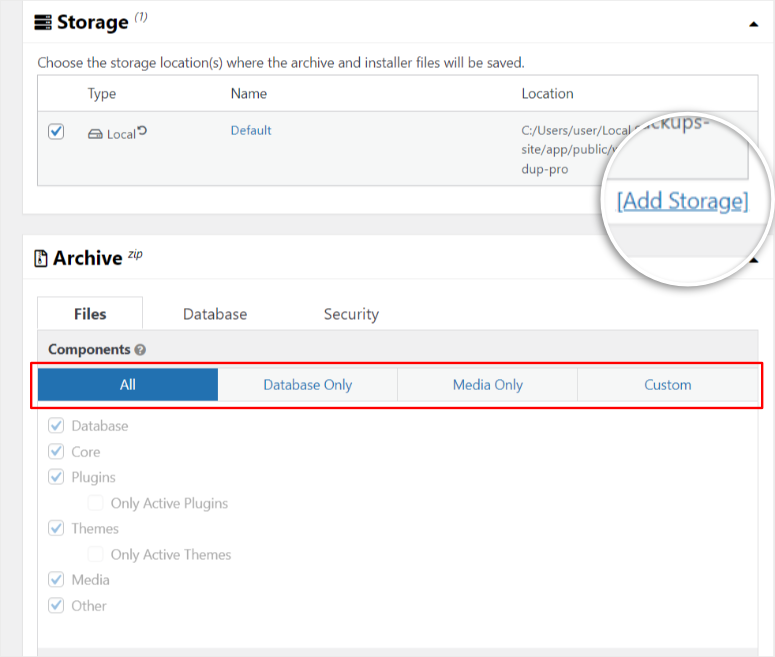
The scheduled backup feature will automatically run on the timeline you choose. You set it once. It backs up weekly or daily without you even remembering to click anything.
This is important because manual backups will fail if you forget about it during busy weeks.
Additionally, cloud storage integration lets you instantly receive your backups to an off-site location. You have options like Google Drive, Dropbox, Amazon S3, and more.
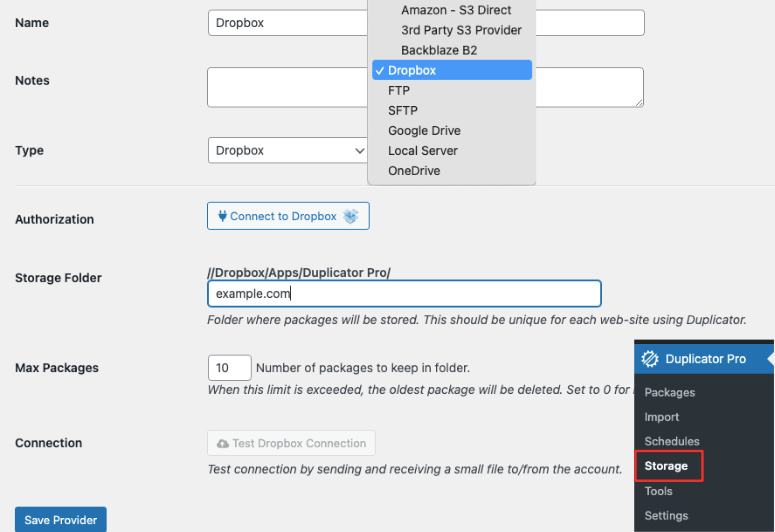
This means your backup is never on the same server that the attackers just compromised. Even if everything on your hosting account is deleted, your backups will remain in the cloud.
Most importantly, using Duplicator during hosting migration just makes sense.
If your host’s infrastructure becomes damaged, you can move your entire website to new hosting in less than an hour. You are not trapped on compromised servers waiting for a host cleanup.
For more information, check out my Duplicator review here. Also, check out this article to learn how to recover your website after a security breach. I’ll walk you through 5 methods.
Alternatively, you can also use UpdraftPlus as a backup plugin.
UpdraftPlus offers a more visual interface with drag-and-drop backup scheduling. The recovery wizard requires more hands on each step, which some beginners prefer.
Both tools offer identical security benefits. Therefore, choose the interface that seems more comfortable to you. Before you make your decision, compare Duplicator vs. UpdraftPlus vs. Solid Backups to find out which is right for you.
Additionally, you can go through this list of the best backup plugins for even more options.
Check if your backups are working:
First, you will receive an email confirmation that will land in your inbox after each backup. This ensures that you have a record of your backup at all times. It also shows backup packages with date and timestamp in your cloud storage.
High Risk Sites That Need This Most:
News sites and content publishers face the biggest problems when they don’t have site backup.
A successful attack can delete years of articles, author profiles and multimedia content. That’s thousands of hours of work.
Unlike eCommerce where you may lose transaction data, WordPress news sites lose their entire business. The intellectual property that defines the publication.
Do you want to restore this content from web archives or Google cache? Almost impossible on a scale.
☐ Enable strong authentication (2 minutes)
I often see website owners using “admin” as their username with “password123”, which is like leaving your house key under the doormat. Others use their name or company name, which is just as risky.
Even a novice hacker will always try this combination before using any fancy bots to try to find your password.
But if these malicious people introduce bots to try to crack your website, even strong passwords may not help.
How do you fully protect your website from password hacks?
Manual approach:
First and most obvious, you need to create strong passwords. More importantly, you must use unique passwords for all your websites.
Just as I see that many people use a simple username and password, I also see that many website owners reuse the same password across all websites because it is impossible to remember 47 different passwords.
To ensure you create a strong password every time, you can use our free password generator.
You can see the length of the password. Then use checkboxes to instruct the password generator to add capital letters, numbers, and special characters or to make the password easier to remember.
It’s your choice.
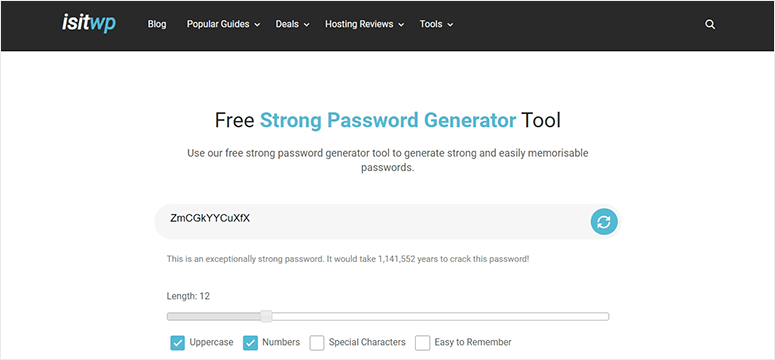
As far as manually protecting your website with a strong password, this is the best solution. I suggest that you save your passwords in a notepad so that they are not on the web and cannot be accessed remotely.
However, this can be time-consuming and still pose security concerns. That’s why I prefer the tools approach.
Tool solution: Password manager + 2FA plugin
Password managers solve the “too many passwords” problem that leads to password reuse. As mentioned earlier, reusing passwords will expose all of your accounts if a breach occurs on any website.
Password managers generate and store unique passwords for each website, so a breach elsewhere will never affect your WordPress login.
LastPass offers a free tier with unlimited passwords for one device type. Also, a more sophisticated user interface that is easy to use for many beginners.
On the other hand, 1Password integrates beautifully if you’re in the Apple ecosystem, with features like Face ID and iCloud syncing. However, requires a paid subscription with no free option.
Both generate random passwords longer than 16 characters from letters, numbers and symbols. For more options, check out my list of tools to help you keep track of your passwords.
So far we’ve solved two of the biggest password problems: creating strong passwords and remembering them. Now let’s figure out how to further protect your website if hackers bypass it.
And I recommend two-factor authentication.
This adds a second layer of verification that attackers cannot remotely bypass.
Even if someone steals your password through a phishing email or data breach, they won’t be able to log in without the six-digit code from your phone.
WordPress 2FA plugins make this setup ridiculously easy. For example, most popular two-factor authentication plugins connect to your phone via a QR code scan.
Your phone will then generate time-based codes that change every 30 seconds. No codes are ever transmitted over the Internet, so attackers cannot intercept anything.
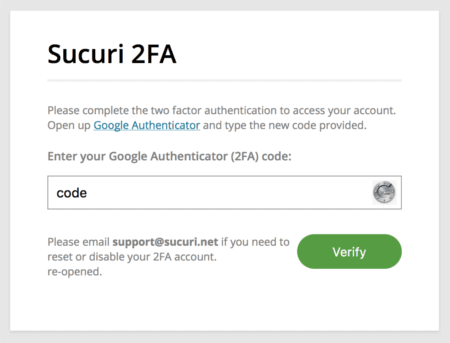
The Backup Recovery Codes feature protects you if you lose your phone. With these one-time codes stored in your password manager, you can regain access and set up 2FA on a new device.
Without backup codes, losing your phone means having to pay a developer to manually disable 2FA in your database.
Here is a list of the best two-factor authentication plugins to get you started. You’ll also learn how to set up a 2FA plugin in just a few steps.
What if you don’t want to use a WordPress authentication plugin?
In this case you can use Google Authenticator And Authyboth of which generate the six-digit codes that WP 2FA requires.
Authy adds cloud backup of your codes across all devices. For added security, Google Authenticator stores everything locally on one device.
What you can achieve with 2-factor verification
First, you can stop most brute force attacks quickly and immediately. Attackers cannot guess your phone. Even if they somehow steal your password, they still won’t be able to log in.
This makes account takeover virtually impossible as most automated bot attacks give up and move on to easier targets.
For a complete overview, here is a list of the best brute force plugins you can try.
High Risk Sites That Need This Most:
Freelance and portfolio websites that operate as sole proprietorships face unique authentication risks.
This is because the WordPress admin contains customer contracts, project files, payment information, confidential theme mockups, and more.
A compromised account doesn’t just affect you. It exposes the confidential information of multiple customers at the same time.
A weak password can result in NDAs being violated with multiple clients at the same time. Your professional reputation is destroyed. You may end up exposed to breach of contract lawsuits from multiple clients.
☐ Install your security plugin (3 minutes)
Think of a security plugin like hiring a security guard who never sleeps.
You see, WordPress does not have built-in attack protection. It is secure software, but it has no idea when bots are attacking your login page or when malware is being uploaded.
A special security plugin adds eyes and ears that WordPress doesn’t have by default.
It keeps an eye out for threats around the clock. Blocks attacks before they impact your website. Alerts you to problems you would never notice on your own.
Manual approach:
You could dive into server logs and write firewall rules. Manually analyze attack patterns. Track every file change yourself.
But honestly? Not. This is way too technical for most people and one wrong step will result in you being banned from your own website.
Tool solution: Wordfence Security (free)
Wordfence Addresses the three security challenges most beginners struggle with: detecting threats in real time, scanning for vulnerabilities, and automatically blocking attacks.
The real-time firewall works like a bouncer at the front door of your website. When bots try to add bad code or cross-site scripting attacks, the firewall detects the malicious patterns and stops them.
Ultimately, the attacks never touch your database because your server never processes the faulty code. They just disappear.
The daily malware scan compares each file against the official versions from WordPress.org.
If attackers sneak in and change your login code to create a backdoor, Wordfence will detect it immediately.
The scanner checks 4 million known malware signatures and looks for suspicious code hiding in your plugins or theme files.
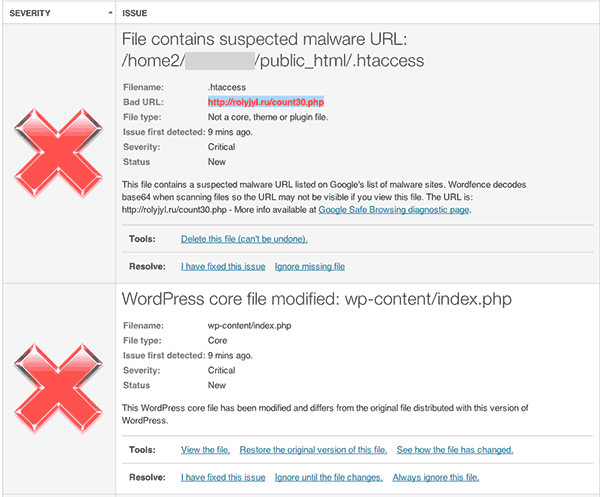
Additionally, monitoring failed logins shows exactly who is intruding on your login page. You’ll see their IP addresses, the usernames they’re testing, and how many attempts they’ve made.
After repeated errors, Wordfence will automatically block them.
The setup wizard takes care of the technical decisions for you. Just click “Accept recommended settings” and you’re protected. You don’t need to understand what a web application firewall actually does.
For more information, see my detailed Wordfence review.
Premium alternative: Sucuri Security
Sucuri offers a premium security platform with features that Wordfence does not offer in its free version.
First of all, the cloud-based firewall blocks attacks before they even reach your server, reducing load and improving performance.
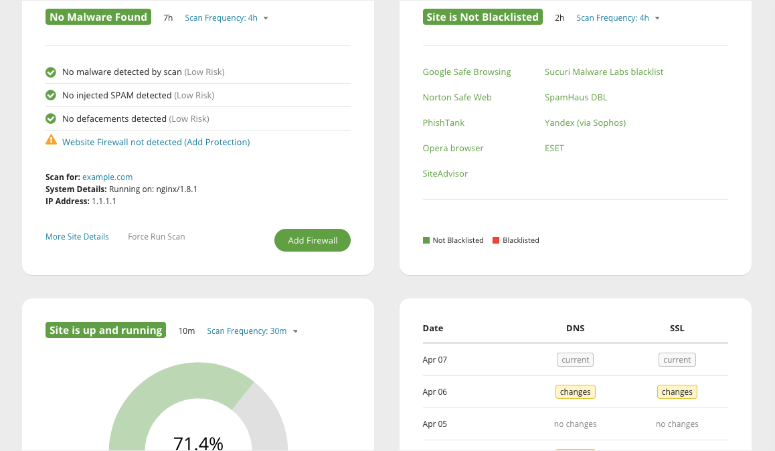
You will receive a professional malware cleanup included if your website is compromised. Best of all, the support team responds within hours, not days.
Sucuri also monitors major blacklists and notifies you immediately if Google or other services report your website. Their security center offers 24/7 human monitoring, not just automated scanning.
This firewall plugin is best suited for corporate sites where downtime costs real money and you need guaranteed expert cleanup in the event of a disaster. For more information, see my Sucuri review.
Additionally, you can find more options in my list of the best firewall security plugins.
High Risk Sites That Need This Most:
Membership sites and online course platforms rely on continuous availability. Members pay monthly subscriptions and expect 24/7 access to course content.
Real-time security monitoring prevents attacks that could take your website offline during peak learning times.
If students are unable to access course content they paid for, chargebacks will occur immediately. Membership cancellations follow.
A successful attack that causes 24 hours of downtime can trigger hundreds of refund requests. Your payment processor sees the chargeback pattern. Your merchant account will be flagged.
Now you can use our free uptime checker to ensure your website is always running smoothly.
Also, here is a detailed list of the best security plugins that will protect your website across different security levels, requirements and budgets.
☐ Check your hosting security (2 minutes)
One thing I’ve learned in my years as a WordPress expert is that your host is either your strongest security ally or your weakest link.
I noticed that 39% of compromised websites have outdated server software. This isn’t your fault. That’s because your host isn’t doing his job.
Your hosting is the foundation of your entire security system. Everything you build is on it. So how do you make sure your foundation is solid before adding the rest of the security layers?
The security foundation your host should provide:
The first thing you should do is make sure your website is encrypted. This is a simple solution that you can achieve with a Secure Sockets Layer (SSL) certificate.
It protects data transmission between your website and visitors. If your website is SSL protected, you will notice that the URL changes from HTTP to HTTPS.
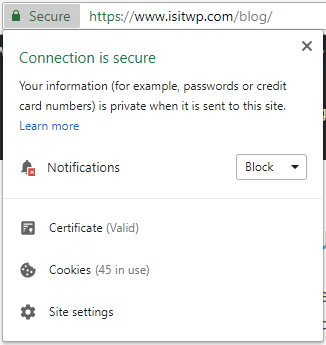
HTTPS encrypts everything transmitted between your website and visitors. Without it, data is transmitted in plain text that anyone can intercept.
That being said, Google no longer ranks non-HTTPS websites well. And modern browsers display large red warning screens on websites without SSL, scaring visitors away before they even see your content.
Manual approach:
Request an SSL certificate from your host and then manually update your WordPress site URLs in the database.
After that, you need to set up .htaccess redirects that force HTTP traffic to HTTPS. Then look for mixed content errors where images or scripts are still loading over HTTP, causing your padlock icon to become corrupted.
The process includes editing database tables, modifying server files, and debugging why security warnings appear on certain pages.
A typo in your .htaccess file will crash your entire website. A missing URL in your database means there are broken links everywhere.
It’s technical, time consuming and honestly? Most beginners break something along the way.
The good news is that most hosting providers offer one-click SSL installation for free. Search for “SSL/TLS” or “Let’s Encrypt” in your hosting dashboard. Click “Activate” and wait 5 to 15 minutes for activation.
If your host doesn’t provide free SSL certificates, that’s a serious red flag for its infrastructure. Consider migrating to a host that includes SSL by default.
Here is a list of the best hosts with free SSL certificates. Additionally, most hosting providers install the SSL certificate automatically.
Tool Solution: Really Simple SSL (Free)
If a client hosting doesn’t offer an SSL certificate, I turn to Really Simple. SSL takes care of everything, which makes manual setup complicated.
The encryption plugin will automatically detect your SSL certificate once it runs. One click on the large “Activate SSL” button and you’re done.
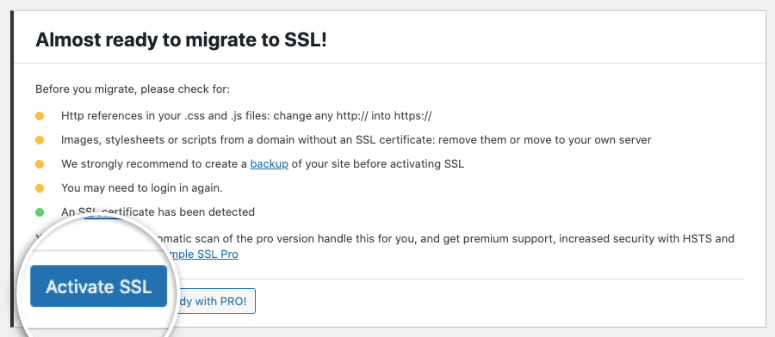
Really Simple SSL takes care of everything behind the scenes. It securely changes your WordPress URLs from http:// to https:// in your database.
Manual database changes that can easily break your entire website with a single typo? Really Simple SSL does it correctly every time.
Additionally, redirects are automatically set up to force all visitors to the HTTPS version. This way, search engines see the HTTPS version and users never get to the insecure version.
Check out my Really Simple SSL review to see how it works. Additionally, here are step-by-step instructions on how to set up your SSL certificates manually or using a plugin.
High Risk Sites That Need This Most:
Real estate and property listing websites require hosting with excellent security.
They manage sensitive customer data like home addresses and financial information and show what buyers can afford.
One of the biggest risks is that you view schedules showing when properties are vacant. So weak hosting security becomes visible when properties are empty. This isn’t just a data breach. This creates physical security risks for homeowners.
Aside from obtaining user information and financial records, attackers targeting real estate websites often also seek addresses of high-value properties for break-in planning.
Robust hosting security is not optional. It protects the physical security of your customers. And it all starts with where your site servers are located.
You can start by checking out this comparison list of safe and powerful hosting providers.
☐ Block user access (3 minutes)
Here’s a shocking statistic: 55% of hacked websites contain fake administrator accounts created by attackers.
These are not obvious usernames like “hacker123”. These are accounts with names like real users or roles like “john_smith” or “support_team” that remain inactive for months.
Attackers create them in the first breach and come back to exploit them later. By then you will have forgotten about the attack and assume everything is fine.
Blocking who can access your website will stop this before it starts.
Manual approach:
The manual approach can be time-consuming, but is very effective at identifying users who may have malicious intent.
All you have to do is leave Users » All usersthen verify each account. Question any username you don’t immediately recognize.
However, manual verification only works if you remember to do so. Most people only forget about it after the violation.
So how do you make sure you “remember” everyone?
First, delete all users named “admin”. Instead, change it to your real name or company name. Attackers specifically target the default username “admin” because it is guaranteed to be present on lazy installations.
Next, remove old accounts. This includes former contractors or employees you no longer work with.
If you have many users on your website, it is impossible to remember them all.
So instead of focusing on that “WHO,” Focus on those “Role.”
This ensures that each user has the correct access level. Your content author does not need admin access. Your virtual assistant doesn’t need editor rights to schedule posts.
Use this approach to set up roles:
- Administrator means complete control. Only you as the website owner should have it. Maybe your lead developer if you run a company.
- editor takes care of all content management. You can publish, edit and delete any post or page. Good for content managers who need complete control over content.
- author only creates and publishes its own content. Perfect for regular authors of your blog.
- Contributor writes content but cannot publish it without permission. Use this for guest authors.
- Participant just reads content. You can log in and comment, but nothing else. Most members should be subscribers.
Tool solution: WP Activity Log (free)
WP Activity Log solves the “who did what” problem that makes breach investigations impossible.
The activity monitoring feature records all logins, logouts and actions of each user. If something goes wrong, you’ll see exactly which account made the change and when.
This is important because attackers often use compromised legitimate accounts rather than creating obvious “Hacker123” usernames.
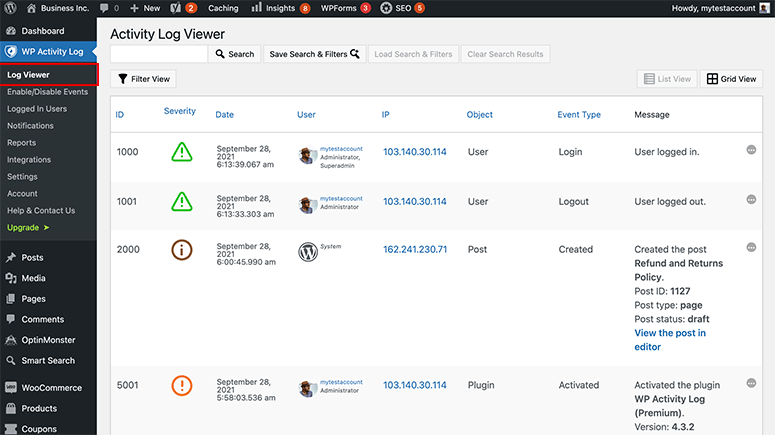
Additionally, New Admin Account Notifications will notify you immediately when Admin Accounts are created. It detects this alert in real time and not three months later during your next manual check.
Login time recording shows unusual patterns, such as: E.g. if you log in from Russia at 3am while sleeping in California.
Geographic anomalies reveal compromised credentials before attackers cause real damage.
Session management displays all active login sessions. You can see if your account is logged in from multiple locations at the same time and terminate suspicious sessions immediately.
Learn how to use WP Activity Log to track user activity for an extra layer of protection. You can also find other traffic tracking tools to help you identify any anomalies.
High Risk Sites That Need This Most:
Community forums and discussion boards face extreme user management challenges because they allow public registration by design.
Attackers create seemingly legitimate member accounts. Through normal participation over weeks or months, they slowly build a good reputation.
Then they find ways to turn their account from a regular member to a full-fledged administrator.
Once inside, they access private messages between all members and reveal email addresses for spam campaigns. The worst thing is that they inject malware that affects every forum visitor.
The slow build attack is difficult to prevent without activity monitoring. Regular members don’t raise suspicion until it’s too late.
☐ Clean up your plugins (4 minutes)
96% of WordPress security vulnerabilities arise from plugins, not WordPress itself.
As mentioned, the WordPress core is rock solid. The WordPress team fixes vulnerabilities within hours of discovery. Only 7 core vulnerabilities were found in the entire year of 2024.
But your plugins? That’s what the attackers are concentrating on. Each plugin you install adds code from different developers with different security standards.
Some plugins are abandoned, others have sloppy code, and some contain hidden backdoors. Your plugin collection is your biggest security risk.
Manual approach:
Go to Plugins » Installed plugins and count them. For me, the average WordPress site runs 20+ plugins. So the first thing you need to look at is the total number of plugins you have.
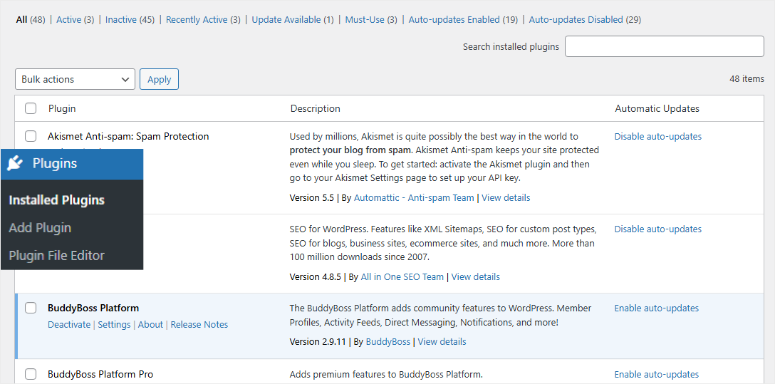
Next, sort your plugins into three categories.
- Important plugins take care of security, backups, SEO and core functions without which you cannot work.
- Practical plugins provide additional convenience, but are not critical.
- Unused plugins just sit there collecting dust.
After sorting your plugins into the categories above, delete anything that is not being used within 3 months. Do not deactivate. Delete completely.
Inactive plugins can still be exploited. The code is located in your directory, where attackers can directly access vulnerable files even when disabled.
Next, go to your “nice to have” list and look for the following red flags.
- Last update within 6 months means active maintenance. Over a year old? Security nightmare waiting to happen.
- WordPress compatibility is important. Incompatible plugins often have unpatched vulnerabilities.
- User reviews should be 4+ stars with recent positive feedback. Scroll through and look for safety complaints.
- An install count over 10,000 means community testing. More users means security issues are reported and resolved faster.
- The responsiveness of the developer shows a person’s home. Check if they answer support questions. Abandoned plugins are ticking time bombs.
If you spot any of these red flags, replace them immediately. Also, enable automatic updates for trusted essentials.
Keep manual updates for page builders as automatic updates can break your website in this case. Above all, remember to update your plugins during off-peak times to avoid downtime.
Theme security works in the same way as plugin security.
This is because abandoned themes cause the same vulnerabilities as abandoned plugins.
In the same way, delete old, unused themes completely and keep your active theme up to date. Default WordPress themes can be retained because WordPress.org manages them.
Remember to make sure your active theme has been updated within the last 6 months. Here is a list of modern themes with great user experience and security features to get you started.
Tool Solution: Your current security plugin should do this automatically.
The beauty of most top security plugins is that they are versatile and handle all the basic functions like effectively securing your plugins.
For example, Wordfence scans your plugins using a constantly updated vulnerability database. If problems are found, you will receive specific alerts with severity ratings.
Not just vague “update available” notices, but clear warnings like “This version has a SQL injection vulnerability that is being actively exploited.”
Sucuri’s scanner works similarly, checking your plugins for known threats and highlighting those that require immediate attention.
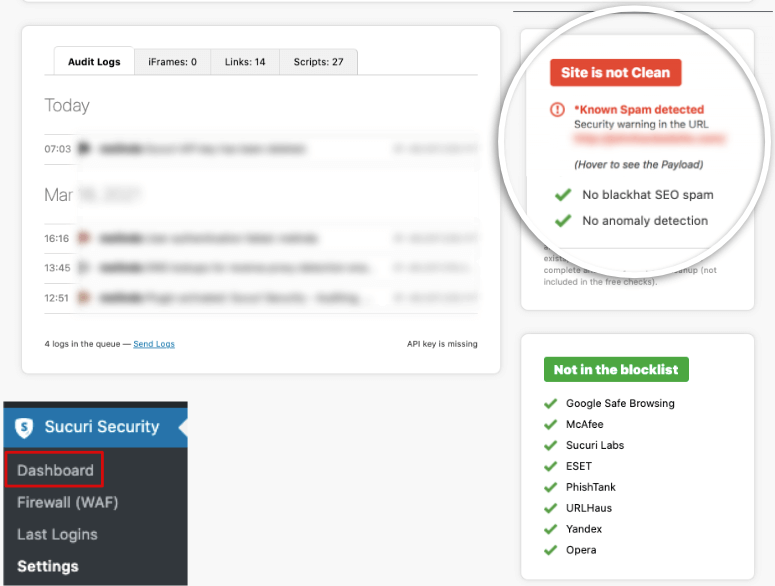
iThemes Security, now Solid Security, also monitors plugin vulnerabilities and can block certain plugin files from running if they are compromised.
On the other hand, All-in-one WP Security takes a slightly different approach and allows you to disable editing of plugins and theme files directly from the WordPress dashboard.
This prevents attackers from modifying the plugin code even if they compromise an administrator account.
As you can see, you don’t need a separate plugin just to monitor plugins. Your main security tool is already monitoring everything.
It checks for outdated versions, known security vulnerabilities, and suspicious code changes. You can go through this list of the best general-purpose security plugins to find out which one is right for you.
High Risk Sites That Need This Most:
Photography and creative portfolio websites typically install numerous gallery, slideshow, and image optimization plugins to showcase work beautifully.
Any special visual plugin adds potential vulnerabilities. Attackers specifically target photography websites to steal high-resolution images for unauthorized commercial use.
A compromised gallery plugin can expose your entire portfolio. Competitors can then download and sell your digital work before they discover the infringement.
☐ Limit login attempts and device access (3 minutes)
As mentioned, WordPress allows unlimited login attempts by default. Attackers can bombard your login page with thousands of password combinations without ever being blocked.
Your security plugin, like Wordfence, already manages basic blocking, but adding a dedicated login restriction creates an additional layer of security.
Additionally, limiting how many devices can access each account prevents credential sharing, creating security vulnerabilities you would never notice.
This move closes the “unlimited attempts” loophole that allows brute force attacks.
Manual approach:
Write custom code in your functions.php file to track failed login attempts by IP address.
Next, create a database table to store the number of attempts and create logic that temporarily blocks IPs after your threshold is reached.
Then manually track which devices each user logs in from, store device fingerprints, and compare new login attempts against known devices. Then finally block access from unrecognized devices.
Sounds complicated, right?
This requires knowledge of PHP sessions, database management and device identification methods. A single coding error will bring your login system to a complete halt and lock everyone out, including you.
Let me show you a simpler approach.
Tool solution: Sucuri Security + WPCode
Sucuri (Free version) includes a login attempt limit that blocks IP addresses after repeated failures. Set your threshold – typically 3 to 5 failed attempts within a specific time window.
Once this limit is reached, Sucuri will block this IP address from fully accessing your login page.
The plugin logs every failed attempt and displays the usernames attempted by the attackers, their IP addresses and exact timestamps.
Attack patterns are emerging – some coming from single IPs testing common passwords, others using rotating proxy networks to try out targeted credentials.
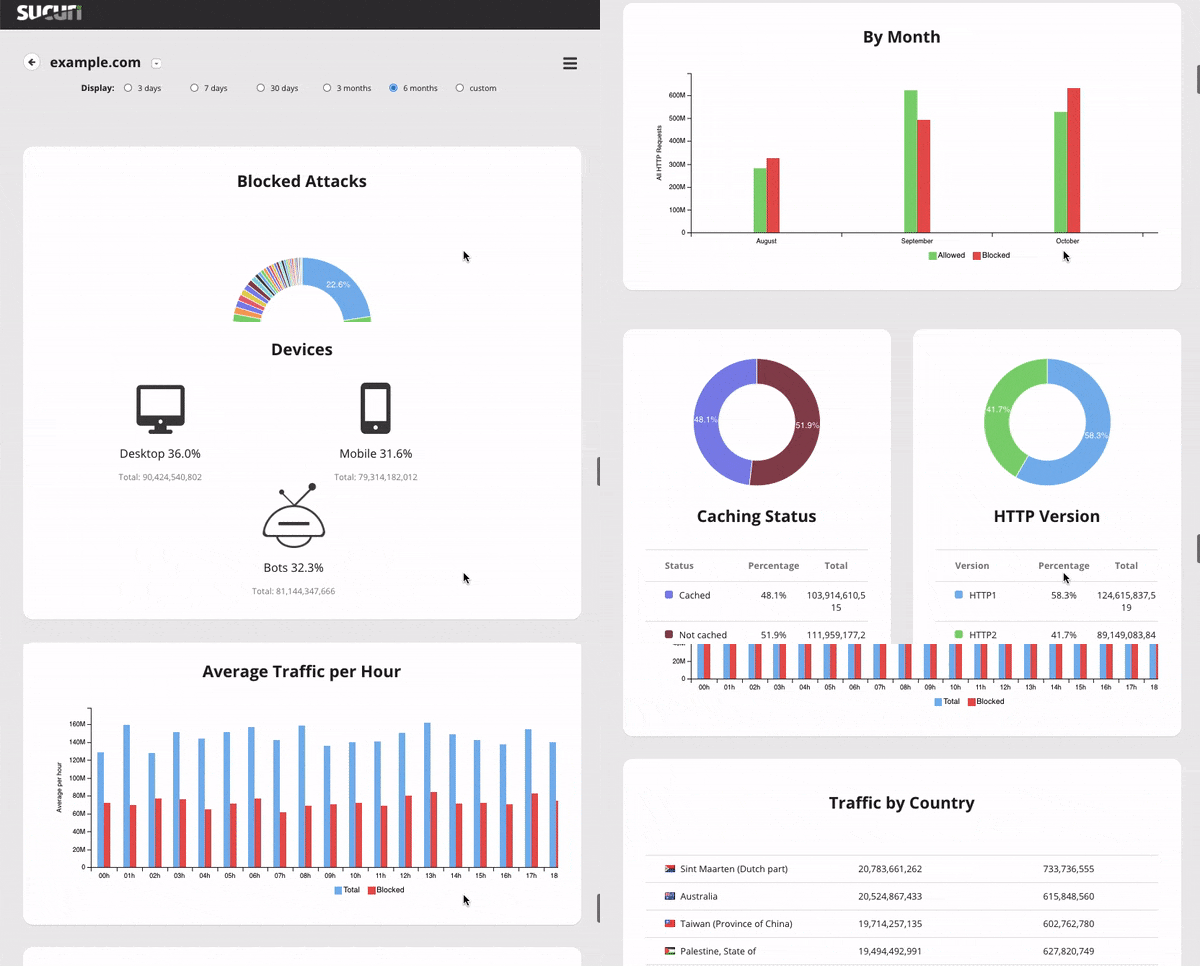
Sucuri blocking occurs at the plugin level before WordPress processes the login request, saving server resources. Failed attempts from blocked IPs use almost no computing power.
Here’s my step-by-step guide to limiting login attempts.
Use on the other hand WP Code for device restrictions.
This allows you to safely add custom code snippets without having to edit theme files.
To restrict users to one device, WPCode provides a code snippet library where you can add device restriction logic that tracks login sessions.
The snippet monitors user sessions and automatically logs out previous sessions when someone logs in from a new device.
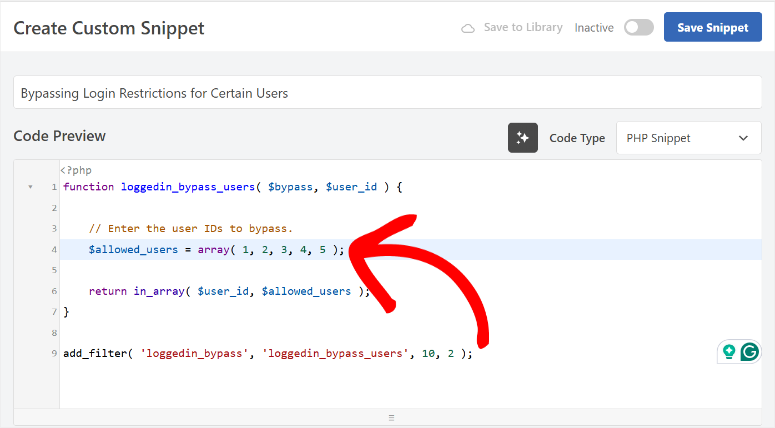
The best part is that you don’t write the code from scratch – you use tested snippets that WPCode securely manages.
If the code has problems, disable it from WPCode’s dashboard without breaking your website. No FTP access required. No crashed websites due to typos in functions.php.
Check out my detailed tutorial on restricting login devices in WordPress. You can also read my WPCode review to see what it can do.
High Risk Sites That Need This Most:
Online course platforms and digital product websites lose huge revenue when customers share login credentials.
Purchasing a course together in a study group means 9 lost sales. In this case, device limits per account prevent this loss of revenue while improving security.
Educational platforms also face regulatory compliance issues when sharing credentials.
If your terms of service prohibit account sharing but you don’t technically enforce it, you’re relying solely on the honor system.
Again, device restrictions provide technical enforcement that Terms of Service cannot provide.
☐ Secure WordPress core files (4 minutes)
Since WordPress itself is secure due to all the patches it runs, the real risk is running outdated versions.
Remember that every security patch released by WordPress is public information.
Like you, attackers read the patch notes, reverse engineer the vulnerability, and then search the Internet for websites still running the old version.
This means you don’t just miss out on a security update. They are advertising a known vulnerability that hackers are actively targeting.
To help with this, keep WordPress updated to address these documented security vulnerabilities before attackers find your site.
Let me show you how.
Manual approach:
Go to WordPress and select Dashboard » Updates. Then click through, check available patches and update WordPress core. The process only takes a few minutes if updates are available.
The challenge? Maintain weekly discipline over months and years.
Although WordPress sends you an email when new updates are released, these notifications end up in your inbox along with newsletters, customer emails, and spam.
You see “WordPress 6.4.3 now available” and think, “I’ll take care of that tonight.” Then you forget it.
You can support email notifications by setting up weekly calendar reminders. Set aside 15 minutes every Monday morning specifically for WordPress maintenance. Treat it like any other recurring appointment.
Always remember to maintain absolute discipline if you want to update your core files manually.
Tool solution: Easy Updates Manager (free)
Simple update manager Fixes the “forgetting to update” issue that leaves websites vulnerable for months.
First, it has an automatic minor updates feature that installs security patches as soon as they are released.
For example, smaller updates like WordPress 6.4.1 to 6.4.2 only contain security fixes and bug patches that Easy Updates Manager processes automatically and without your intervention.
However, for larger WordPress updates, use the Manual Approval Large Updates feature instead. This allows you to control large feature updates yourself, reducing the risk of something breaking.
Major updates like WordPress 6.4 to 6.5 introduce new features that may conflict with your theme or plugins.
So, with this feature, you can test the new WordPress update on a staging site first before pushing it to your main site.
Remember to use a reliable staging plugin or your host’s staging environment so that your original website is replicated properly.
High Risk Sites That Need This Most:
Restaurant and hospitality websites with online reservation systems face critical security requirements.
Breach shows exactly when VIP customers or celebrities want to dine, leading to privacy breaches and real physical danger.
Paparazzi monitor restaurants using leaked reservation data. Stalkers follow the movements and eating habits of celebrities. Thieves target burglaries when celebrities are found to be eating out.
Beyond names and times, leaks reveal dietary restrictions, health conditions, phone numbers, no-show credit card information and private party notes.
☐ Clean and protect your database (2 minutes)
Your database is the vault where everything resides.
It includes every post you’ve written, every user account and password hash, every plugin setting and configuration, every comment, every image metadata, and every custom field.
Hackers target databases because a successful attack gives them everything at once. You don’t have to search through individual files. The database hands them your entire website on a platter.
Additionally, database attacks are often invisible. Your website looks normal and pages load smoothly. But attackers are quietly extracting user data or inserting malicious content into posts.
Manual approach:
You will first need to access your site’s database directly from your hosting control panel. This gives you the ability to manually edit database tables and run cleanup commands yourself.
Additionally, you can navigate through phpMyAdmin and check for bloated tables. Here you can write SQL queries to delete spam comments or optimize table structures.
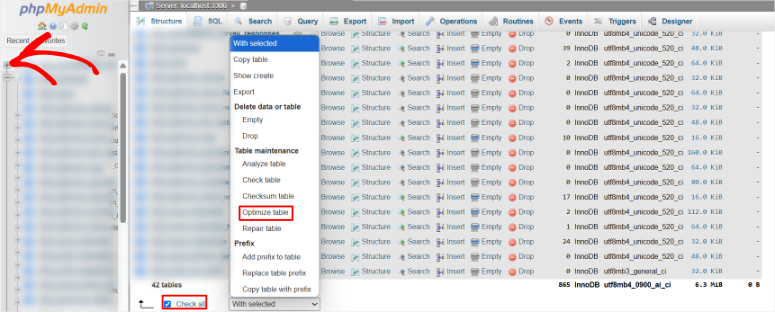
The problem? Databases are merciless!
There is no undo button. One wrong command will delete all your posts. An incorrectly entered table name will delete any user account. A single typo irrevocably ruins months of work.
Additionally, working directly with databases requires understanding complex technical concepts. Most beginners feel lost as soon as they open the database interface.
Because all you see are strings of cryptic data with no clear explanation of what does anything.
It’s risky. Therefore, use the manual approach only if you have developer experience. If you do, follow my detailed guide on cleaning your WordPress database for complete instructions.
I’ll also show you how to delete unused files in your database if you notice files that pose a security risk.
Tool solution: WP-Optimize
WP-Optimize solves the “bloated database” problem that both slows down your website and creates security vulnerabilities.
Additionally, the spam comment removal feature deletes thousands of spam comments that are cluttering your database. Spam comments create vulnerabilities in your database that hackers exploit to inject malicious code.
This optimization plugin also helps with post-revision cleanup and removes old draft versions that WordPress automatically saves.
Every time you save a draft, WordPress creates a new database entry. After a year, you might have 50 revisions of a single post. The plugin keeps your three most recent revisions and deletes the rest.
The best part is that WP-Optimize is easy to use and most database optimizations are enabled with a checkbox.
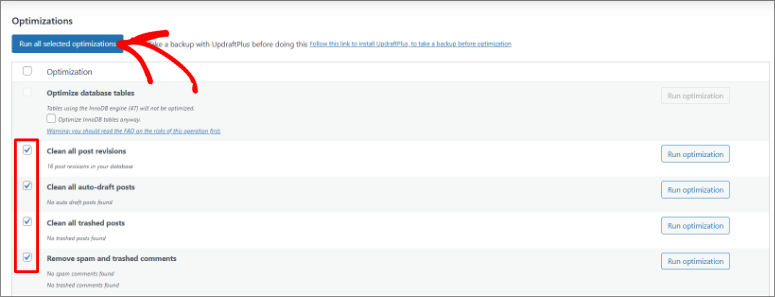
In short, database optimization cleans up and compresses your data. Your website will load faster and require less storage space.
In addition to WP-Optimize, there are other database tools for cleaning and optimizing your website.
High Risk Sites That Need This Most:
Job boards and career platforms maintain databases with thousands of resumes.
This information includes full names, addresses, phone numbers, employment history, salary expectations and more.
This concentrated personal information makes construction sites prime targets for identity theft. A database breach exposes the entire professional history of hundreds of job seekers.
Criminals use this data for sophisticated phishing attacks. They pose as recruiters to steal banking information to “set up direct deposit.”
Resume data sells at premium prices on dark web markets because it is so complete and up-to-date.
Extended protective layer (8 minutes)
You are now more secure than 80% of WordPress sites. Here you can actually stop your WordPress security optimization and be sure that you are protected. But you can do even more!
These advanced measures provide additional monitoring and protection against sophisticated attacks. Think of this as an upgrade from a simple alarm system to a comprehensive security system.
☐ Add a Web Application Firewall (3 minutes)
A web application firewall sits between your website and any visitors who want to visit it. Think of it like a bouncer at the entrance to a nightclub.
Every request that tries to reach your website is checked first. Legitimate visitors are redirected immediately, while malicious traffic is blocked before it ever touches your server.
This is important because attacks consume your server resources even if they fail. Without a firewall, your hosting server will waste energy processing thousands of malicious requests every day.
Ultimately, your website will slow down and real visitors will experience delays.
With a WAF, attack traffic doesn’t reach your server at all. Your hosting resources only serve real visitors.
Manual approach:
Log in to your hosting control panel and navigate to the firewall settings. Here you need to write rules that define which traffic patterns to block.
Then create lists of IP addresses to which you want to deny access and update these lists as new threats emerge.
You need to be specific about what types of requests will be blocked while ensuring that legitimate visitors continue to get through.
Always test each rule carefully because blocking the wrong pattern can prevent real customers from accessing your website. One wrong configuration and you could lock yourself out completely.
Remember: To manage this manually, you need to review logs daily, identify new attack sources, and add them to your block list one by one. It never ends.
Tool solution: Cloudflare (free)
Cloud flare Stops attacks before they reach your website, preventing crashes when traffic floods.
With cloud-based filtering, attack traffic never reaches your hosting server. Even DDoS attacks that send 100,000 requests per second to your website are absorbed by the Cloudflare network.
This means your server only receives legitimate visitor traffic.
Additionally, the global CDN network caches your static content in over 300 data centers worldwide. This will make your website faster while blocking attacks.
Cloudflare offers another way to get an automatic SSL certificate in addition to those discussed above. This will give you a backup SSL certificate even if your host’s certificate expires.
Your website remains encrypted during certificate renewal periods.
The best part is that you can easily set up the security rules engine to automatically block malicious traffic patterns.
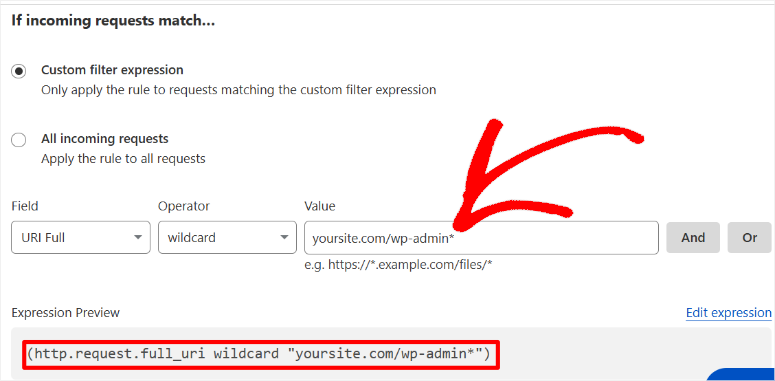
Cloudflare sees billions of requests on millions of websites every day. So when new attack patterns emerge, the network detects and blocks them before attackers reach your website.
Here’s a guide to help you set up Cloudflare and optimize your website for security and performance. You can also find other firewall plugins here that you can also use instead of Cloudflare.
High Risk Sites That Need This Most:
WordPress-based SaaS and web application platforms often face coordinated attacks that attempt to exploit API endpoints and user authentication systems.
Without a firewall, attackers will flood your website with millions of login attempts. They test millions of stolen username and password combinations to hijack user accounts.
These attacks consume server resources even if they are unsuccessful. Your website will slow down and real users will experience timeouts and errors.
During critical business hours, performance suffers and drives away real users. This results in your paying customers being unable to access their accounts and a flood of support tickets.
☐ Set up malware scan (4 minutes)
We already talked about using a malware scanner above.
But now that we’re talking about advanced WordPress security, it’s important to know that a single scanner or scan doesn’t catch everything.
Different scanning tools look for different threats. Wordfence might miss something that catches Sucuri. Google’s scanner detects problems that transcend both.
Think of it like getting a second medical opinion. Your first doctor may be excellent, but a different perspective reveals things the first missed. Malware scanning works the same way.
Using multiple free or premium scanners together creates layers of detection. What one misses, the other finds.
Manual approach:
Download any file from your website via FTP. Then open them in text editors and scan the thousands of lines of code for suspicious patterns.
Your website contains thousands of files and malware hides as real code. A file scan takes 10 minutes, making manual malware detection a full-time job that still misses most threats.
As you can see, this is not practical at all, no matter how experienced you are. Therefore, I always recommend scanning tools.
To ensure you find a good combination of malware scans, I provide you with a short list of manual and premium malware scanning options.
Tool Solution: Free and Premium Malware Scanners and How to Combine Them
1. Free IsItWP Security Scanner – 100% Free
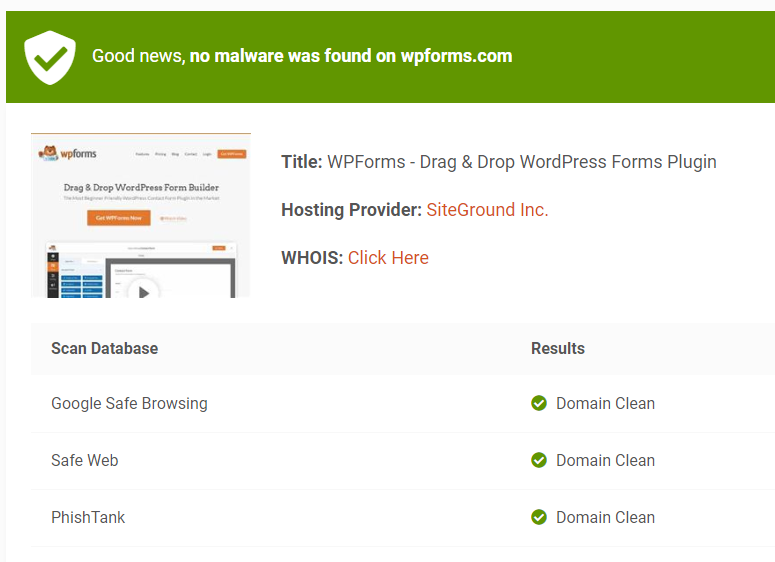
IsItWP’s free security scanner scans your entire WordPress site for malware, vulnerabilities, and security issues in seconds.
All you have to do is enter your URL and get instant results showing malware detection, blacklist status, outdated software and security misconfigurations.
No plugin installation is required. The scanner runs externally, so your website won’t slow down while thousands of files are checked for threats.
2. Google Search Console – 100% free
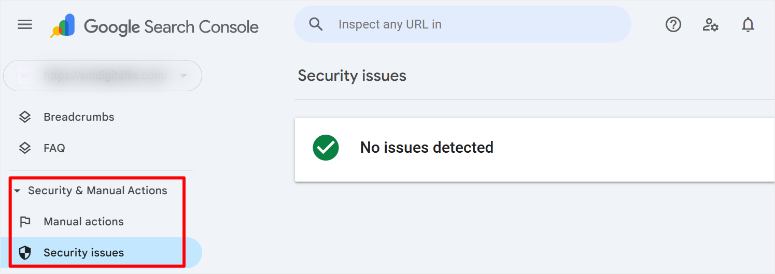
Google Search Console continuously monitors your website as part of Google’s crawling process; You don’t need to set anything up.
If Google detects malware, phishing attempts, or hacked content, you’ll receive instant email notifications. The Security Issues report shows exactly what Google found and which pages were affected.
3. Sucuri Security – Free, with premium version

Sucuri’s free plugin provides basic security hardening and activity monitoring, helping you track changes on your website and implement recommended security settings.
On the other hand, the premium SiteCheck scanner offers cloud-based malware detection that runs externally without consuming your server resources.
You will also receive professional human cleanup if your website becomes infected. Premium includes a website firewall that blocks attacks before they reach your server, as well as priority support from 24/7 security experts.
Check out my updated Sucuri review here.
2. Wordfence Security – Free, with premium version
Wordfence free scans your website daily for malware by comparing files with official WordPress versions to detect unauthorized changes and known malware signatures.
With Premium upgrades, you get real-time threat intelligence that updates within minutes of new threats being discovered, instead of waiting 30 days.
You also get country blocking to stop traffic from high-risk regions, two-factor authentication for all user accounts, and advanced firewall rules that adapt to new attack patterns.
For more information, see my latest Wordfence.
3. MalCare – Free, with premium version
The free version of MalCare offers a basic security scan that checks your website for common vulnerabilities and configuration issues.
The premium version offers external malware scanning that takes place on MalCare’s servers rather than your servers, preventing performance degradation during scans.
Get automated one-click malware removal that cleans infected files without affecting functionality. In addition, scanning the database makes it possible to detect malicious content injected into posts and comments.
Premium includes staging site environments to safely test updates before they go live.
These 5 malware scanners are best for detecting malware in different ways. But as mentioned, you need to combine them to have a better chance of nothing falling through the cracks.
How to combine malware scanners
Combination of free scanning tools
First, run IsItWP’s external scan weekly to detect threats from outside your network. Remember that malware often remains hidden from internal scanners but reveals itself during external inspections.
At the same time, Google Search Console continuously monitors in the background. Set it up to notify you when Google detects problems while crawling.
Finally, Wordfence Free allows you to run daily internal file scans and compare your WordPress files with official versions. This three-layer approach intercepts threats from multiple angles and costs nothing.
Combination of premium scanning tools
Combine Wordfence Premium with Sucuri’s cloud scanner for enterprise-grade protection. Wordfence provides real-time threat intelligence updates within minutes of detection.
Additionally, internal malware scanning with instant notifications.
On the other hand, Sucuri adds cloud-based external scanning that detects threats that Wordfence misses. You also get professional human cleanup when malware breaks through.
Alternatively, you can combine MalCare with Wordfence Premium to perform offsite scanning that does not consume server resources.
With either combination, you get internal monitoring, external review, automated cleanup, and real-time threat updates.
Here is a list of the best malware scanners you can use for WordPress.
High Risk Sites That Need This Most:
Nonprofit and charity websites that accept online donations are facing malware attacks aimed at redirecting donation payments to accounts controlled by attackers.
These attacks silently alter payment pages so that donations go to criminal accounts rather than to your charity. Everything looks normal to the donors. They receive confirmation emails and think their money helped your cause.
Months later, they discover that their $10,000 donation (in anticipation of a tax deduction) never reached your organization. It went to criminals.
Ultimately, charity regulators investigate when financial records don’t match and your nonprofit status is called into question.
You are at risk of losing your tax-exempt status. Donors permanently lose trust even though you were the victim.
☐ Add advanced login protection (2 minutes)
We’ve already talked about how to create strong passwords and then store them in your password manager. We also looked at two-factor authentication, which protects your login using codes from your phone.
This combination blocks 99% of login attacks because bots cannot guess your password. Even if they steal it somehow, they won’t be able to access your phone for the second authentication code.
But here’s the thing: attackers still know where to find your login page. Every WordPress site uses /wp-admin by default. All bots have to do is continually hammer that URL onto millions of websites.
Now let’s look at another simple layer that completely hides your login page and makes it invisible to automated attacks.
Manual approach:
Open your website’s functions.php file and write custom code that redirects the default login URL to something hackers can’t guess.
So instead of “Yoursite.com/wp-admin” it’s something like “Yoursite.com/random-charecters” or “yoursite.com/backend-access”.
Then add rules that track login attempts by IP address. Then create your own system to block repeated errors.
The problem? A typo in functions.php will cause your entire website to crash and display a white screen of death. Your website is down. You cannot access the admin area to troubleshoot the issue.
You’ll need to establish an FTP connection and manually edit or delete the faulty code to get your website back online.
You also need to understand PHP syntax, WordPress hooks, and redirection logic. Most beginners don’t know where the functions.php file is or how to safely edit it.
Tool solution: WPS Hide Login (free)
Hide WPS login helps you change your login page URL from the same predictable login URL that bots constantly attack to a custom one.
You see, the custom login URL feature changes your login page from yoursite.com/wp-admin to any page you choose – perhaps yoursite.com/secure-access or yoursite.com/backend-2024.
The plugin creates a completely custom login path that only you know. Automated attacks can’t find what they can’t see.
Your login page becomes invisible to the bots that search millions of websites for the default wp-admin URL.
Bots still hammer away at /wp-admin looking for your login page, but now they just encounter a 404 error and move on to easier targets.
Important reminder: Save your new login URL to your password manager immediately. If you forget it, you will need FTP access to deactivate the plugin and regain access.
Beyond hiding your login page, you can further improve user login security with dedicated login and registration plugins that add features like social login, custom registration forms, and advanced user management.
Check out my guide to the best WordPress user login and registration plugins for more ways to secure and customize your login experience.
High Risk Sites That Need This Most:
Blogger and influencer websites with large social media followings attract targeted attacks from competitors and trolls who know the identity of the website owner.
Custom login URLs prevent harassment campaigns. Disgruntled followers or jealous competitors try to extort access data collected from social media profiles using brute force attacks.
Remember that public figures are often subject to coordinated attacks when controversy arises. If you post something controversial, others may try to break into your WordPress admin area.
Hiding wp-admin eliminates the easiest attack path in these moments of crisis and ensures attackers cannot find your login page to attack.
Well done! Your advanced and basic protection is now active.
Now let’s look at some common mistakes to avoid when working on WordPress security.
Common Beginner Mistakes (and How to Avoid Them)
“I’ll worry about security later”
- Websites are attacked within hours of going live. Attackers are constantly looking for new WordPress installations.
- Solution: Implement the basics during initial setup. This 40-minute website launch checklist will prevent months of problems.
Use weak passwords everywhere
- Password reuse leads to many interrelated security concerns. A breach on any website will result in all of your accounts using this password being exposed.
- Solution: Password manager from day one. Bitwarden or LastPass. Generate unique passwords for everything.
Too many plugins are installed
- Every plugin represents a potential security vulnerability. The average hacked website has more than 25 plugins running, including several abandoned ones.
- Solution: Monthly plugin audit. Delete anything unused within 3 months. Quality over quantity.
Update notifications are ignored
- 33% of hacked websites had available security updates uninstalled. Attackers specifically target known vulnerabilities.
- Solution: Enable automatic updates for trusted plugins. Manual updates only for complex functions.
Backups are not tested
- 40% of backups cannot be restored if necessary. Untested backups give false confidence in emergencies.
- Solution: Monthly backup restore test. Download a backup package and check if it opens.
Sharing admin credentials
- There is no way to track who made changes or who was compromised. Multiple people using an administrator account hide violations.
- Solution: Individual accounts with corresponding roles. Editor for content manager, not administrator.
Using invalid or pirated plugins
- Premium plugins that are cracked and distributed for free often contain hidden malware backdoors built into the code.
- Solution: Only use official plugins. Pay a premium if necessary. There are free alternatives for most functions.
Panic during incidents
Congratulations! This concludes our WordPress security checklist. If something is unclear, check out the frequently asked questions below.
FAQ: WordPress Security Checklist
How Long Does WordPress Security Really Last?
If you want to complete both the basic and advanced WordPress security processes in one session, my detailed checklist will take you 40 minutes. Most security features run automatically after initial setup, meaning ongoing maintenance takes significantly less time.
Do I have to pay for security plugins?
Free versions meet 95% of personal website security requirements. My recommendation is to use the free versions of Wordfence, Duplicator and Cloudflare to provide solid protection. Upgrade to Premium if your website generates revenue or processes customer data. In this case, real-time threat updates and priority support for corporate sites become valuable.
What happens if my website has already been hacked?
No panic. Rushed decisions make problems worse. First, take your website offline in maintenance mode. Here are some maintenance mode plugins you can use. This protects visitors and prevents further damage.
Second, scan with Wordfence and external scanners like Sucuri SiteCheck to determine the extent of the compromise.
Third, restore from a clean backup created before infection. Your Duplicator backups make this easy with one click.
Fourth, complete the entire checklist to prevent reinfection. Remember that attackers often leave backdoors that allow easy re-entry.
How do I know if my security is working?
Use a malware scanner to check your website and ensure no malware is found during weekly scans. Also check that the backup has completed 100% successfully and email confirmations are received for each scheduled backup.
Ensure there are few failed login attempts after setting up a custom login URL and 2FA, reducing attacks by over 90%.
Most importantly, you won’t receive Google security warnings while browsing your site. At the same time, make sure that no manual penalties appear in Google Search Console.
Which free security plugin is best for beginners?
The free version of Wordfence has over 4 million installs. The tremendous community support means finding answers to problems takes minutes instead of hours. It also includes great documentation for learning security concepts.
The setup wizard will help you install it quickly and make good WordPress security decisions automatically. You don’t need any technical knowledge to get solid protection.
All-in-One Security offers a simpler interface when Wordfence seems overwhelming. Both offer completely free protection.
Can too much security slow down my website?
High-quality security tools like Wordfence and Cloudflare often improve speed. Cloudflare’s CDN makes your website faster while increasing security.
The only problem is that installing multiple security plugins results in duplicate functionality and conflicts, reducing your performance.
The solution is to choose a comprehensive security plugin that meets your needs and stick with it.
How often should I update WordPress?
For smaller updates, you can perform an automatic update within a few hours of release. Although they may be minor updates, security patches must be installed immediately.
On the other hand, major updates for most websites should be completed within 1 to 2 weeks of release. If you have complex custom features, it’s important to test on staging sites first.
- Plugins: Check weekly for available updates. Enable automatic updates for trusted essential plugins.
- Theme: Monthly review unless you are actively developing. Themes change less often than plugins.
Regular updates prevent 33% of successful hacks because most attacks exploit old known vulnerabilities rather than zero-day exploits.
Final Verdict: How important is WordPress security for your business?
WordPress security is no longer optional. It is the foundation on which everything else is built.
And with this detailed security checklist, you’ve just implemented protection that 80% of WordPress sites don’t have.
You now have automated backups to protect your work and real-time monitoring to detect threats before they spread.
Additionally, you have robust login systems that block 99% of attacks and work hand in hand with the professional firewalls you have in place.
The 40 minutes you invested today will prevent the $2,000 cleaning bills, the week of downtime, the loss of customer trust, and the months of rebuilding search rankings after violations.
You have systems in place to protect your investments while you focus on growth.
This is smart business.
Want to make even smarter security business decisions?
These resources transform your security foundation into a complete fortress. Smart business isn’t just about protecting what you have – it’s also about staying ahead of threats you haven’t yet faced.

