As I’ve grown as a WordPress and marketing expert over the years, one thing I’ve seen is the relationship between sales and social proof.
Customers are always looking for evidence that others love what they buy. This reassurance can be the deciding factor between someone hitting “Buy Now” or walking away.
Full disclosure, I love online shopping. As a result, my social media feeds are full of ads, strange but just the way I like it.
But when I see an ad for something I’m interested in, I don’t just click through and buy. I’m closing this ad immediately and google the company name to see what real people say about it.
This habit is not unique to me!
Most of your potential customers do exactly the same thing. They leave your carefully crafted website after landing on your business via SEO or ads to search for reviews on Google, Yelp, or Facebook.
Here’s the problem: once they leave your site, there’s a big chance they’ll find a competitor with better reviews and never return to your site.
What does that mean?
You essentially paid to send customers to your competition!
This despite having a beautiful website, great content and even cheaper prices.
What’s worse, as people quickly leave your business website, your bounce rate can increase, which can further impact SEO, resulting in even fewer page visits and ultimately sales.
With my own buying process, I realized that I needed to bring social proof directly to my pages instead of forcing people to search for it.
But social proof wasn’t enough for me; I needed the reviews and testimonials to come from reliable sources for more credibility. Check sites like Google and Yelp.
After testing dozens of review embedding methods, I discovered three reliable ways to showcase your Google and Yelp reviews directly on your WordPress site.
I’ll walk you through each method, from a quick manual approach to automated solutions that update themselves.
In the end, you’ll keep visitors on your site and give them the social proof they need to buy with confidence.
What you learn:
- How to manually embed individual reviews (quick but limited)
- The breakthrough no-API method that works in 60 seconds
- Advanced API setup for unlimited verification sources
- Drag-and-drop solutions for landing pages
- Which method suits your technical skills and business needs
Why embedding reviews on your WordPress site is important
The numbers behind customer review behavior tell a powerful story. When I started tracking analytics for client websites, I was shocked to see how many visitors stopped returning to websites without social proof.
Understanding these patterns changed the way I approach the user journey by understanding exactly what they need.
Here’s what the data reveals about your customers:
- 95% of consumers read online reviews Before making a purchase decision
- Showing just 5 reviews increases conversion rates by 270% Compared to products without reviews
- 88% of people trust online reviews As much as personal recommendations from friends
- 67% of customers read between 1-6 reviews before they feel confident enough to buy
- 91% of people check reviews at least monthlyyounger customers checked even more frequently
- 81% start their research on Google Reviews firstThen go to other platforms like Yelp or Facebook
- Mobile users are 46% more likely Reviews on their phones before purchasing, even when shopping in physical stores
When customers leave your site to find reviews, play with their attention. The average person visits 2-3 review sites before making a decision.
As a result, every click from your website is another chance for them to discover a competitor with better reviews or compelling social proof.
How to Display Google & Yelp Reviews on Your WordPress Site (API + NO-API Methods)
Now that you understand the power of displaying reviews and testimonials, let me walk you through the best ways I have to embed them in WordPress.
I will walk you through 3 different methods so you can choose the one that works best for you. If you want to read about a method directly, hit the links below.
With that said, let’s get into it.
Method 1: Balloon without API key (my favorite no-hasle method)
Yelp made things difficult for small businesses in 2024 when they started charging for API access.
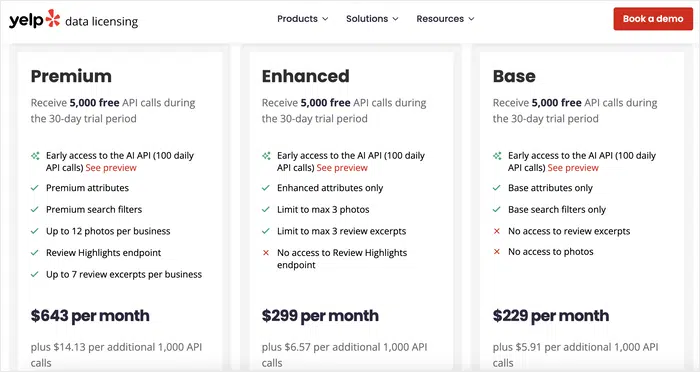
Aside from the usual technical steps like creating a Google Maps project, verifying billing accounts, and navigating confusing dashboards, you now have to deal with additional costs to view your own reviews.
Google’s API isn’t much simpler. You still need to create a project, enable billing, and provide credit card information. These are steps that can feel overwhelming if you’re not technical.
I have stopped so many business owners right there. The idea of paying for API access alongside setting up credit cards and developer accounts for API access feels like too much. And honestly, I don’t blame them.
That’s why Smash Ballon’s no-API feature felt like a game-changer!
It completely bypasses all of these traditional roadblocks. The best part? You can set up review feeds in about 60 seconds. No developer accounts, no credit card requirements, no surprise bills.
What used to take 2 to 3 hours to configure for a client now takes less than a minute.
As a result, I can focus on design and strategy rather than wrestling with technical setup, and my clients receive their reviews almost instantly.
In addition, this function also works on the Free version by Smash Balloons Reviews Feed Plugin. This makes this feeds plugin perfect for small businesses.
But as a downside, reviews update once a week. So it’s not completely automatic, but for most smaller sites that’s more than enough to keep social proof fresh and visible.
As you grow and start collecting more reviews, you can always switch to the traditional API method for faster updates. A method that I will also discuss in this post.
But for starters, let’s get set up in the Smash Balloon No-API Yelp and Google Reviews.
Step 1: Install and set up Smash Ballon.
Well, although Smash Balloon Feed Free Reviews Can help you set up assessments without APIs. For this review I will be using the Pro version.
This way I can show you everything you can do with this social proof plugin.
Go to first Official Smash Balloon website and choose a plan.
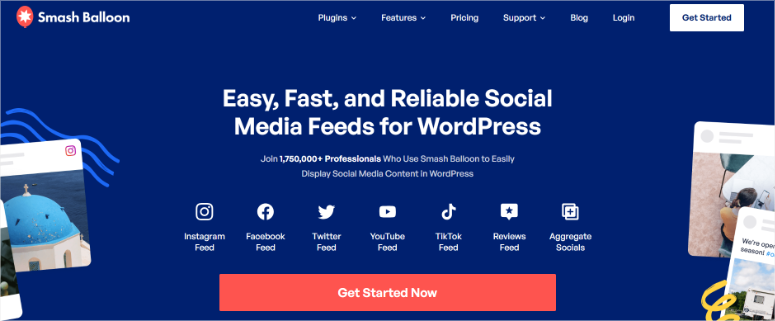
Here you can get that All access bundles from Smash Balloon, which contains feed plugins for InstagramPresent FacebookPresent TiktokPresent TwitterPresent YouTubeAnd Reviews in one.
Check out my Smash Balloon reviews to see what each plugin contains.
Alternatively, if you just want to show reviews, go with that Reviews Feed Pro.
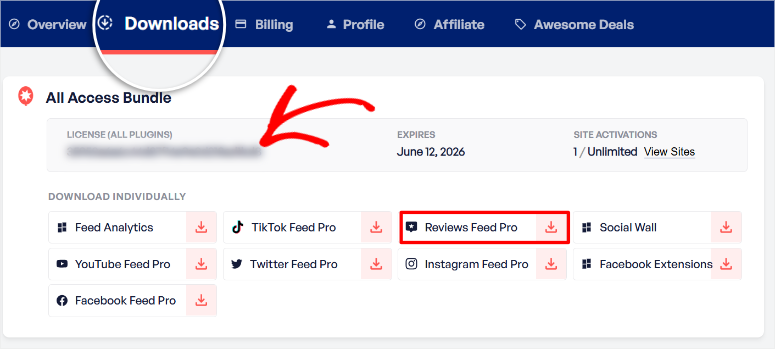
Once you have purchased the plugin, log in to your Smash Balloon dashboard and navigate to Downloads. Depending on the product you purchased, you will see different download options.
So, find the Reviews Feed Pro tab and download the plugin archive file on your PC. Also copy the license key on this page. You will need it later to activate the Pro version.
Now go to your WordPress dashboard and navigate to your Plugins »Add new plugin. Upload the plugin file, click “Install” and then Activate.
If you have problems, check out my tutorial on installing a plugin.
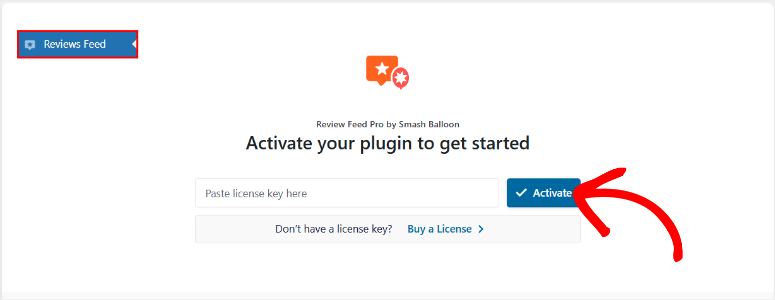
Once activated, you should see a new menu option in your WordPress dashboard called “Reviews Feed”. Select it to open the License keyboard page, then paste the code you copied earlier.
Finally meet Activateand you should have reviews of Smash Balloon Feed Plugin fully installed.
Next, let me show you how to create your review feeds.
Step 2: Connect review feeds to Yelp and Google Reviews
Once Smash Ballon is activated, you will automatically be directed to the Smash Ballon dashboard where you can build your first review feed. On this page, select the “+New New” button.
Alternatively, you can also open up Reviews Feed »All feeds Head out of your dashboard and click the “New New” button. This leads you to the same point.
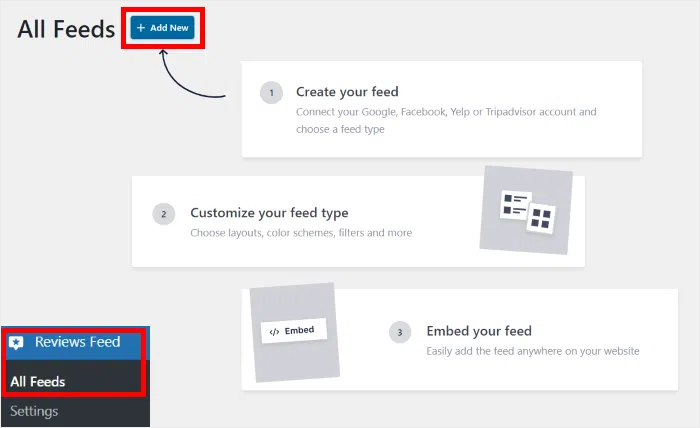
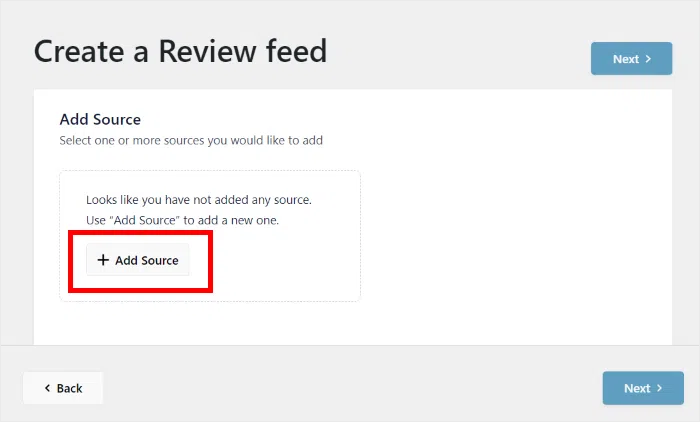
On the next page, select “Add Source” to open all review site options you can use with Smash Ballon, such as Facebook, Yelp, TripAdvisor, TrustPilot, and more.
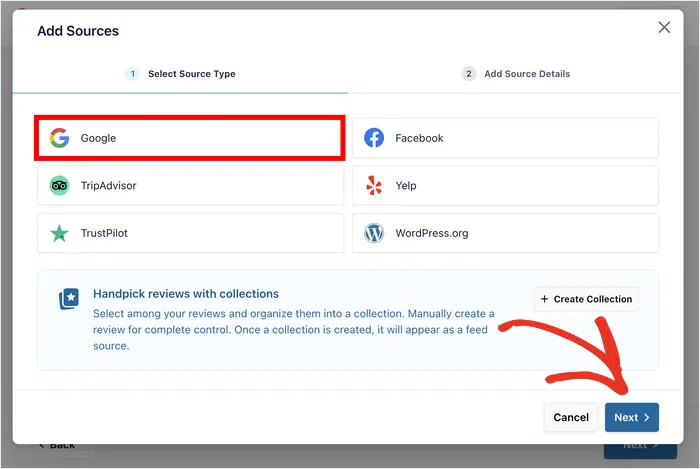
Then, in this pop-up window, select “Google” as the source and click “Next” to proceed to the next page.
On this page, all you have to do is enter your Google Place ID and press finish.
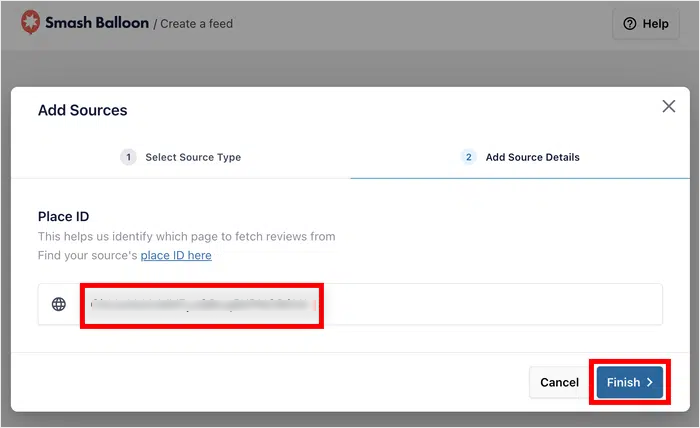
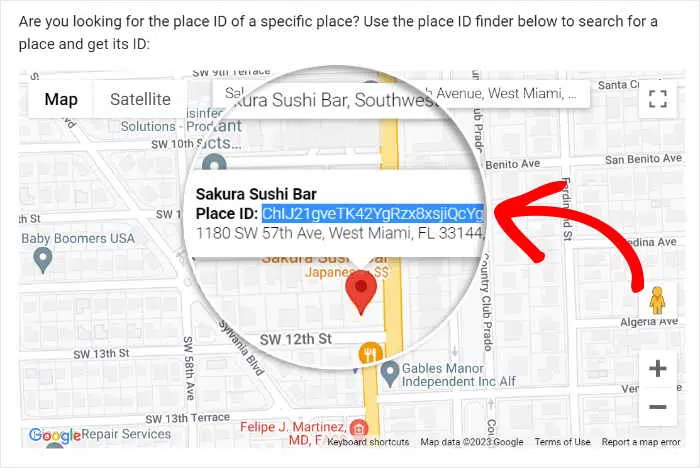
Now if you don’t know how to find your Google Place ID, don’t worry, it only takes a few seconds to find it.
Find your Place ID by searching for your business on Google Maps. The URL contains a long string after “location/” that represents your unique business description.
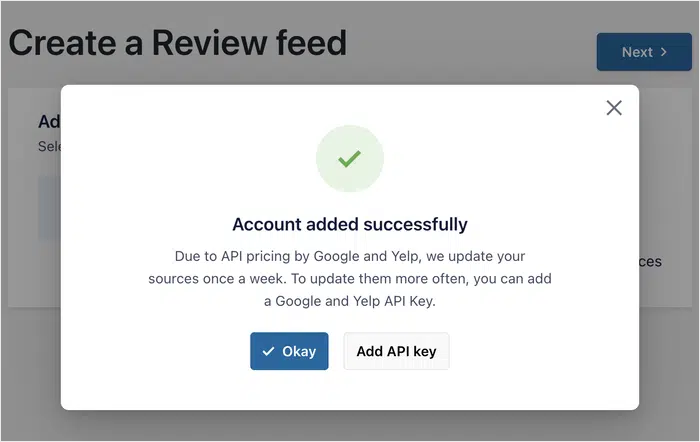
Once you’ve inserted your Google Place ID, you should see a confirmation screen showing you that your account has been added successfully.
At this point, your review feeds will be updated once a week. However, you have the option to add an API for automatic review updates. More on that later.
What if you want to add Yelp reviews?
They follow exactly the same process. Only this time, on the Add Sources page, you’ll select Yelp instead of Google.
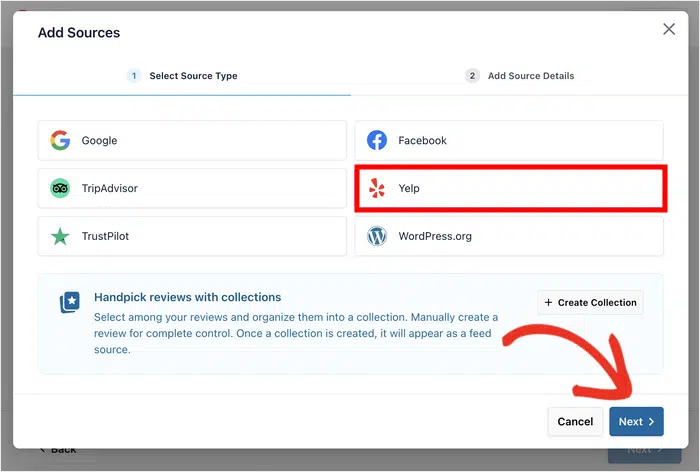
Then, on the next page, you’ll simply add your store’s Yelp URL as it appears in your browser.
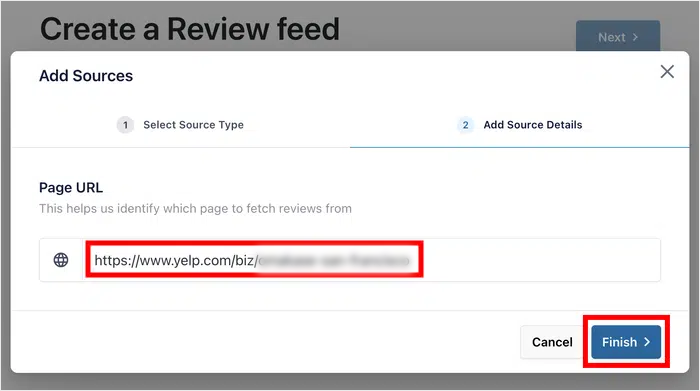
After that, you will receive the same confirmation message that you would see if you add Google Reviews using Smash Ballon without an API.

Once your Yelp or Google business account is complete, select Next At the end of the screen you will move on to the next step, creating your reviews feed.
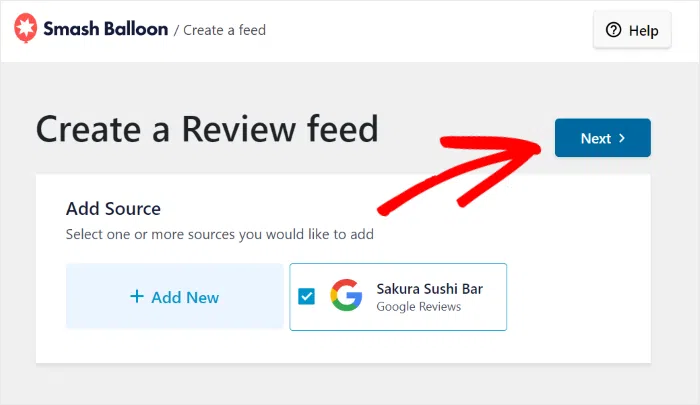
Step 3: Create Google and Yelp Review feeds
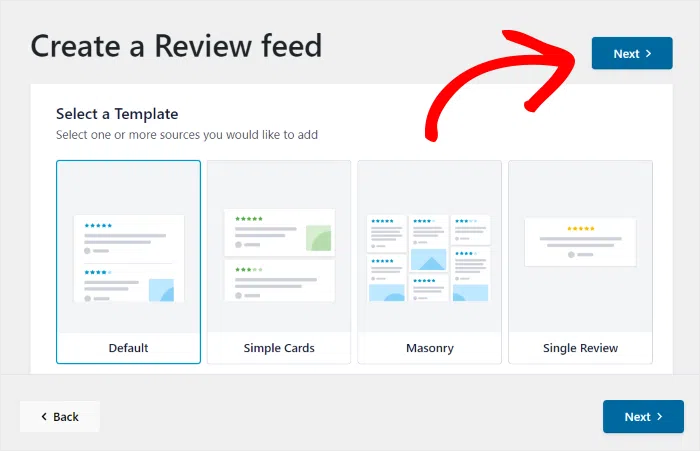
Next, you need to select a feed template. Smash Balloon comes with templates like simple cards, masonry, carousel and more.
To make your selection easier, each template comes with a quick preview so you can see what the reviews look like on a live site.
Choose the one that best suits your website and press “Next”.
This opens the Smash Balloon Feeds Editor, a simple drag-and-drop interface that makes creating feeds super easy.
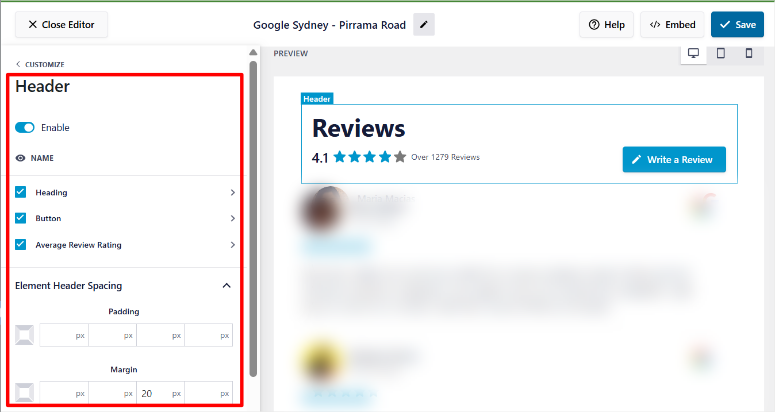
You have this on the left Adjust And Settings On the right, you have the Live Preview window to see how your review feeds are performing as you create them in real time.
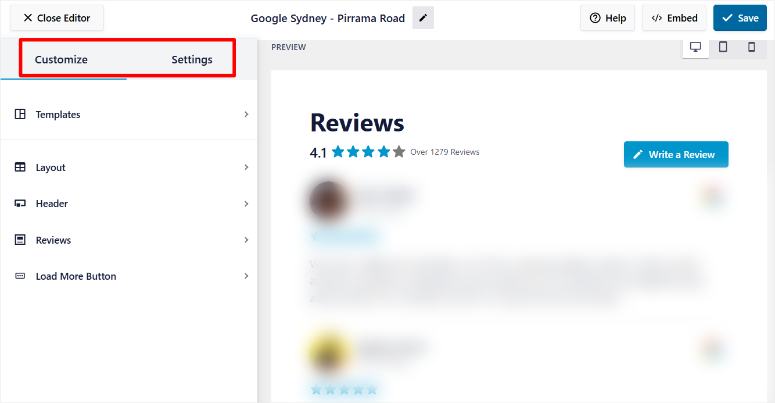
Then under Customization you can change the template and layout even though you had already set it up. This just shows how flexible Smash Balloon is.
But it doesn’t end there. You can customize it Header By adding a button, an average review rating and even the heading itself with a checkbox.
And like all top drag and drop page builders, you can also add margins and padding.
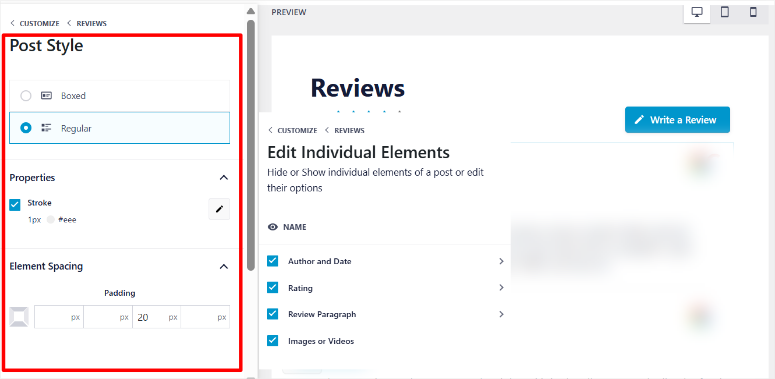
Then in the review Customization option allows you to change the post style between Boxed and Regular with a checkbox. You can change the properties and element spacing.
Apart from that, you can also edit individual elements like author, date, reviews and more.
To keep your users in the reviews longer, you can add a loading button that creates the infinite scroll effect.
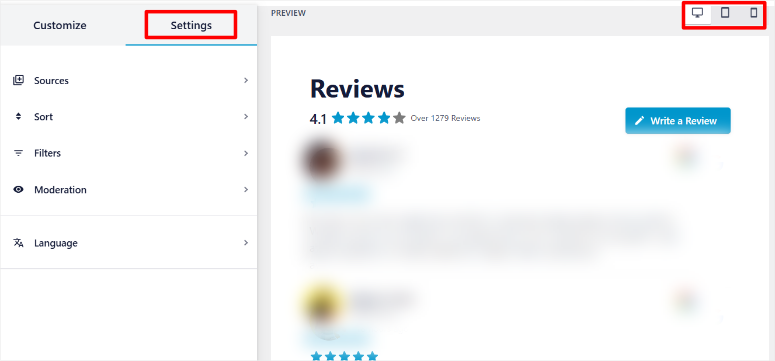
The best part is that you can see how the reviews search for different screen sizes by selecting the PC, tablet, and phone icons in the right corner of the page.
Next, under the Settings tab you can:
- Change sources
- Sort reviews by date, rating or randomize
- Filter by star rating
- Filter by words so that it contains words or not.
- Also filter by character number and set the minimum and maximum character limit.
- Moderate the reviews added to your feed.
Once you’re done, all you have to do is customize your review feed and all you have to do is select Save In the top right corner you are ready to add it to your website.
Step 4: Add your reviews feed to your website
The plugin automatically fetches your reviews and creates a shortcode that you can embed anywhere on your website.
To add it to your website, Smash Ballon gives you 3 options so you can choose one that you find easiest.
First, select the Embed button in the top right corner again. At this point you will see a pop-up with all 3 embed options.
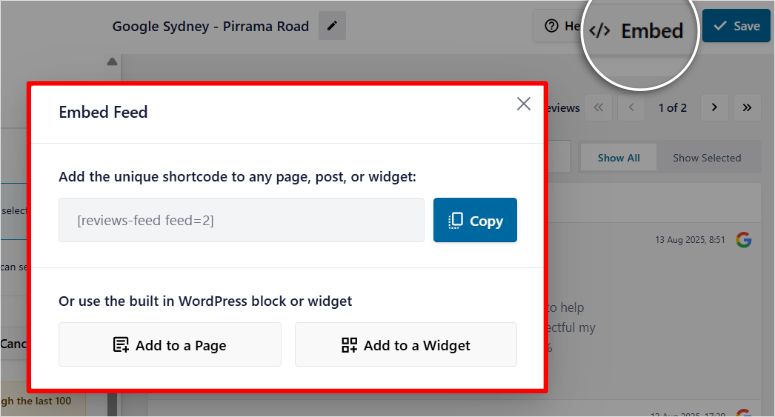
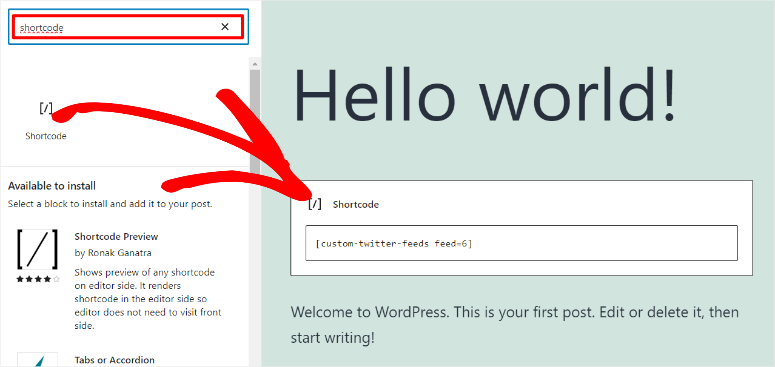
1. You can use the shortcode
This method allows you to add the review feed to a page, post or widget area. To use the shortcode, open a page or post. Then use the search bar to find the shortcode block.
After that, drag the shortcode block where you want to display the review feed. Finally, paste the shortcode into the block and click Save.
2. You can add the option to page option
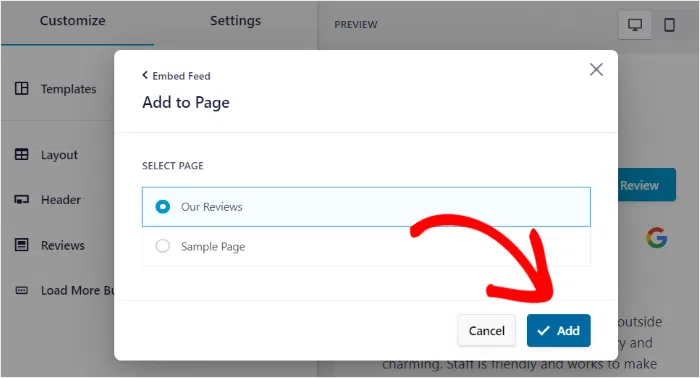
Once you select this option, a list of all pages will appear on the next screen. Use a check box to select the page you want the review feed to display.
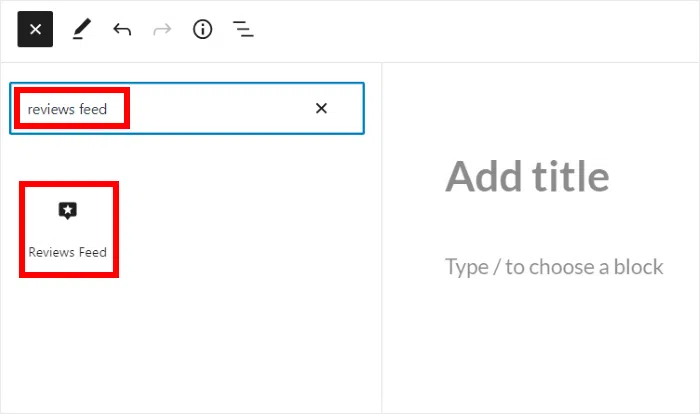
On this page, use the search option to find the review feed block. Again, drag and press the block where you want to display the review feed and click Save.
3.. You can add the option to Widget option
This option takes you to your widget list. That means Appearance »Widgets In your WordPress dashboard.
On this page, use the search bar to find the Reviews Feeds block. Drag and drop to desired widget position.
Finally met Save. All of these methods are super easy and won’t distort how your reviews feed will look. In the end, your review feed should look like my example below.
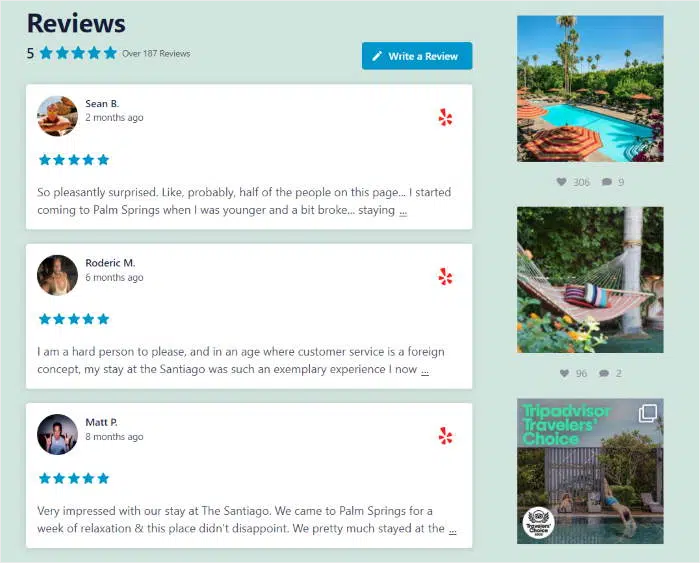
The best part is that you can add multiple feeds on the same page. This means you can add both the Yelp and Google reviews on the same page to make it look like my example below.
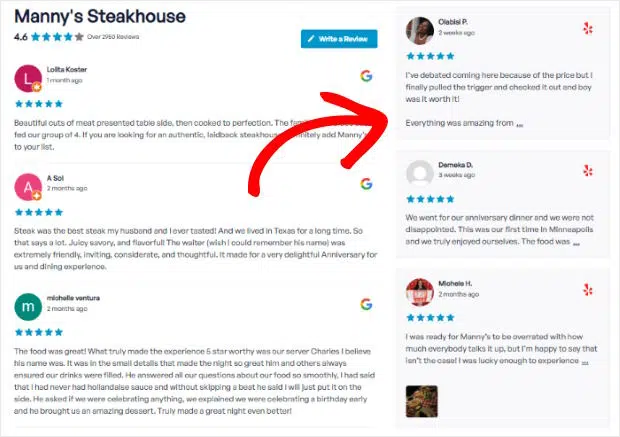
That’s it! You can now add Google and Yelp reviews to your WordPress site in minutes. Plus, you can do this with the free version of Smash Ballon’s review feeds.
Advantages and disadvantages of the no-API method
Before choosing the no-API verification feeds method, you must fully understand the benefits and limitations.
Here’s what you need to know:
| professionals | Disadvantages |
|---|---|
| 60 second setup with just a URL or a location ID | Limited to a maximum of 50 reviews per feed |
| Zero API fees or subscription costs | Weekly update schedule vs real time |
| No credit card or billing account required | Cannot combine multiple store locations |
| Perfect for non-technical users | Fewer customization options than API method |
| Works out of the box without developer accounts | No historical review data beyond recent posts |
| Eliminates API key expiration issues | Limited to one review source per feed |
This method is great for small to medium-sized businesses that want to showcase their best reviews without any technical complications.
The limitations only come into play if you are running a large operation with multiple locations or need real-time check updates.
As mentioned earlier, most businesses find that weekly updates provide a lot of fresh content for SEO purposes.
Plus, 50 reviews per feed provide you with more than enough social proof to influence purchasing decisions.
Method 2: Balloon with API key (for advanced users)
As mentioned earlier, the no-API method satisfies most small businesses perfectly. But you may outgrow these limitations and need something more robust.
As a result, real-time updates become crucial for businesses that receive dozens of reviews every day.
This option is great for high-volume restaurants, popular retail stores, and service businesses with active review streams.
That being said, you should consider this approach if you have a business with multiple locations. This comes in handy if you operate restaurants in different cities or run a franchise.
Smash Balloon Review Feeds with an API lets you combine reviews from all locations into a single feed. Additionally, you can add reviews in unique places, like on your order form.
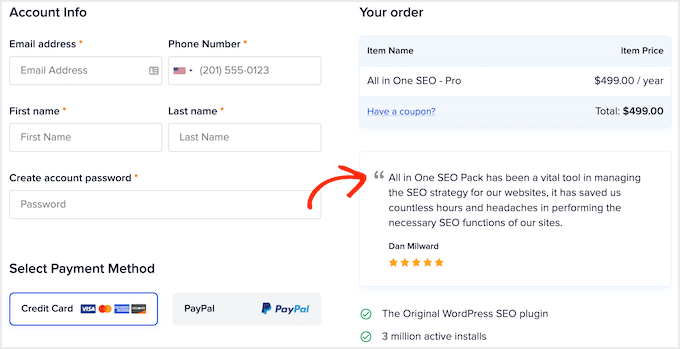
Additionally, enterprise-level customization requires access to full review metadata for advanced filtering and viewing options.
The reason I use Smash Balloon for both the API and non-API methods is that the steps to add a review feed are the same aside from the APIs.
With that in mind, below I will primarily show you how to create and add the Yelp and Google Reviews APIs.
How to get your Google Cloud Console API
Step 1: Set up your Google Cloud console project
First, open a new browser tab and navigate to Console.cloud.google.com. Sign in with your Google account here, or create one if you don’t already have a Google account.
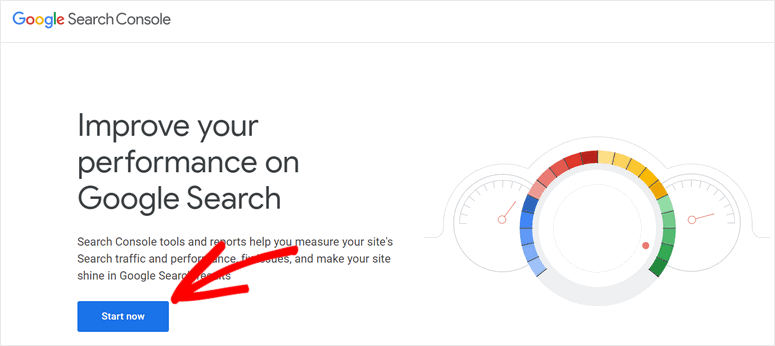
Remember that the Google Cloud Console is free to access and provides the foundation for all Google API services. Next, select the Google Home Drop down at the top of the page to open the Projects popup.
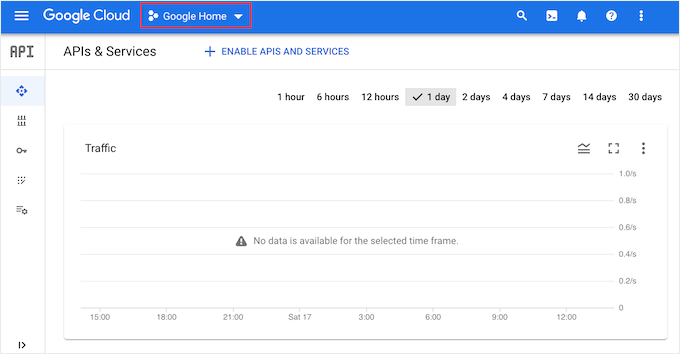
Then select “new project” in the pop-up window to create a dedicated project for your review feeds.

Then give your project a descriptive name like “WordPress Review Feeds” or enter your company name for easy identification later.
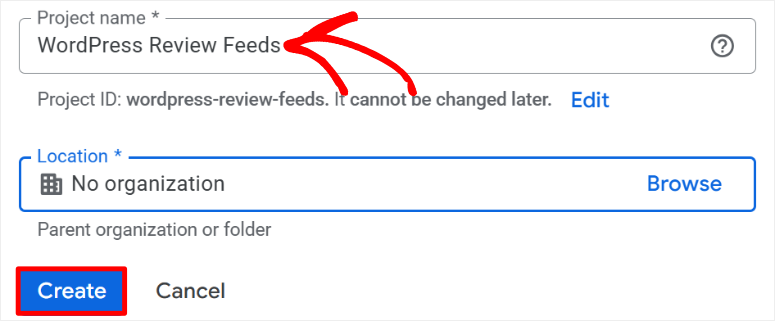
Wait for Google to create your project, which usually takes 30-60 seconds. Once finished, you will see your new project name in the top navigation bar.
You can also select the Google Home drop-down again and select the new project you created from the list.
Step 2: Enable the Google Places API
After that, use the search bar to find “Places API” and click on the result. Then press the blue Enable button to enable the Places API for your project.
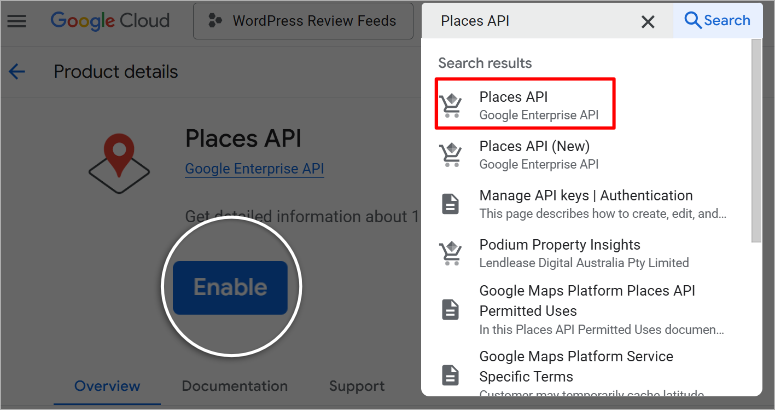
This step tells Google that your project needs access to business and review data. The activation process only takes a few seconds.
Once you have enabled the API, you should now enable the button in the location of the button. Click on it and set up your billing information.
I should point out that Google requires billing information even though they provide generous free usage limits.
Most small businesses stay within the free tier, which includes 5,000 API calls per month. You will not be charged unless you exceed these limits.
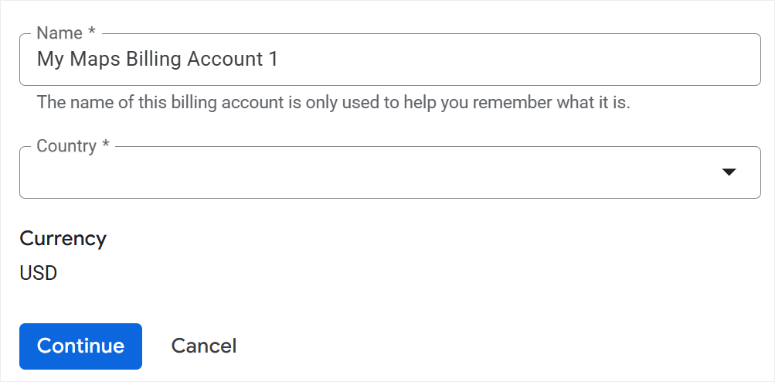
Step 3: Create and configure your API key
Once you’re done, choose APIs & Services » Credentials and then click “Create Credentials” in the top menu. Then select “API Keys” from the drop-down menu.

Google generates a long string of random characters – this is your API key. Copy this key immediately and store it in a safe place such as a password manager.
You need exactly this key for your WordPress configuration.
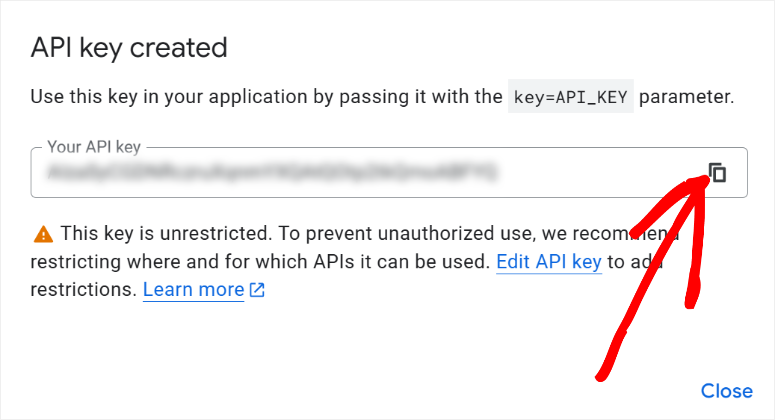
At this point, your Google Cloud Console API is ready, but we want to take it a step further and secure it for better security. This way no one else can use it.
To this end, we will add restrictions to prevent unauthorized use and potential billing overages.
So select your new API on the same page. You will notice the little yellow caution sign next to it, indicating that it is unrestricted.

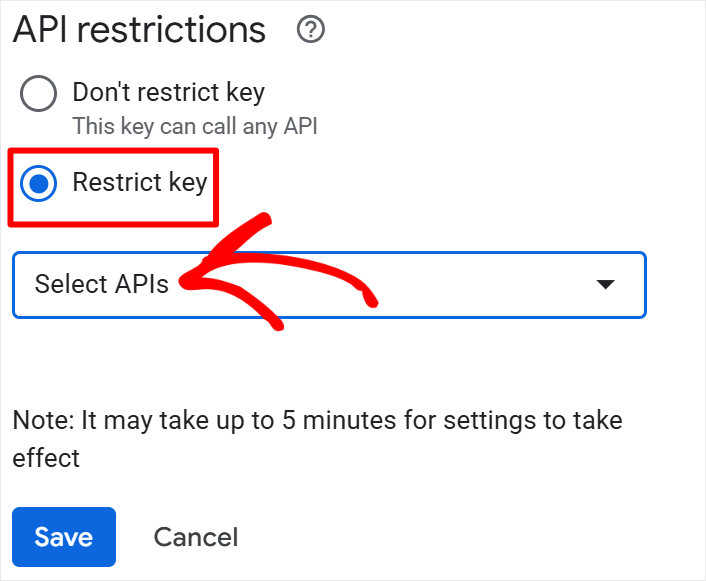
Then go to the API Limitations section on the next page. Here, use the STRICT key checkbox to enable this and then select your API key from the dropdown menu.
Once you hit save, you will be redirected back to your API list with the yellow caution mark. Now there is a green check mark indicating that the process was a success.
That’s it. You can now build your Google Cloud Console API to improve Balloon for automated feed updates.
How to get your Yelp API
Getting the Yelp API is much easier and faster than the Google API. Let me walk you through the process.
First, make sure you have a Yelp account. If you don’t already have one, you can quickly create an account or claim your business page on Yelp’s main website.
Once this is done, go to the Yelp Developers page. You will see a simple registration form where you only need to enter your email address.
Once completed, select the “Send Login Shortcut” button. Within a few minutes they will send you a one-time registration link via email.
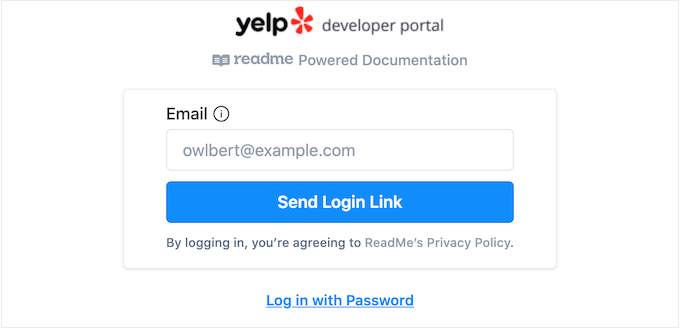
Next, go to your email inbox, open that email, and click “Click Sign In” to access the Yelp Developer portal.
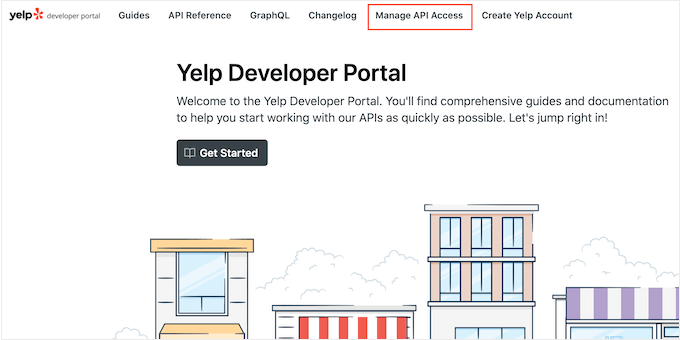
Now comes the easy part. Click “Manage API Access” in the top navigation. This will take you to the app creation page where you will fill out a short form.
On the next page, give your app a name – this is for your own reference only, so something like “my site reviews” will work perfectly.
Then select your industry in the drop-down menu and add your email address.
You also need to write a brief description of how you plan to use the API. It’s okay to say something simple like “Show customer reviews on my business website.”
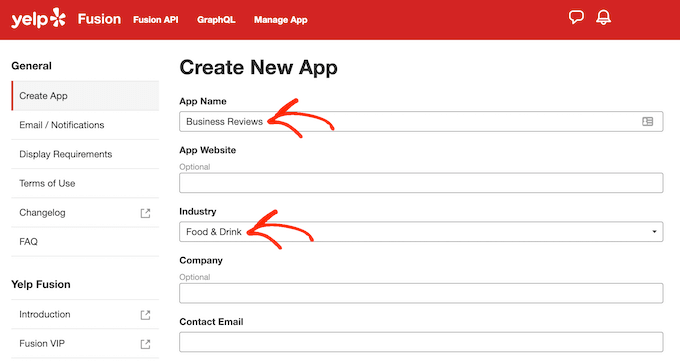
Finally, select “Create new app” and you’re done.
Wait a few minutes and Yelp will show you a success message along with your app ID and API key. Copy this API key – you’ll need it for the next step in your review feed setup.
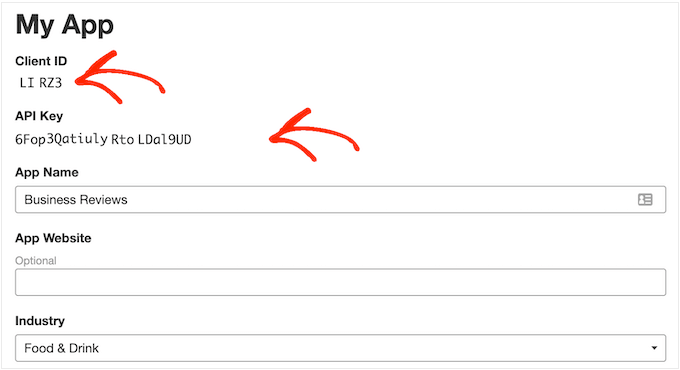
The entire process takes about 5 minutes, and you’ll have everything you need to get a handle on your Yelp reviews.
Now I’ve shown you how to get your Yelp and Google API. Now let’s dive into how to add these codes to smash balloon now.
How to add your Google API or your Yelp API to smash balloon
You will follow the same steps we used with the No API to set up Smash Balloon. Now there are 2 methods you can use to add the balloon smashing APIs.
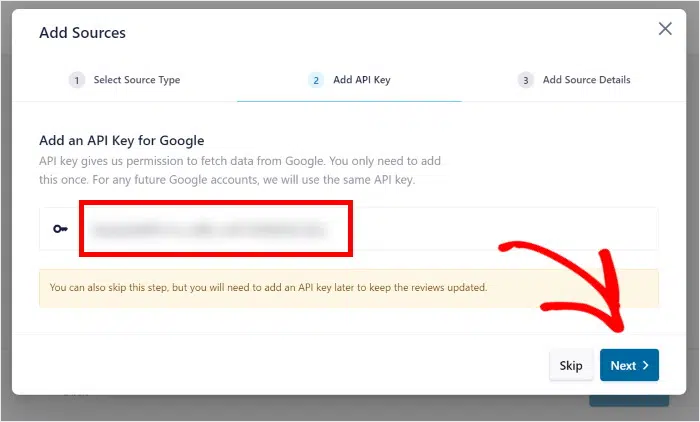
The first is to go to go All feeds »Add new. Then follow the same steps for the NO API process. Once you have entered the successfully added account, you will see the Add API button.

After that, enter your Yelp or Google API key and you’re done.
For the second method, just go to Reviews Feed »Settings In your WordPress dashboard. Then scroll the General tab to manage API keys.
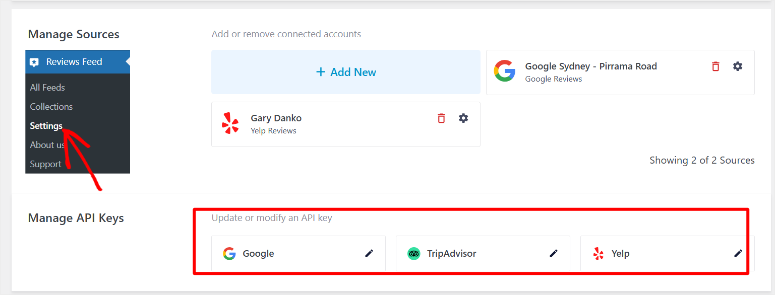
Here you can see the different platforms you can add the API to. So select the pencil icon next to Google or Yelp and enter the API key on the pop-up screen.
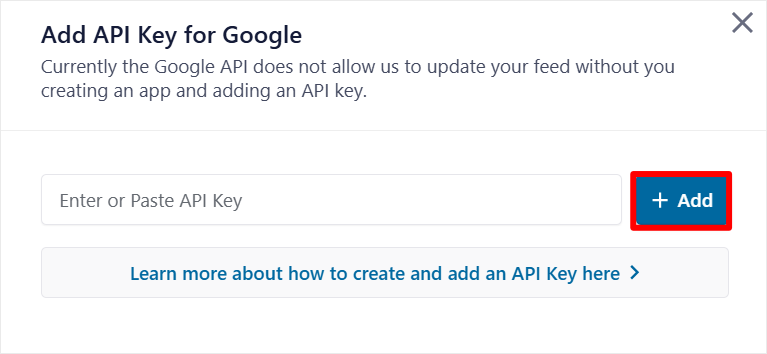
That’s it. You can now generate your Google and Yelp APIs and use them with Smash Ballon to create review feeds.
Advantages and disadvantages of the API method
After setting up API-powered review feeds for enterprise customers and multi-location companies, I’ve learned exactly when this added complexity pays off.
The API method requires more initial work, but unlocks features that are simply not possible with simpler approaches.
Here’s what you gain and what you sacrifice with API integration:
| professionals | Disadvantages |
|---|---|
| Unlimited review sources per feed | Complex setup that requires Google Cloud Console |
| Updates in real-time or hourly checks | Requires credit card for Google Billing account |
| Combine multiple business locations | API key management and security considerations |
| Access to full review metadata | Potential usage costs for high-volume locations |
| Improved filtering and sorting options | Technical troubleshooting when problems arise |
| Better control over update timing | Regular monitoring of API usage limits |
API vs No-API comparison
The choice between the Smash Balloon API and No-API methods often confuses business owners as both approaches work well for displaying reviews.
The decision comes down to your specific needs, your technical comfort level, and your long-term growth plans.
Here is a side-by-side comparison of the providers of each smash balloon method:
| Special feature | No-API method | API method |
|---|---|---|
| Setup time | 60 seconds | 30-45 minutes |
| Technical skills required | None – just copy/paste URLs | Basic Google Cloud setup |
| Cost | Free forever | Free up to 5,000 calls/month |
| Check sources per feed | 1 business location | Unlimited locations |
| Update frequency | Weekly automatically | Real time to hourly |
| Maximum ratings | 50 per feed | Unlimited |
| Credit card required | NO | Yes (for Google Billing) |
| Check metadata access | Basic display only | Full reviewer details and business responses |
| Multi-location support | Separate feeds required | Combined in single feed |
| Layout options | Standard templates | Advanced layouts and custom styling |
| Filter functions | Basic sorting | Advanced filtering and organization |
| Developer customization | Limited CSS options | Complete hooks and classes for custom control |
| Mobile optimization | Standard reaction | Combined in a single feed |
| Best for | Small medium company | Enterprise and multi-location |
Next, let’s look at the manual method of embedding a review feed into your website.
Method 3: Manually check embedding (quick but limited)
The manual approach is where most people start when they want to present reviews. It feels easy at first glance.
All you have to do is find a review you love, grab a code and drop it on your website. This is how it works.
Embed manually to embed Google reviews
Google makes it pretty easy to embed individual reviews once you know where to look. The process begins in Google Maps, which most business owners already use to manage their listings.
First, open Google Maps and search for your business name. Navigate to your business listing and click the reviews section.
You will see all customer reviews displayed here. Find the specific review you want to feature on your website. Click on the three dots next to this review and select “Embed” from the menu.
Google generates an HTML snippet that looks like code. Copy this entire section. Don’t worry if it looks confusing – you just need to copy and paste it as shown.
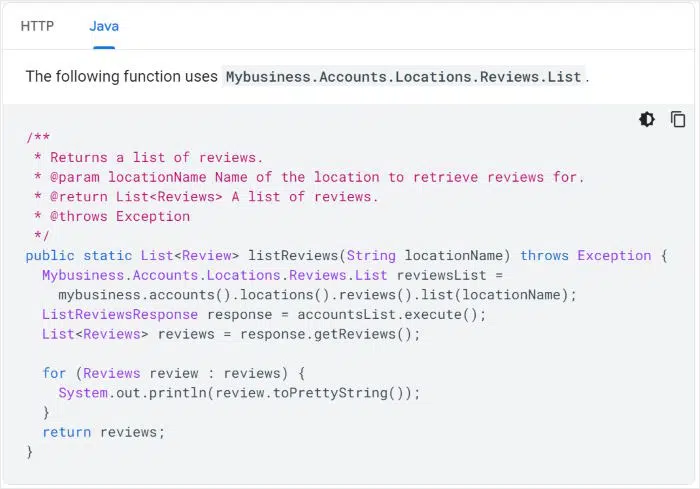
Now comes the WordPress part. Go to your WordPress dashboard and create a new page or edit an existing one.
Add a custom HTML block in which to display the review. Paste the Google code directly into this block. Save your page and preview to view your embedded review.
Manually embed Yelp reviews
Yelp follows a similar pattern, but the interface looks slightly different. Visit your business page on the Yelp website. Scroll down to find the Reviews section with all your customer feedback.
Look for a review that represents your business well. Click on the three dots next to this review and select “Embed” from the drop-down menu. Yelp shows you an HTML snippet, just like Google.
Copy this code completely. Return to your WordPress site and use the same custom HTML block method.
Finally, paste the Yelp code where you want the review to appear. The embedded review is displayed with Yelp’s styling and branding.
Advantages and disadvantages of manual embedding
The manual embedding verification approach has clear advantages that make it attractive for certain situations. At the same time, the limitations can seriously impact your long-term verification strategy.
Here’s the honest breakdown of manual embedding:
| professionals | Disadvantages |
|---|---|
| Complete control over which reviews are displayed | Time-consuming setup for each individual review |
| Zero ongoing subscription costs | No automatic updates when ratings change |
| Works without plugin dependencies | Limited design customization options |
| Perfect for presenting specific testimonials | Easily breaks when platforms update embed codes |
| No API keys or technical setup required | Poor SEO value from static content |
| Platform independent approach | Difficult to scale beyond 3-4 reviews |
Well done! You are now fully equipped to add Google and Yelp reviews to your website with an API or without an API. However, if something is unclear, read the frequently asked questions below.
FAQs: How to add Yelp & Google Review feeds to WordPress feeds (with and without API keys).
Can I view both Google and Yelp reviews together?
Yes, you can combine both platforms. Smash Ballon will need to create separate feeds for each platform. However, you can add as many feeds on the same page using shortcodes, widgets, and a Gutenberg block. You can add different feeds manually. Keep in mind that an embed requires individual HTML snippets for each review for full control, but requires more work.
Do I need coding skills to embed review feeds?
Not at all. Smash Balloon’s no-API method takes 60 seconds if you just copy your business URL. Even the API method uses visual interfaces rather than code editing. This makes it longer but still easy. All you have to do is follow this guide. I have detailed each step for you.
Will Smash Balloons review feeds slow down my WordPress site?
No, all Smash Ballon plugins have minimal impact when configured properly. This is because it includes built-in caching that reduces server load. However, if you are still worried, you can view 10-15 reviews, which will cause virtually no slowdown. Manual embedding has the least impact because the reviews are static HTML. However, always avoid showing too many reviews or unnecessarily frequent updates.
How often does Verification feeds update check automatically?
The refresh frequency varies with the method. Smash Ballon’s no-API method refreshes weekly by default. The API method is automatic. While manual embedding will never update automatically because you are viewing a static HTML code.
Can I filter out negative reviews before adding them to my website?
Yes, dynamic methods offer filtering options. Smash Balloon allows you to set minimum star ratings to show. For example, you can only show 4-5 star reviews. Apart from that, the Smash Balloon API method offers advanced filtering by rating, keywords or data.
On the other hand, manual embedding offers the ultimate control as you have hand live with each review.
Final Verdict: Choose your review embedding method
After all of these approaches have been extensively tested, the selection comes down to three simple factors: your technical comfort level, the size of the company and your maintenance expectations.
- Go with the manual embedding method If you just want to add a few reviews. Choose it if you only receive periodic reviews.
- Start with Smash Ballon’s no-API method If you want zero technical setup and run a single location. This approach works perfectly for 90% of small businesses and only takes 60 seconds.
- Upgrade to the API method If you manage multiple locations or need real-time updates. The complexity of the additional setup pays off for high-volume companies that receive dozens of reviews weekly.
I always recommend that a company start simple and upgrade later as needed. You can switch methods at any time as your review volume and technical needs grow.
Resource hub
Now that you understand how to set up your review feeds, here are more resources to improve your social proof and ultimately drive more sales.
These resources will help you build a comprehensive social proof strategy that goes beyond just reviews.
Combined with your new review feeds, you have everything needed to build trust, reduce visitor hesitation, and convert more browsers into buyers.

