Are you looking for a convenient way to set up Google Analytics 4 in WordPress?
One of the most powerful weapons you have as a WordPress site owner is analytics. The data and patterns can help you make more informed decisions and better understand your audience.
Therefore, Google Analytics 4 is one of the best ways to gain data insights into website performance, user behavior, and traffic patterns.
In this ultimate guide, we’ll explain everything you need to know about Google Analytics 4. We’ll show you how to set it up, configure it and connect it to your website.
What is Google Analytics 4?
Google Analytics 4 (popularly known as GA-4) is the latest version of Google’s analytics platform. It is an updated version of Universal Analytics that we are all familiar with.
The main reason Universal Analytics has evolved into Google Analytics 4 is the way users interact with websites today.
UA primarily tracked user activity within a single session. This resulted in missing actions that users performed across multiple sessions, making it difficult to understand the entire user journey.
For example, a user would browse a product on their phone and later on their laptop to complete the purchase. In this case, Universal Analytics would consider this as two separate sessions where the connection is missing and the conversion cannot be accurately attributed.
For this reason, GA-4 introduces an event-based data model.
This latest version of Google Analytics tracks user interactions as events instead of sessions. GA-4 events include things like page views, button clicks, and product purchases.
To make it even more effective, each event is timestamped and can be linked to a specific user ID, even if it occurs in different sessions. This creates a more comprehensive user journey that spans multiple sessions or devices.
To give you more context about how this metrics tool has changed, check out the new Google Analytics 4 dashboard here:
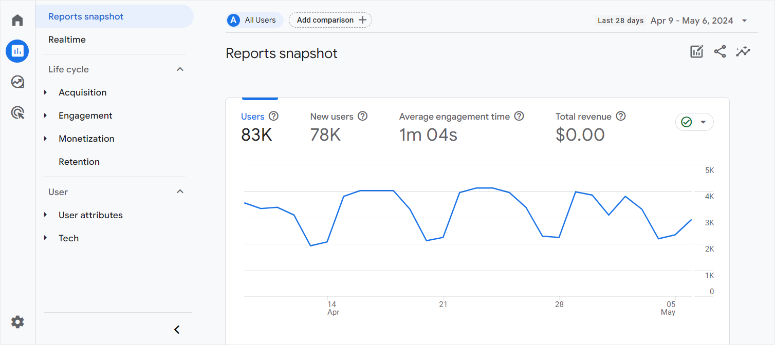
Additionally, GA4 has numerous new features to help you track your website and get detailed insights into its performance, including:
- Data protection-oriented measurement: With increasing concerns about user privacy, GA4 offers features such as enhanced data controls and cookie-free measurements to help you comply with regulations while still gaining valuable insights.
- Machine learning and AI: GA4 uses machine learning to deliver smarter insights and automate tasks. This can include creating predictive reports and identifying user trends. Cross-platform tracking: Gone are the days of separate tracking for websites and apps. GA4 seamlessly collects data from both sources, providing a unified view of the customer journey.
- Advanced Integrations: GA4 integrates more easily with other marketing platforms such as Google Ads, enabling streamlined campaign management.
- Improved reporting: GA4 offers a revamped reporting suite with features such as customizable dashboards and trend funnels for deeper analysis.
Ways to integrate Google Analytics with WordPress
As a website owner, you should always have access to reliable and up-to-date data to run your website efficiently.
Every metric offered by Google Analytics 4 can be analyzed to help you understand your past and current data to predict your future website performance.
These metrics include:
- Number of site visits
- Where the visitors come from
- What they did when they were on your website
- How long did they stay on your website?
- How many pages have you visited?
- Which part of the page do they stay on the longest?
- Website speed analysis
- And much more.
Apart from that, here are other and interesting ways you can use Google Analytics:
- Check how users move between devices and platforms when interacting with your brand
- Review the paths users take on your website and identify bounce points
- Set up alerts to notify you of significant changes in your site’s metrics
As you can see, Google Analytics 4 offers a lot of data that can quickly become confusing, even for experienced users.
Additionally, Google Analytics is a standalone platform that can be difficult to set up as it requires coding experience. You will also need to add a tracking ID to your site code and perform other processes to fully implement it.
A small mistake could result in incorrect tracking or damage to your website.
That’s why adding Google Analytics directly to your WordPress dashboard is more convenient and the perfect solution. It ensures that you collect all the information about your website through your website’s WordPress dashboard without having to leave your backend.
There are three main ways to add Google Analytics to your WordPress site:
To make this article easier to navigate, use the links above to jump to the method you want to use.
Now add Google Analytics MonsterInsights And WP Code requires a plugin. These plugins are a faster and more user-friendly approach that requires no coding experience.
On the other hand, adding Google Analytics to your website through your theme is a manual approach. Although it is a cost-effective solution, it requires coding experience, which can lead to human error, incorrect code placement, or even your website failing.
We recommend using a plugin even if you have programming experience as it can help you avoid data tracking issues.
Adding Google Analytics via MonsterInsights
MonsterInsights is the best plugin to add Google Analytics to WordPress. It is an easy-to-use plugin that transforms complex data into actionable, practical, and easy-to-understand insights.
Advanced features allow you to better track specific website aspects such as click-through rates, conversion rates, and popular content. You can do all of this without complex processes or programming experience. Also, you don’t need to go through additional steps like Google Tag Manager, Google Site Tag, and child themes.
This is by far the easiest way to handle the Google Analytics technical setup process without having to worry about breaking your website or putting the tracking ID in the wrong place.
Additionally, MonsterInsights is a highly customizable plugin that allows you to personalize the Google Analytics metrics you want in an easy-to-understand structure and language.
For these reasons, MonsterInsights is the best way to add Google Analytics to your website.
Check out our detailed information MonsterInsights review here.
Step 1: Sign in to Google Analytics
Now, to get started adding Google Analytics with MonsterInsights, you’ll need a Google account. If you don’t have one yet, just sign up for one. It’s free!
To do this, open the Google Analytics website and continue with that Get started Today Button.

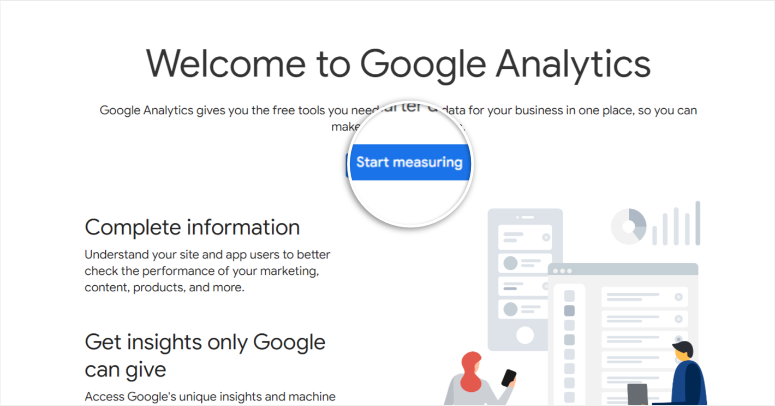
Next, log in to Google Analytics with your Google account and search Start measuring Button.
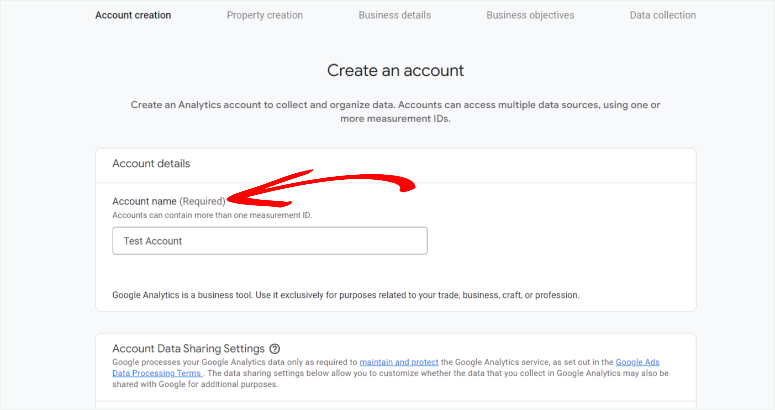
Next, create an account name for the website you want to track. Remember that you can create multiple accounts in GA-4. Therefore, use a name that you can easily associate with the new property.
Remember that you can add multiple tracking IDs to the same Google Analytics account so you can monitor all of your properties in the same place. This ensures everything is streamlined and avoids confusion and duplication.
Then, in the pop-up window that appears, review the permissions you want to grant to Google Analytics and proceed Next.
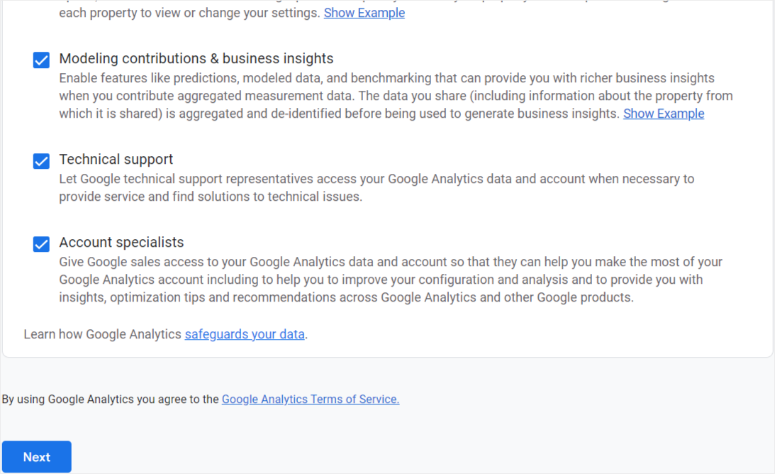
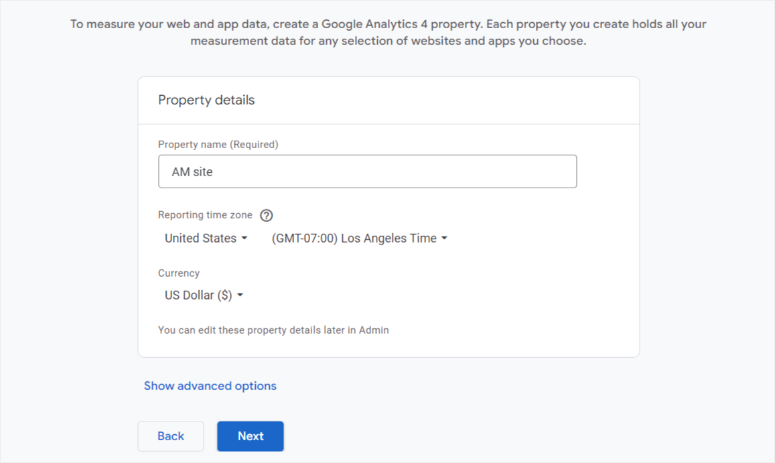
On the next screen add Property details.
A GA4 property can be a website or an app that you want to track. So enter the property name, reporting time zone and currency and proceed Next Page.
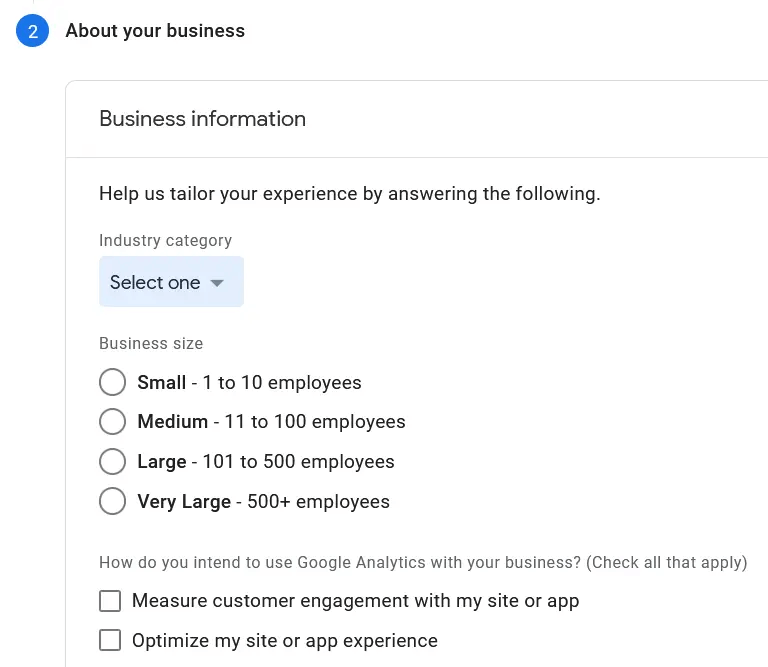
The next step is to provide details about your business. On this page you add your industry, category and company size.
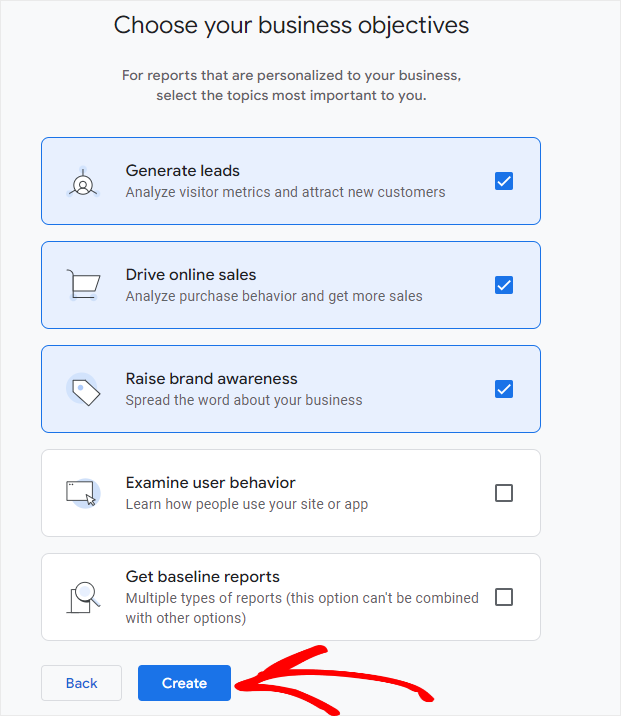
Then, in the next window, tell Google Analytics how you want to use the platform. Check the target fields that apply to you and continue Create.
After that, a new popup will appear where you can review the information and check the “Terms and Conditions” box before clicking ‘I accept’ Button.
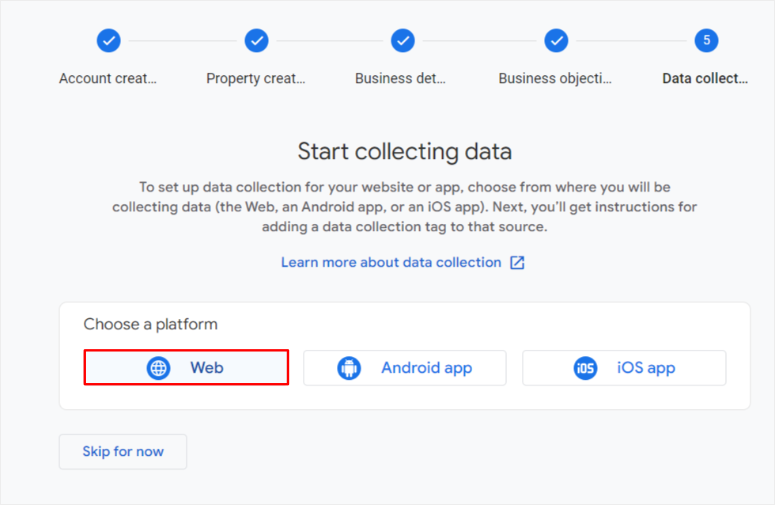
After the property details are filled out, it’s time to create one data stream for your property. Since the property we want to track is a WordPress website, we’ll choose Web.
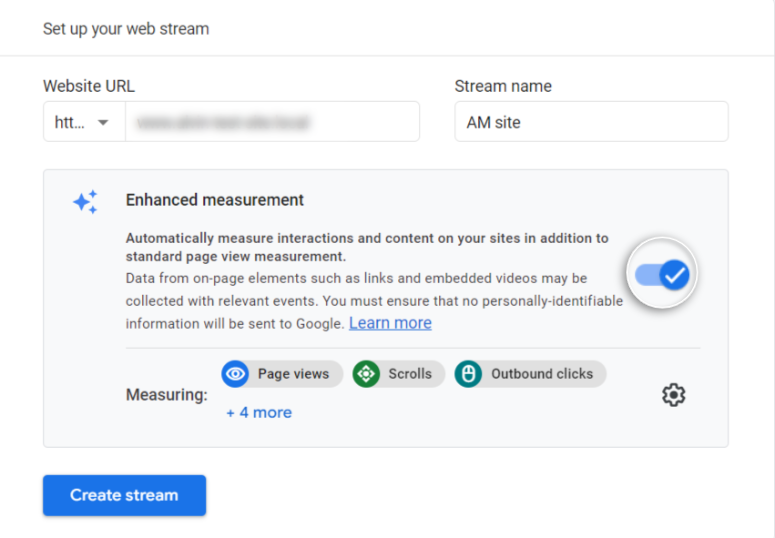
Once you’ve created the stream, add the site name and URL. Then activate Advanced measurements to automatically monitor content elements and interactions.
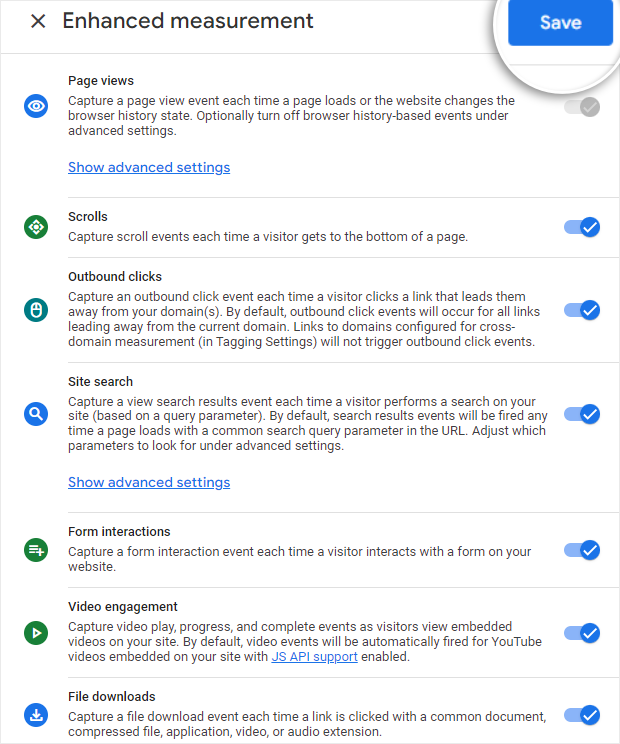
On the Settings tab, on the far left, use a toggle key to set up the metrics you want to measure automatically. Then select Create to go to the next page.
At this point you should have a complete property created. You will receive a unique tracking code that you can add to your website.
If you want to add GA4 manually, you will need to copy this code and add it to your WordPress site.
To cover all the bases and find your tracking code in the future, just go to Admin » Properties » Data streams.
Then select the desired data stream. You should see this Measurement ID on the far right after the stream name, stream URL and stream ID.

You have now successfully created a Google Analytics property and its tracking code.
Step 2: Set up MonsterInsights
Once everything is set in the Google Analytics dashboard, go to your WordPress dashboard to set up MonsterInsights.
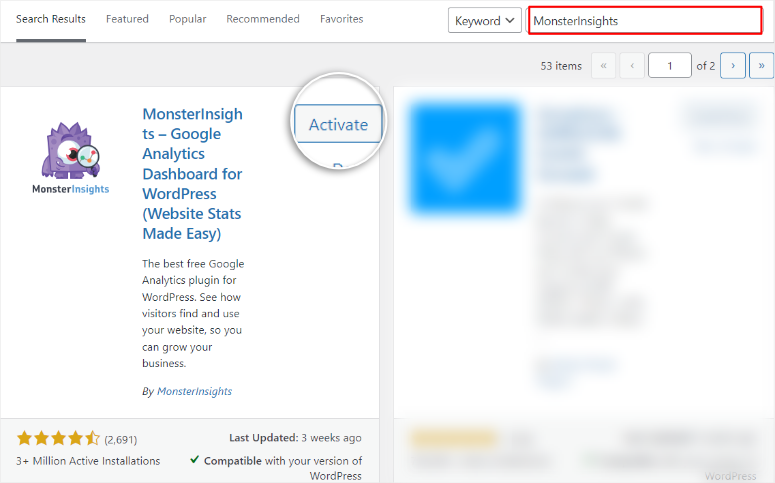
Here, go to Plugins » Add new Plugin. Then search for “MonsterInsights” in your plugin repository, install the plugin and activate it like any other plugin.
If you encounter any problems, check out our WordPress tutorial how to install a plugin.
Even if the Free version of MonsterInsights helps you add Google Analytics to your WordPress dashboard. You should think about buying it MonsterInsights Pro For more information about advanced features, please visit the plugin’s official website.
MonsterInsights Pro can be particularly useful for eCommerce as it offers advanced metrics measurement tools such as headline analyzers and coupon reports.
Here are other useful features you can expect from the premium version of MonsterInsights.
- Form conversion tracking: Track how well your contact forms, opt-in forms, and other website forms convert visitors into leads.
- Custom Dimension Reports: Create custom reports to track specific metrics that matter to your business.
- Real-time reports: Get instant insights into website traffic and user behavior.
- User Journey Report: Visualize how users navigate your website and identify areas for improvement.
- Affiliate link tracking: Track clicks on your affiliate links to measure their effectiveness.
- Video tracking: Get insights into how visitors are engaging with your videos, including playtime and completion rates.
Step 3: Connect MonsterInsights with Google Analytics
Once the plugin has been successfully installed and activated, MonsterInsights will automatically prompt you to launch it Setup wizard.
The setup wizard provides a simple progress bar to help you follow these simple steps, making it easy for even beginners to get started.

Alternatively, you can access the setup wizard by going to Insights Menu in your WordPress dashboard. Then go to Settings and proceed to the “General” tab.
Finally, scroll until you find this Start the setup wizard button on the page.

Now, on the first page of the setup wizard, select your website category and click “Save and Continue.”
Make sure the category reflects your activity on your site to ensure MonsterInsights adds the relevant tracking features for you.
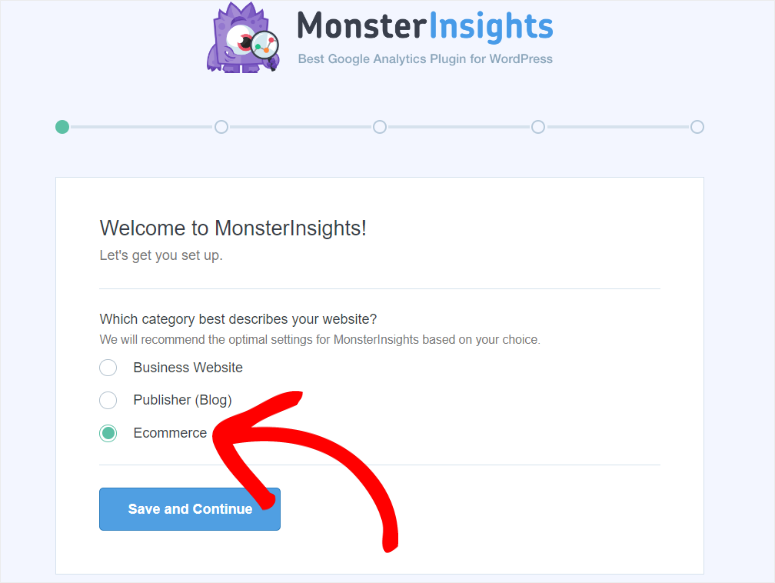
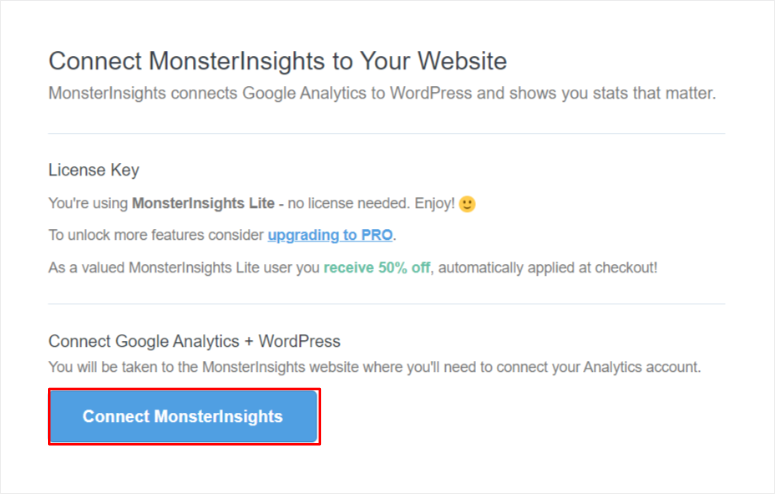
Then click on the next screen Connect MonsterInsights Click on the button and let the authentication take place.
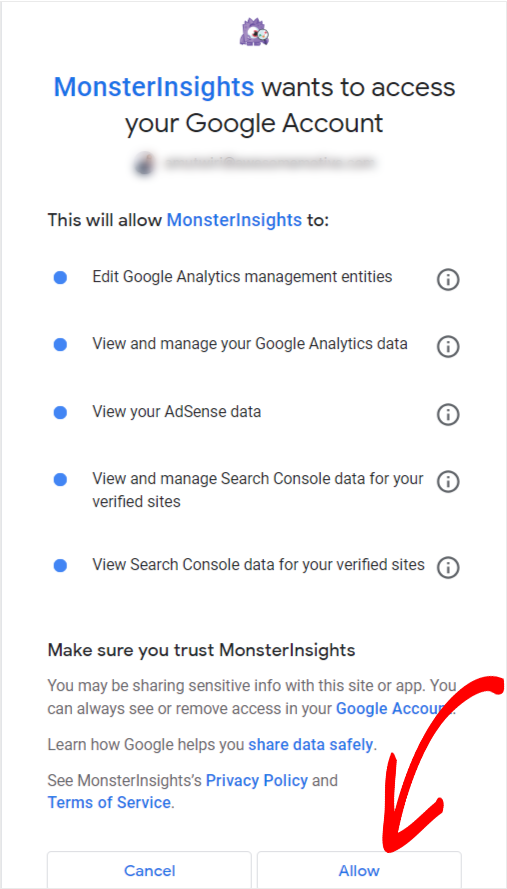
Next, add the Google account you signed up for in Google Analytics and then grant MonsterInsights permissions.
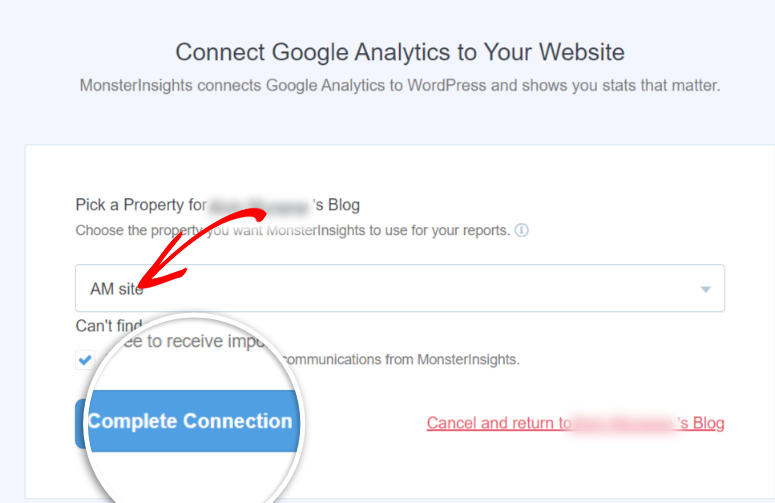
Then select Complete connection After selecting the property you want to connect from the drop-down menu.
Next, fill out all the required information on the Recommended Setting screen Save and continue.
After the plugin completes the setup process, you will be redirected to the Insights WordPress menu.
Select here Reports Submenu to get insights about your website. The dashboard uses a tab system to make it easy to compare different metrics.
The metrics reports are systematically structured and include the following:
- overview
- Traffic
- Publisher
- Search Console
- E-commerce
- Dimensions
- Forms
- Real time
- Website speed
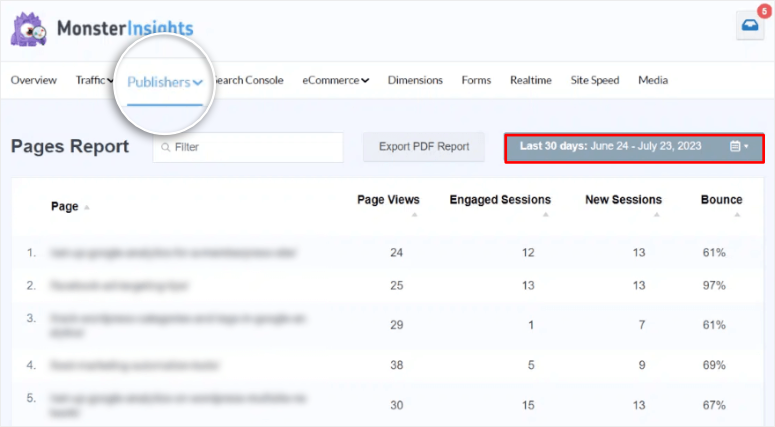
For example on the Publisher The tab allows you to check standard metrics such as page views, bounce rate, active sessions, and new sessions. You can customize this report to show a precise time period to identify moments of traffic increases or decreases.
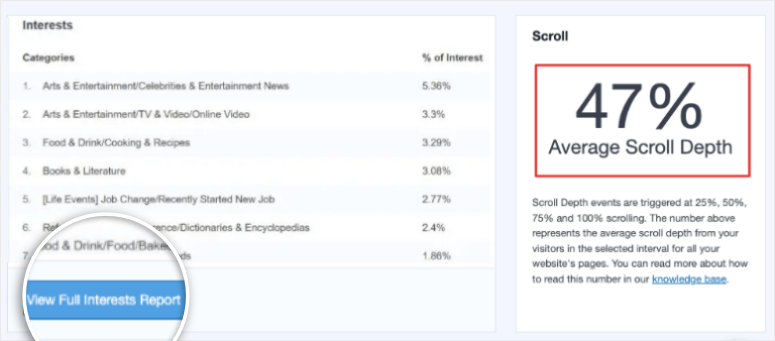
You can also see more specific data further down the page, including “Interests” and “Average Scroll Depth.”
Now, the reports you get on MonsterInsights are usually simplified.
To get the full report, select View full interest report to open the data in your Google Analytics dashboard.
But that’s not all you can do with MonsterInsights. Let’s look at the different ways, features and settings you can use this plugin.
Step 4: Customize insights with MonsterInsights
Website owners, niches, and industries have different priorities when it comes to reporting and metrics. By personalizing your data and creating custom reports with MonsterInsights, you can always easily measure the metrics that matter most to you.
This makes it easier to align your goals with your data and leads to better decision making and forecasting.
MonsterInsights makes it easy to create custom reports like this.
In addition, all of these settings can be made via Setup wizard during the initial configuration.
But to do it manually, go to Insights Menu on WordPress and visit the Settings Submenu. Then scroll to find Start the setup wizard and select it.
Here you can set up the following configurations:
- Affiliate link tracking: Although most affiliate links have affiliate partner tracking capabilities, MonsterInsights gives you access to your own data. This way you don’t rely on what the affiliate report says. You can also easily compare the report from MonsterInsights and the affiliate.
- Access control: This feature is especially great if you have a large team. You can easily control who sees your insights by granting specific access to individuals.
- Automatic plugin updates: MonsterInsights regularly performs updates to integrate new features and improve the plugin. Set up automatic plugin updates to make sure you don’t miss anything.
- Advanced link attribution: This feature provides the best way to see how users have interacted with your links. Identify which links are clicked the most, e.g. B. Image, anchor or title links. Advanced link attribution also provides a great way to track event links.
- 20+ advanced tracking: MonsterInsights offers easy-to-use but advanced tracking features such as form tracking, scroll tracking, author tracking, file download tracking, category and tag tracking, and logged in user tracking.
- All-in-One SEO Toolkit Integration: All in one SEO is the best WordPress SEO plugin. Integrating with MonsterInsights gives you the best insights into search engines, such as: B. Keyword tracking, on-page SEO insights and an SEO score.
- Ecommerce tracking: You can track revenue, sales, product performance, cart abandonment, referral sources, conversion rate and more.
- Advanced Growth Tools: MonsterInsights has several advanced growth tools you can use. Create custom URLs with defined parameters to specifically track the effectiveness of your marketing efforts. The Popular Posts Addon highlights your most popular content by creating a list and highlighting these top-performing blog posts prominently on your website. Another great feature is A/B testing. This involves comparing two website versions to determine which performs better in terms of user engagement or conversion rates.
- Privacy Compliance Add-on: This ensures that Google Analytics is GDPR and CCPA compliant.
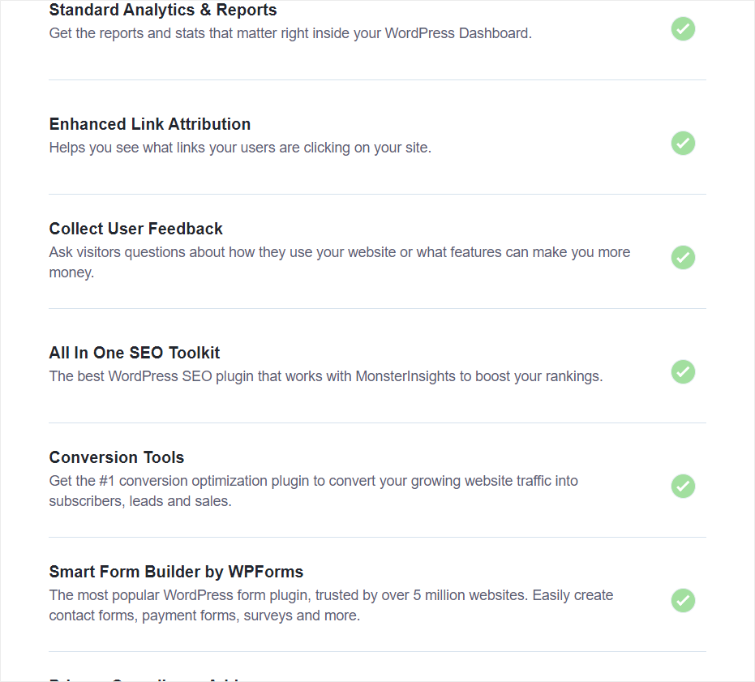
While these features may seem complicated due to the advanced functionality and customization they offer, setting them up with MonsterInsights is incredibly easy. All you have to do is check the box next to the advanced feature and click Carry on when finished.
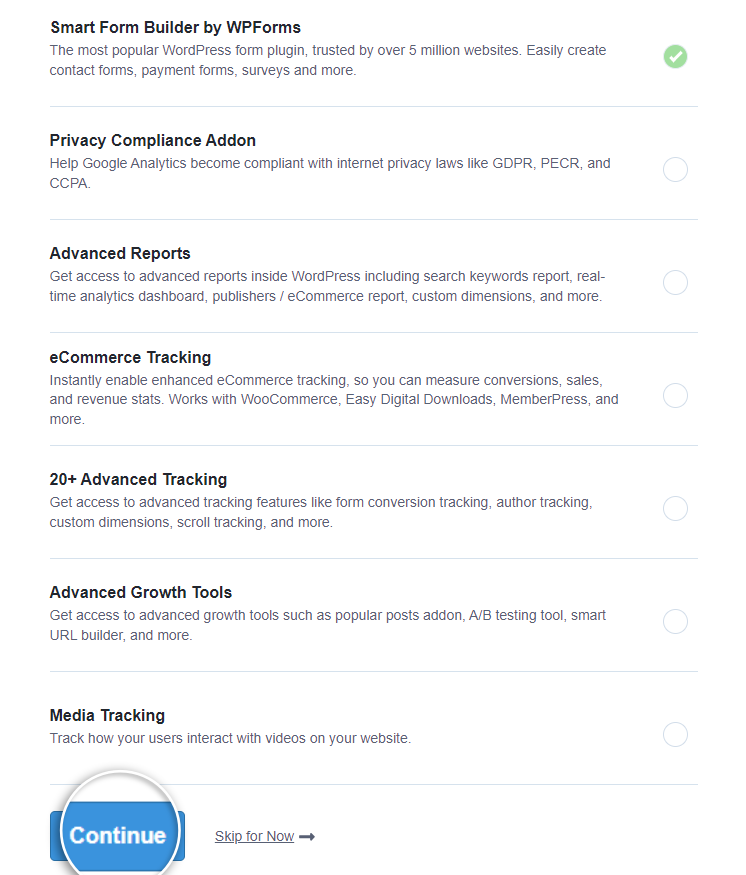
That’s it! You have successfully added Google Analytics to your WordPress dashboard. Now you can get detailed insights in an easier and personalized way without ever leaving your WordPress dashboard.
Adding Google Analytics via WPCode

WP Code is designed to simplify and manage custom code snippets, reducing reliance on plugins and inevitably reducing site bloat.
It’s an incredibly handy tool for programmers and beginners alike. You can set up header and footer snippets to integrate tracking codes like Google Analytics and Facebook Pixel, advertising codes like AdSense, and more.
Additionally, WPCode allows you to insert code snippets written in various programming languages such as PHP, JavaScript, CSS, and HTML. This allows you to make a variety of customizations such as: Such as adding custom features, changing the appearance of the website, or integrating other third-party services.
WPCode also allows you to use conditional logic.
This allows you to control where and when your code snippets appear. For example, you can display a specific code snippet only on specific pages, posts, or to users logged in to the site.
As you can see, WPCode can help you code even if you don’t have developer experience.
How can this snippet plugin help you set up GA-4?
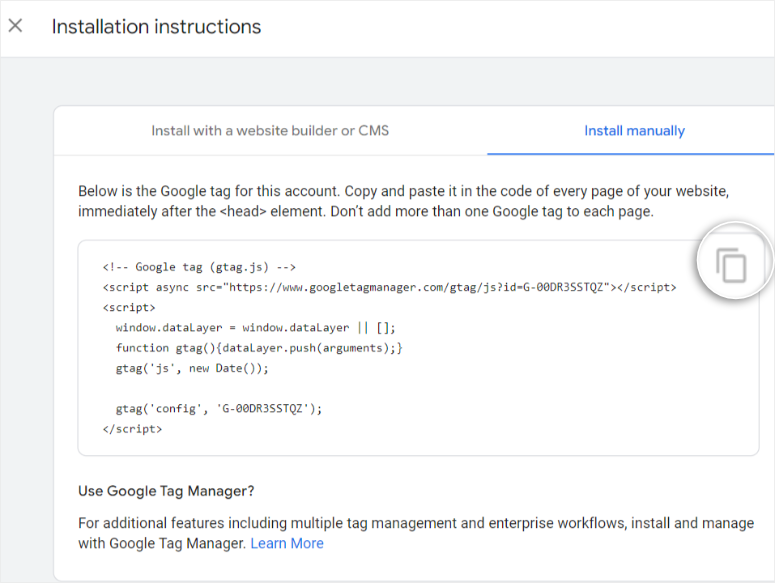
First, go to your Google Analytics dashboard and select Go to Data Streams. Then select the desired data stream and click Show tag instructions.
Copy the code below here Install manually Tab.
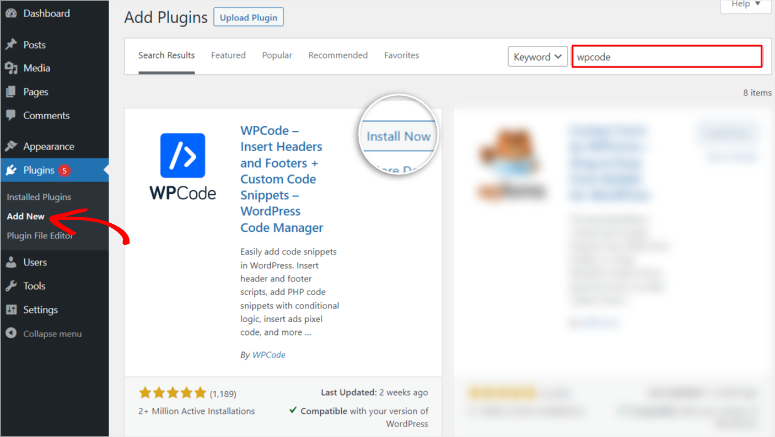
Now back on your WordPress dashboard, install and activate that WPCode plugin via the plugin repository.
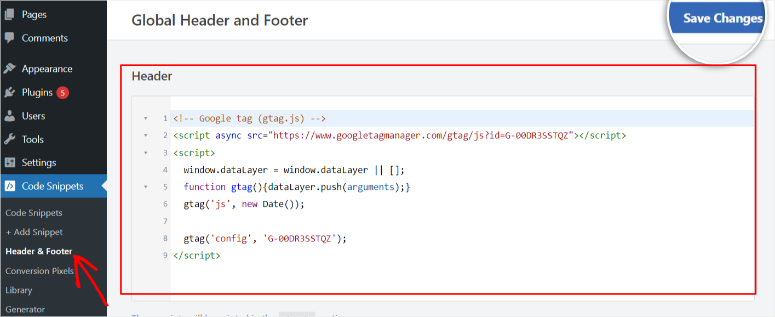
After WPCode is activated, go to Code Snippets » Headers and Footers in your WordPress dashboard.
Then paste the tracking code that you previously copied from your Google Analytics 4 account Header section of this page.
Make sure you press the button save Changes Click the button after adding your Google tracking code.
That’s it! You can now manually connect Google Analytics to WordPress with a plugin.
You can only view your data in your Google Analytics dashboard and not in WordPress like MonsterInsights.
Now, as mentioned earlier, WPCode allows you to manually add complex code without touching the code. It helps you add the code snippets in the same place as you would with the manual process but without all the risk.
You can also set up GA4 manually with WordPress without any Google Analytics plugins.
Adding Google Analytics to your WordPress theme
It is possible to insert the Google Analytics tracking code into the header or footer of the website theme without the help of a plugin.
However, we do not recommend this method.
Because the slightest misstep can cause your entire website to crash or malfunction. You will need to update the code if you change the design or make major changes to your website, which can also introduce security risks.
You also need to troubleshoot tracking issues and constantly check site performance, making it difficult to scale.
After clearing up these disclaimers, there are three ways to add the Google Analytics tracking code to your theme.
- Add tracking code via Header.php file
- Add tracking code via Footer.php file
- Add tracking code via Functions.php file
Add code via the Header.PHP file
You must access your files through your cPanel or FTP client portal. For this example we are using the Bluehost cPanel.
Once you have logged in to your cPanel, go to “File Manager” under files tab and navigate to public_html root folder.
Go to this folder wp-content » Topics. Then find and select the active theme you are using on your website. Finally find them header.php File within this file and right click Edit.
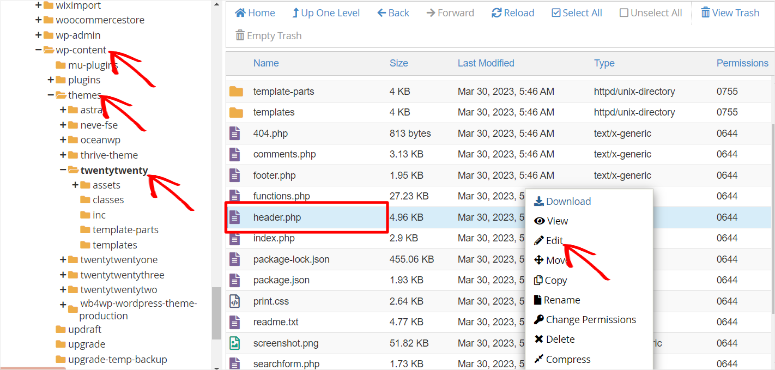
Search in the code editor Line of code is above. Paste the Google Analytics tracking code right before completing Label. Then, Save the processing.
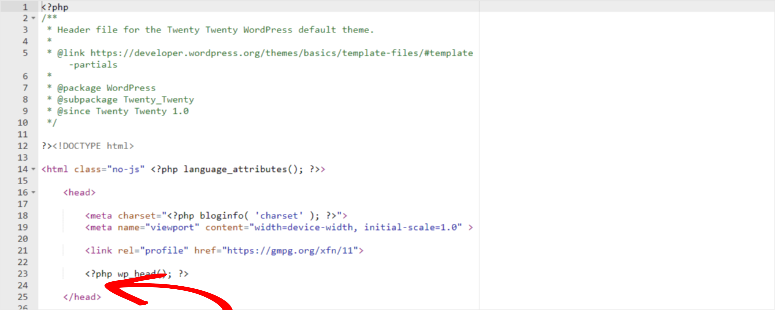
Great! You have just manually added the Google Analytics tracking code to your WordPress theme via the header.php file.
Add tracking code via Footer.PHP file
Adding the tracking code to the footer is almost identical to adding it to the header. The only difference is that you add it to that footer.php File, not The header.php File.
To get started, use your cPanel or an FTP client portal and search public_html Root folder as in previous process.
Follow the same process you did when pasting the code header.php file, but this time you will find the footer.php File.
Finally, just before finishing, paste your Google Analytics tracking code


